October 15, 2022

QUACKY BIRTHDAY

I am drawn to stamp sets that feature animals, whether they're silly or realistic. Because of the presence of a very sketchy fox and a pair of mallards, I needed to have this Sale-A-Bration set in my arsenal.


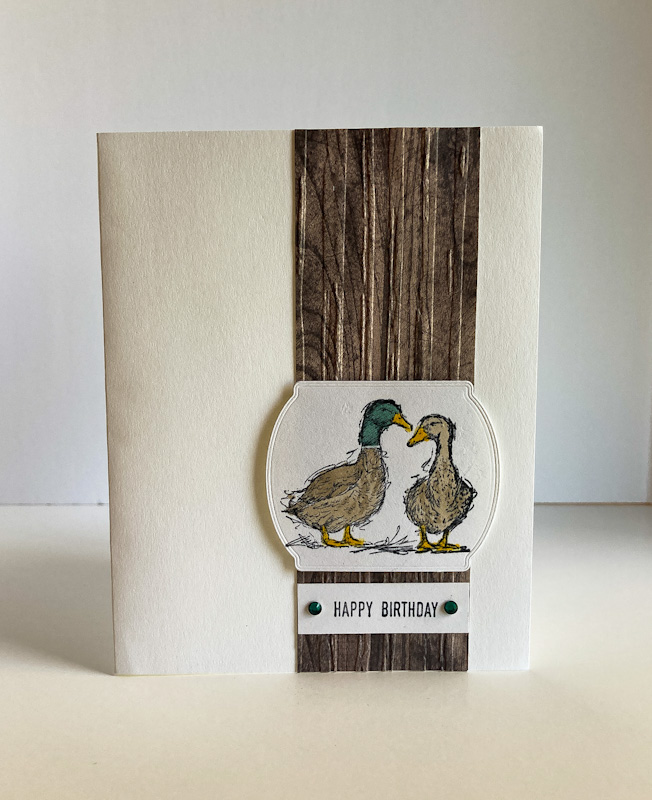
For this card, I chose to highlight the mallard ducks in a very simple, fairly masculine setting. I wanted it to be a CAS (Clean and Simple) card, meaning it features lots of white space and not too much going on in the card.


To add to the masculine feel of the card, I cut a strip of woodgrain Designer Series Paper and used the lined folder of the Stripes andd Splatters Embossing Folders to add texture and maybe a more real feel to the "wood".

Below you can see a closeup of the "wood" and how well it complements the ducks.


After stamping the mallards in Memento Tuxedo Black ink, I used Stampin' Blends to color them in as realistically as possible, using photos of actual mallards to do so.

I love the sketchy look of this ducky pair. It adds so much more interest than if they'd been sketched without the extra lines.


The only dimension on this card comes from the slightly elevated piece containing the ducks with the help of Stampin' Dimensionals and then the two mallard green rhinestones that flank the simple sentiment.


Following is a tutorial on how to make a card similar to this one.

SUPPLIES:
White cardstock
Woodgrain Designer Series Paper

Itty Bitty Greetings (unfortunately retired)
Stylish Sketches (from the most recent Sale-A-Bration)

Stampin' Blends in:
     Light and Dark Crumb Cake
     Light and Dark Soft Succulent
     Dark Daffodil Delight
Memento Tuxedo Black ink

Die cutting/embossing machine
Tasteful Labels dies (retired)
Stripes and Splatters Embossing Folders (page 177, Annual Catalog)
Green rhinestones
Stampin' Dimensionals

DIRECTIONS:
Fold a 5 1/2" x 8 1/2" piece of white cardstock in half, creasing it well with a bone folder.

Cut a 1 3/4" x 5 1/2" piece of Woodgrain Designer Series Paper that coordinates well with the colors you will use in your ducks. Emboss it using the stripes folder of the Stripes and Splatter Embossing Folders.

Adhere this strip to the card base about 1/2" - 3/4" from the right edge.

On a 2 1/2" square of white carstock, stamp the male and female mallard ducks from the Stylish Sketches stamp set in Memento Tuxedo Black ink. Color the ducks as desired.

Use the appropriate die from the Tasteful Labes set (or any other label die that you have that will nicely frame your couple) to die cut the ducks. Use Stampin' Dimensionals to add this over the wood look strip about 1" - 1 1/4" from the bottom.

In black ink, stamp the sentiment on a strip of white cardstock that measures 1/2" x 1 3/4". I used the sentiment from Itty Bitty Greetings (or use any other sentiment that will fit the occasion and the label). Add this flat onto the wood strip, so it lands about 1/2" from the bottom,.

To finish it off, add green rhinestones on either side of the sentiment. If you don't have green rhinestones, you can always color a couple of Basic Rhinestones with Stampin' Blends to match.

^^^^^^^^^^^^^^^^^^^^^^^^^^^^^

We are united with all life that is in nature. 
Man can no longer live his life for himself alone.
- Albert Schweitzer (1875-1965) -


^^^^^^^^^^^^^^^^^^^^^^^^^

Quacky
Smiles.


October 11, 2022

TO SHARE WHAT I LEARNED

 Several weeks ago, I wrote a post, Wooden Leaves and Tenth Blogiversary, about how things have changed in the blogging world, my blogging world specifically, and how I'm trying to grapple with these changes and trying to accept them. I questioned whether it was worthwhile continuing to blog and whether or not blogs are slowly dying.

The response to this post was incredible and overwhelming. The love, empathy and advice came pouring forth from so many of you. And in the Comments, I heard from several other bloggers that they had learned from some of this advice and planned on incorporating these ideas into their own blogs.

Since I have received such a vast amount of information and advice from so many of you, I thought I would share with others the bounty of these thoughts so it was not only I who benefited. Many of these ideas require some technical savvy, so I am still trying to work my way through those. Others are common sense, and you may already know some of this.

Below I have compiled all the helpful tips I received. Have fun and run with whichever of these seems to fit your blogging situation. 


On the Instagram platform, check out linktr.ee to add links to other platforms where readers can find you, such as your blog, your Etsy shop, your Facebook page, your Twitter account, and your Pinterest boards. When you figure this out, all of it will appear on your Instagram home page. More links that were mentioned as helpful included linkin.bio and smart.bio. linktr.ee is free to use.

Use YoastSEO to optimize each of your posts for SEO. 

A blogger application that creates links for readers to be able to share your post on social media easily is Add to Any. 

Since it's good to pay attention to SEO and algorithms, Keywords are important to use throughout a blog post.

Fix or change any broken/nonworking buttons on your blog home page. If you have any problems with your page, it looks bad for you and visitors may not come back out of frustration.

If you don't already have these, add buttons for readers to easily follow you on the various social media platforms, such as Pinterest, Facebook, Twitter, Instagram, etc. (I am working on that now, but am having no success whatsoever.)

It's good to have posts on your blog that are considered "evergreen", those that are worth revisiting, as these posts are timeless. Make it possible for your readers to do so.

Add labels/tags so people can find an item of interest they may be searching for.

Create a Gallery Page. 

Provide links to other similar posts that you have written, such as, in my case, other autumn cards I have made. Just for further inspiration.

Keeping readers on your page longer makes Google happy.

Utilize links directly to products you may have been referring to in your post. 

You could explore and get involved with affiliate programs. If anyone buys through your links, you earn a commission.

Attach a shop to your blog or to your Instagram account.

Tag others, in my case, Stampin' Up!, on any card posts on Instagram.

Utilize Instagram better, such as expanding to Reels or Stories, not just still photos. Make Reels using your Smartphone on a tripod to film your creation.

If you have a Facebook Business Account, use the Meta Business Suite to schedule Facebook and Instagram posts.

Search out and become involved in Facebook groups that work together to help build each others' traffic. These groups are also good for brainstorming.

Pin your work often to Pinterest.

Be consistent in your blog posts. For example, if you decide to publish posts on Tuesdays and Saturdays, be faithful about doing so, as your readers will expect to find fresh content from you on those days.
 
^^^^^^^^^^^^^^^^^^^^^^^^^^

That's about it. Many of these hints are still flying right over my head. But, hopefully some of you wonderful bloggers out there will find benefit in one or two of these helpful nuggets. 

If you have any further comments or advice, we would love to hear from you! Thank you to all who have contributed through comments on the Blogiversary post. Not only do I appreciate all you put into them, but I'm sure a lot of us bloggers take to heart what you have shared. GO BLOGGERS!

^^^^^^^^^^^^^^^^^^^^^^^^^^^

If you would like to create a card like the one at the beginning of my post, just go to Pinterest and search for the maple leaf quilting pattern. It took me some trial and error, but I did it!

^^^^^^^^^^^^^^^^^^^^^^^^^^^

Never give up on something that 
you can't go a day without thinking about.
- Winston Churchill -


^^^^^^^^^^^^^^^^^^^^^^^^^^^^^^^^^^^^^^

Sharing
Smiles.


October 8, 2022

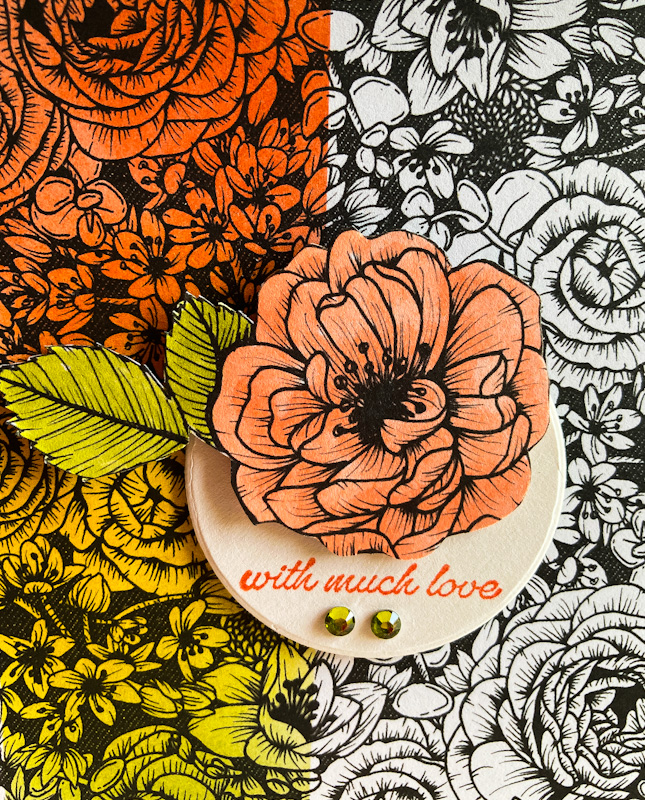
WITH MUCH LOVE

It's October in Wisconsin. And we are being treated to a wonderful colorful exhibit! Some of the trees around here, especially the maples, almost look like columns of fire. The intensity literally takes your breath away!

With the beautiful autumn colors in full force, I thought I would share with you a card I made incorporating the varying colors we are experiencing right now.. 


I have been weaning myself away from politics (it is literally driving me crazy!) and have been focusing more on creative videos and blog posts instead. Occasionally I will come across something that really inspires me. 

Thus, I wanted to try using Post-It notes to screen off a strip of a black and white Designer Series Paper and color it in that way. Normally I do all that fussy coloring with Stampin' Blends, which I adore doing. This way, however, is ever so much quicker, and results in a stunning strip of color in an otherwise black and white space.


Using my Blending Brushes with Calypso Coral at the top, gradually blending in to Crushed Curry, and finally, Pear Pizzazz, is the process I used.. 

In the photo below, 
you can see the sticky notes in place with the blending of the inks done.


But then, when the Post-It Notes are slowly peeled away, 
the eyes are treated to a striking stripe of autumn colors.


I found a flower and leaf stamp that sort of echoed the look of the flowers in my DSP and stamped it in Memento Tuxedo Black ink. Using Stampin' Blends in Light Old Olive and Light Calypso Coral, I colored it in, then fussy cut it.


I cut a simple white circle using dies from the Beautiful Shapes dies on page 169. In Calypso Coral, I stamped a lovely sentiment from the Through It Together stamp set (page 69, Annual Catalog) towards the bottom of the circle.

Using Stampin' Dimensionals, I added the flower to the top of the circle, then used more Stampin' Dimensionals to place the flowery circle partially covering the blended in stripe.

Two Basic Rhinestones in Pear Pizzazz completed the focal point and also added a bit of bling.


I added this completed piece to a Crushed Curry card base. 


How are the autumn colors in your neck of the woods? Do you experience a change in the seasons? I always think it's so sad when this happens because the trees had worked so hard in spring to produce all those lovely leaves, only to have them survive just a handful of months.


^^^^^^^^^^^^^^^^^^^^^^^^^^^^^^

Heaven is under our feet as well as over our heads.
- Henry David Thoreau -


I must mention that any photographs I include in my blog posts are my own. 

^^^^^^^^^^^^^^^^^^^^^^^^^^^^^^^^

Autumn
Smiles.


October 4, 2022

FAUX SILK HALLOWEEN

On Friday I was watching a video telling me how to do an age-old technique, only revisited somewhat. The technique, Faux Silk, is one I've been using very often over the past years, most times incorporating the topmost layer of a decorated napkin. 

This take on the technique was different, however. Jessica Taylor from Ink It Up With Jessica, was showing how to do the technique by using plain old white gift tissue paper over DESIGNER SERIES PAPER!

She was doing it over flowered DSP, but I thought that, with the almost spooky look that can be achieved with this technique, I would try it with some Halloween DSP!

With the next day being World Cardmaking Day, I commented on Jessica's YouTube video that I was going to give it a try on this occasion.


The Designer Series Paper I decided to use for my card:


How the DSP looks after applying the Faux Silk Technique to it:


To apply the tissue paper to the DSP -- and this is how you do the Faux Silk Technique -- crush the tissue paper into your hand, sort of flatten it, crush again, sort of flatten it, doing this three times so you have lots of nooks and crannies (?) to give it character. Use a glue stick on the surface of the DSP ALL OVER, CORNER TO CORNER, EDGE TO EDGE. This is so so so important. Then just lay the flattened and crushed tissue paper on top of the glue, gently patting it in place. Be gentle, but firm, about this in order to retain the texture.

Once the piece is dry, use  your paper snips to trim the tissue layer even with the DSP layer. Very easy to do.

I love the almost spider web look -- making it even more spooky -- my card has.


Since I loved the way the background looked, I wanted some sort of focal point that wouldn't detract from it. So I decided on a simple Halloween vignette. 

For the jack-o-lantern I used Pumpkin Pie, Garden Green and Black inks on one of the pumpkins from the old retired Fall Fest stamp set. 

Using the sentiment -- with a great font! -- from the also retired Wonderfully Wicked set, I stamped it in a wicked black. A die from the Stitched So Sweetly die set was perfect for cutting out the sentiment.

After adhering the pumpkin and sentiment together, I looped some Linen Thread (page 145, Annual Catalog) all around the focal point, and added it to my spidery background with Stampin' Dimensionals. A couple Black Matte Dots (page 143, Annual Catalog) finished it off just right.


I noticed that the spidery texture was even more pronounced 
when looking from the top of the card!


Adding this to a layer of black cardstock, then to a Pumpkin Pie card base -- and voila! -- a cool Halloween card!


If you'd like to check out how Jessica made her card, click on either of the links above. One will take you to her blog, where the project is the first one, or the other link, which is her YouTube presentation of the project. Thanks, Jessica, for the wonderful inspiration!


^^^^^^^^^^^^^^^^^^^^^^^^^^^^^^

Make the most of yourself, for that is all there is to you.
- Ralph Waldo Emerson - 


^^^^^^^^^^^^^^^^^^^^^^^^^^^^

Faux
Smiles.


October 1, 2022

#dailycreating JUNE/JULY 2022

I am finally able to report that I seem to have reluctangly climbed back onto the drawing train a bit -- at least, more than I had been of recent months. During those intervening months, I had done a lot of Neurographic Drawing, necessary as a wonderful stress reliever. Now, on October 1, it's been a few weeks since I've indulged in that sort of soul searching creativity, and have started drawing normally a little more.

As a part of Terry Runyan's #dailycreating group for more than three years now, up until about January, I'd been a faithful follower of her daily prompts. Since then, it's been a struggle to get back on the daily prompt train again. But, I am slowly but surely doing it.

Once again though, I don't have enough non-Neurographic Art to show you so I've combined June and July to come up with a respectable ten drawings to share with you in this post.

As always, I will note above each drawing what the day's prompt was (if I followed it) along with any other pertinent information I may have gleaned about the subject matter.

#world parrot day

alexandrine parrot / asia


#ladybug-urday

#frog-urday
albino green frog

off prompt
rose-crowned dove - australia/indonesia

#cow

#llama-urday

#thing on thing
osellated turkey - yucatan peninsula/mexico

#dragonfly

#thing on thing
great crested grebe - everywhere except the americas

#blue
black-naped monarch - tropical southern asia

A few explanations: Terry has designated every Wednesday's prompt as #thing on thing. I had decided a long time ago that I would do birds with something extra on their heads, be it a crown, a little something hanging off the beak, etc., for my #thing on thing prompt.

Also, she originally designated Saturdays as #caturday, then she extended it to #dogurday. But several months ago, she also included any animal-urday. 

I do have prints of many of my drawings. So, if you're interersted, just let me know.

These are my original pieces of art and are not to be copied or used in any way without my express permission. Thank you for your cooperation in this.

^^^^^^^^^^^^^^^^^^^^^^^^

May you live all the days of your life.

- Jonathan Swift - 


^^^^^^^^^^^^^^^^^^^^^^^^^^^^^

Creating
Smiles.