April 15, 2023

CHEAP TISSUE AND FAUX SILK

After the Christmas Holidays were over and I was going through gifts, I discovered in one box something that SHOULD have by all rights be tossed directly into the garbage. But, just as I was about to release it from my hand, I thought twice about it. The object in question was a ratty cheap piece of white tissue paper. You know the awful stuff that comes in products from China? As I said, it should have been tossed in the garbage. Without hesitation.

But, then I wondered how it would work in the Faux Silk technique. Hmm. I'd used lots of different tissues in this technique, but nothing quite as awful as this pitiful thing. 

So I decided to give it a chance. And I did. 


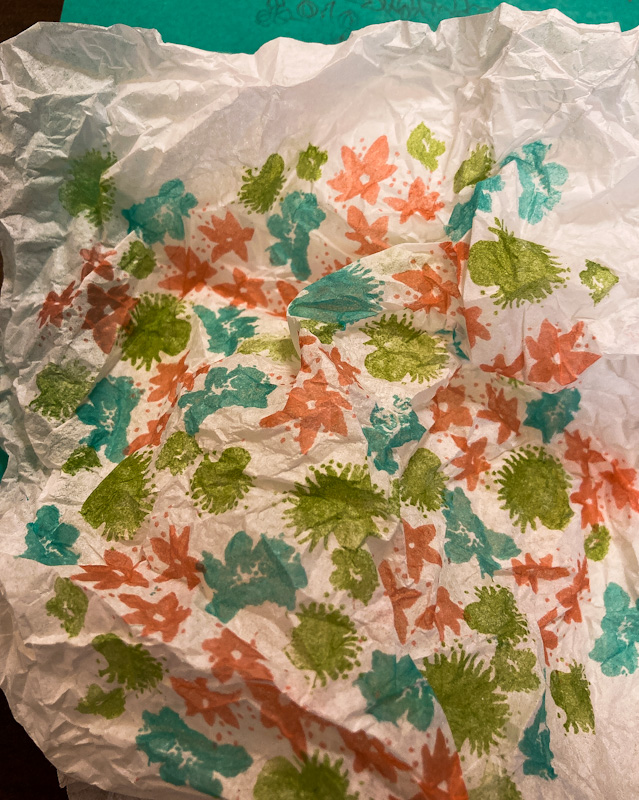
Using inks in Flirty Flamingo, Coastal Cabana and Granny Apple Green, I stamped the various flower shapes from the Wildflower Path stamps set randomly across this cheapo tissue paper.

I knew I wanted to place it onto a 4" x 5 1/4" piece of white cardstock, so I made my stamped area a little larger than that size.


After I finished all my stamping, I crumpled the piece of tissue paper in my hands several times, almost flattening it each time.


Once I crumpled it 4-5 times, I flattened it, but NOT COMPLETELY. You need lots of mountains and valleys to provide the interesting texture this technique yields.

I cut a piece of white cardstock to 4" x 5 1/4" and used a glue stick to completely cover one side of the paper with glue --- edge to edge and corner to corner. This is essential in order to achieve maximum results.

After the cardstock was all gluey, I carefully laid my crumpled tissue paper onto the glued surface. 

Without pulling the tissue taut, I simply gently pressed it in place over the glue. It is so important to just press, not pull or flatten.
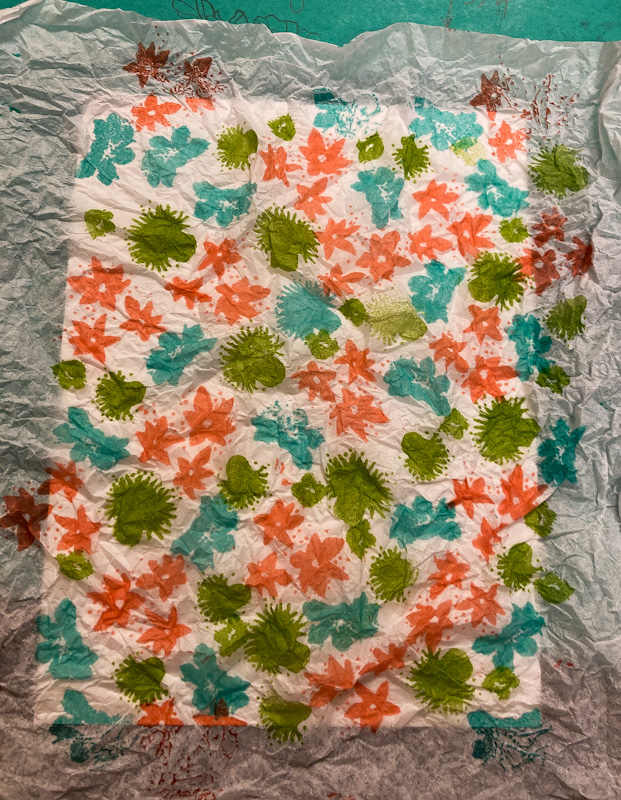

Once everything was carefully glued in place and none of the edges or corners were lifting away from the cardstock, I trimmed off the edges of the tissue against the cardstock.


As happens so often when I'm creating, the background ends up being the most important part of a card. So as not to cover up just too much of this importance, I made the rest of the card quite simple.


I stamped a simple heartfelt sentiment from the Eden's Garden stamp set in Flirty Flamingo ink and die cut it into a tag. 

A diagonally cut 1/2" strip of Coastal Cabana cardstock that measures 4" long, topped by a snippet of ribbon and attached to the back of the sentiment tag, then popped up with Stampin' Dimensionals, complemented my background so well.

I added a trio of Pool Party gems (one of which migrated off to the upper right, which I didn't realize before I took the photos). 


The final touch was to add this all to a Granny Apple Green cardstock base.

Now, be honest. Would you have thrown away this poor defenseless little piece of papery garbage?


^^^^^^^^^^^^^^^^^^^^^^^^^
If you look the right way, 
you can see that the whole world is a garden.
- Frances Hodgson Burnett -


^^^^^^^^^^^^^^^^^^^^^^^^

Cheap
Smiles.


April 11, 2023

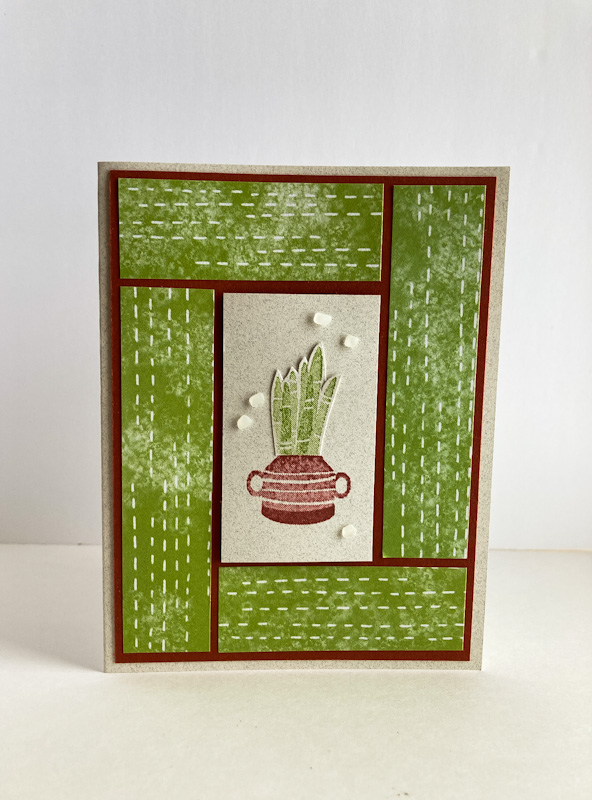
ROCKY PLANT

I really love to use Designer Series Paper in various ways when creating my cards. This card shows one more way that DSP can shine.


The only embellishment on this simple card are the little faux sea glass pieces around the plant.


The plant was stamped, fussy cut, and planted in its pot.


SUPPLIES:
Neutral cardstock
Cajun Craze cardstock
Celebrate Everything Designer Series Paper

Plentiful Plants stamp set

Cajun Craze ink
Granny Apple Green ink

Stampin' Dimensionals
Paper Snips
Faux Sea Glass Shapes

DIRECTIONS:
Fold a 5 1/2" x 8 1/2" piece of light neutral cardstock in half, creasing it well with a bone folder.

Add a 4" x 5 1/4" piece of Cajun Craze cardstock to this card base.

Cut a 1 5/8" x 2 7/8" piece of the light-colored neutral cardstock. About 1/2" from the bottom of this piece, stamp the rounded pot in Cajun Craze ink. On a separate scrap of the same paper, stamp the plant in Granny Apple Green ink. Fussy cut the plant, leaving a small margin, except at the bottom so it can rest nicely atop the pot. Adhere the plant in place.

From Designer Series Paper, cut two strips that measure 1" x 4" and two that measure 1" x 2 3/4". Using the sample card as your guide, add these strips around the edge of the Cajun Craze piece, keeping the pieces as evenly spaced as possible.

Add the plant piece to the center with Stampin' Dimensionals. It should fit just right.

Add five of the Faux Sea Glass Shapes around the plant.


^^^^^^^^^^^^^^^^^^^^^^^^^^^
Like people, plants respond to extra attention.

- H. Peter Loewer -


^^^^^^^^^^^^^^^^^^^^

Growing
Smiles.


April 8, 2023

GLITTER WINGED BUTTERFLY

Even though pretty much of everything used in this card is retired, since we finally have some springlike weather coming up in our forecast, and that means that butterflies will be around in a bit, I thought I would share a tutorial on how to make this happy sparkly butterfly card.

I really like the way the whole card is built upon layers of circles, right down to the shape of the card itself. 


Don't you just LOVE the sparkly butterfly wings!?


Read on to find out how to make a sparkly winged butterfly for yourself!

SUPPLIES:
Pear Pizzazz cardstock
White cardstock
Black cardstock
Designer Series Paper that will coordinate with the color of your butterfly

Die cutting/embossing machine
Butterfly thinlits
Layering Circles dies (page 172, Annual Catalog)
Packing Tape
Glitter of your choice
Metallic gold thread
Fluttering embossing folder
Silicone Craft Sheet (page 127, Annual Catalog)

DIRECTIONS:
Fold a 5" x 10" piece of Pear Pizzazz cardstock in half, creasing it well with a bone folder.

Using the large scalloped circle die, you will be cutting your card base. Lay the folded edge close to one of the edges of the die, moving it just a smidge into the die, so that the top three or so scallops will not be cut. This will form the hinge on your card.

Run this folded card base through your embossing machine inside the Fluttering embossing folder, keeping the card folded. This way, the embossed butterflies will show up on every portion of the card.

Using the circles dies, cut two white circles just a bit smaller than the card base, one black circle, in the next smaller size; and a smaller circle out of Designer Series Paper. All of these circles can be adhered to the card base at any time. Oh, the second white circle goes inside the card; writing on embossing is not fun.

From black cardstock, use the butterfly die to cur a butterfly.

Lay the butterfly upside down on top of the silicone mat. Attach packing tape to the back of the butterfly. One strip doesn't quite fit the butterfly; you will have to add a bit extra. This won't matter because it won't show.

Carefully cut the tape off, following as closely as possible the edges of the butterfly. If done properly,, the only sticky portions will be within the butterfly itself.

Lay the butterfly, sticky side up, on a piece of folded up paper. Choose your favorite color of glitter and sprinkle the glitter over the butterfly. Press the glitter well into the packing tape. Yes, you will get glittery, but there is water in the bathroom. Tap the excess glitter back onto the folded sheet of paper, then funnel it back into its container. Close the container. Have you ever spilled glitter? Eeeeuuuw.

Put a bit of adhesive on the back of the butterfly, and loop the gold cord back and forth three times so the loops extend beyond the butterfly, catching the cord on the tape with each pass. 

With one Stampin' Dimensionals, attach the butterfly to the DSP circle, gently lifting the wings into a "ready to take off: position.


^^^^^^^^^^^^^^^^^^^^^^^^^^^^^
Butterflies are self-propelled flowers.
- Robert A. Heinlein -


^^^^^^^^^^^^^^^^^^^^^^^^^^^^^

Glittery
Smiles.


April 4, 2023

STAMPED DEER IN A CLEARING

Awhile ago I shared a card on my blog featuring a diecut deer in a clearing. It was a white-on-white card. Completely diecut.

I truly loved that card, but this time I wanted to try the components of the same bundle in a card, but this time, both the stamps as well as the dies.


The white-on-white completely diecut card I shared with you previously:


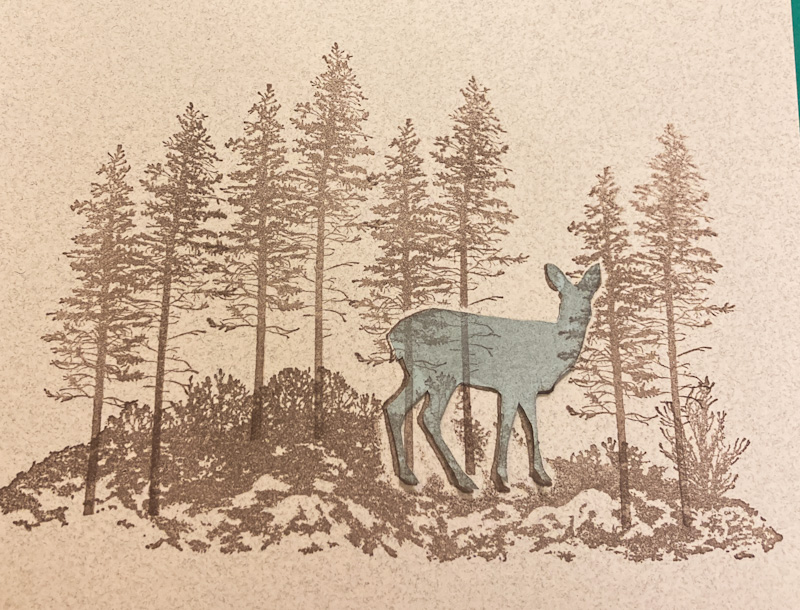
This latest card is very labor intensive. I started out by stamping part of the scene in a neutral color.

Since I needed to do some masking, I stamped the deer image one more time with a temporary adhesive on the back of the paper I'd stamped it on. I then fussy cut this piece, being careful to cut a little bit INSIDE the inked portion. 


If you cut right on the inked line, you get too much of a halo effect around the masked image. I got some of that anyway, but it was fixable.


After fussy cutting my deer mask, I laid it right on top of the deer I had originally stamped. I then stamped the next set of trees, with the stamping going right over the deer. 


By having the mask in place, I didn't get trees going over the stamped deer. In using the mask, once it was removed, it appeared that the deer was standing in front of the trees.


You can see in the previous photo that I have a bit of halo around the deer, where there is no ink. I was able to fix that with a Stampin' Write Marker in the same shade, by drawing in the missing portions.


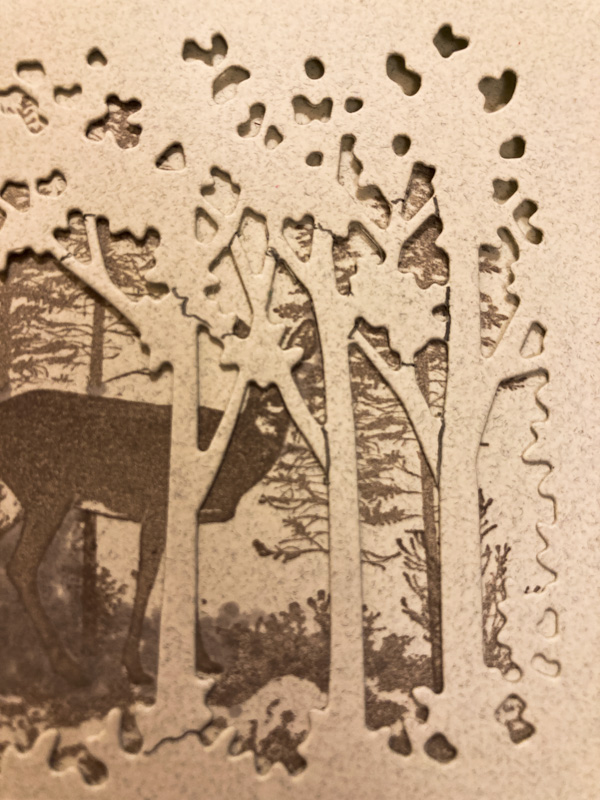
After the stamping was all finished, I die cut the tree foreground. Placing it in front of the stamping, the deer was fairly lost among the trees. While this is perhaps realistic in spotting a deer in a wooded setting, I didn't want it for my card.

You can see in the photo below that I'd added lines on the trees/branches that I thought should be eliminated so the deer can be more out in the open.


The next photo shows how much of the diecut trees I'd carefully cut away.


I put Stampin' Dimensionals in strategic places on the back of the diecut piece.


The next photo shows how the setting turned out after some pruning of the trees. 


And a closeup:


The card took a lot of time, patience and precision. But I am quite happy with the final result.


^^^^^^^^^^^^^^^^^^^^^^^
How can a deer tell when a leaf falls silent in the forest? 
She hears it breathing differently.
- Richard Bach -

^^^^^^^^^^^^^^^^^^^^^^^^^

Deer
Smiles.


April 1, 2023

#365birds FEBRUARY 2023

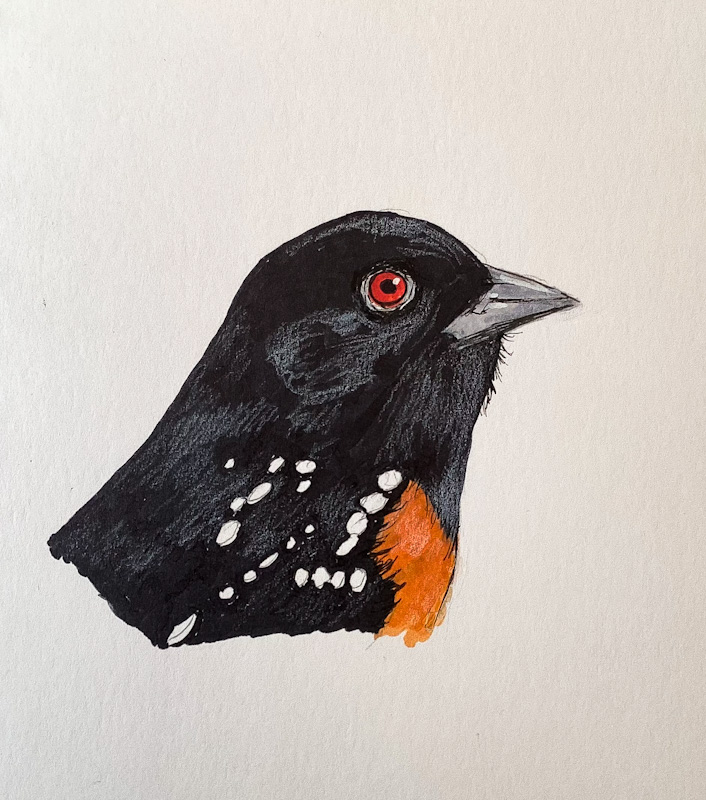
First of the month. Time for another installment of #365birds, a month's worth of bird drawings I've completed as part of my own personal challenge.

As part of Terry Runyan's #dailycreatinggroup on Facebook, I'd discovered my true love for drawing birds. As a result of that discovery, starting on November 3, 2022, I set out on a personal journey of drawing a bird each day for a whole year.

You will find below 15 of the birds I drew during the month of February. Above each of my drawings, I will tell the name of the bird, as well as the area of the world in which it can be found.

day 94 - spotted towhee

northwestern north america


day 95 - madagascar red owl
madagascar

day 96 - european goldfinch
throughout europe into northern africa and central asia

day 97 - capuchinbird
northeastern south america

day 98 - asian paradise flycatcher
asia

day 99 - silver-breasted broadbill
bangladesh, bhutan, cambodia, china, india, indonesia, 
laos, nepal, malaysia, myanmar, thailand, vietnam

day 100- claret-breasted fruit dove
southeast asia and oceania

day 101 - yellow oriole
northern south america

day 102 - new zealand kea
new zealand

day 106 - flameback woodpecker
south asia

day 109 - black-throated bushtit
asia

day 111 - crested finchbill
southeastern asia

day 115 - green jay
central and south america

day 117 - brown pelican
atlantic, gulf, and pacific coasts of the americas

day 118 - red-whiskered bulbul
tropical asia

And there you have it. Another month's worth of birdies. Stay tuned for the March drawings in about a month.

Thank you for not reproducing my drawings without my consent. If you would like prints of any of them, please let me know. 

^^^^^^^^^^^^^^^^^^^^^^^^^^^
Tame birds sing of freedom. 
Wild birds fly.
- John Lennon -


^^^^^^^^^^^^^^^^^^^^^^

Feathered 
Smiles.


https://www.facebook.com/groups/dailycreating