March 29, 2022

PRIZED PEONY

 As you probably already know, there are two techniques in papercrafting that are referred to as "embossing".

One, dry embossing, used to be done with a stylus through a stencil onto cardstock. Nowadays though dry embossing is done by a much simpler means: the embossing folder. Dry embossing gives a bit of dimension in a raised surface, lending lots of eye interest in the texture it provides. I love it!

The second embossing technique, referred to heat embossing, requires a stamp (usually), a sticky clear ink, such as VersaMark, embossing powder and a heat tool. I find heat embossing to be one of the most magical processes one can experience while doing papercrafting.

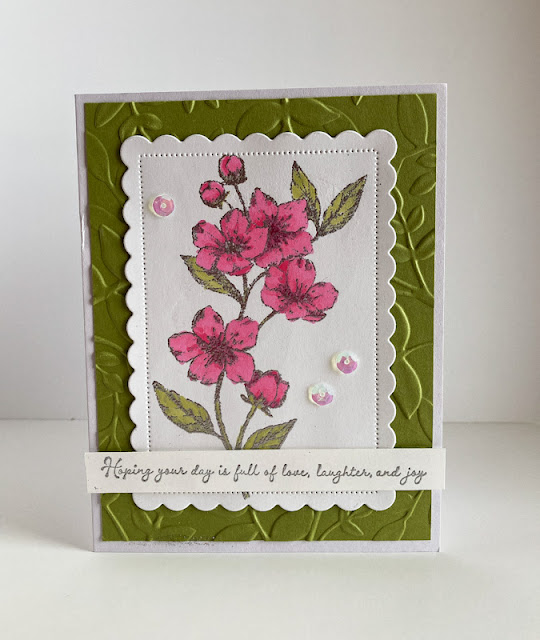
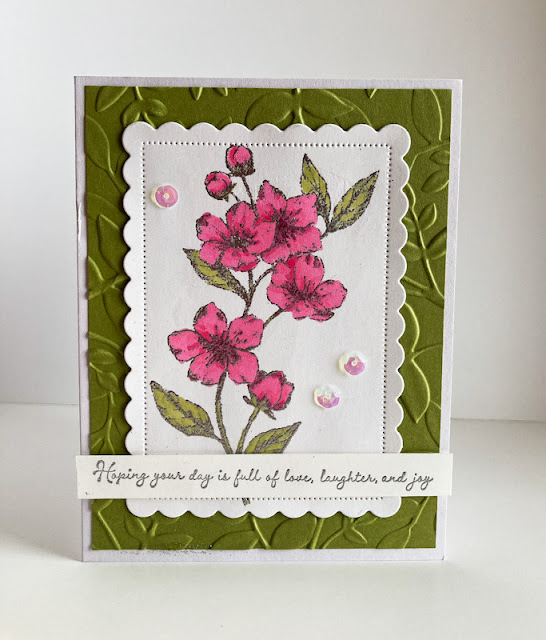
Today's card features heat embossing in two spots: on the flower, as well as the sentiment. Using gold embossing powder gives any image a truly elegant and expensive look.

Even though this flower would have been gorgeous in its embossed state only, I decided to add a bit of realism to the flower and leaves with a little coloring with Stampin' Blends. This way I could pick up on the soft pink in the Designer Series Paper behind the flower.


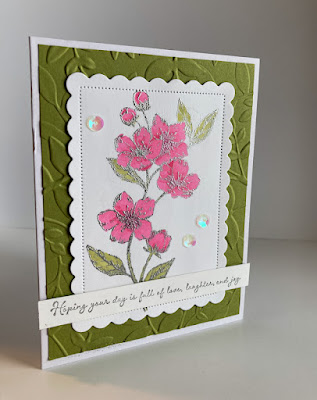
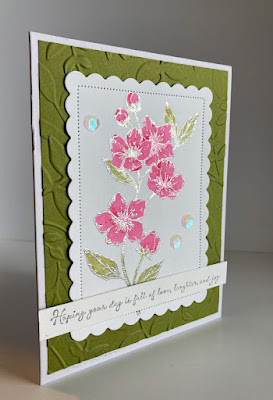
In the following photo, I angled the card towards the sun to show off the embossing. To echo the metallic gold of the embossing, I also incorporated brushed gold cardstock, both as the card base and also behind the sentiment label.


Following I will share with you a tutorial on how to make this card.

SUPPLIES:
Brushed Gold Cardstock
White cardstock
Friendly Hello Designer Series Paper (a freebie from the recent Sale-A-Bration)

VersaMark ink

Prized Peony (page 73, Annual Catalog)
Many Messages (page 42, Annual Catalog, but RETIRING!)

Stampin' Blends in: Light Granny Apple Green and Dark Petal Pink

Die Cutting/Embossing Machine
Ornate Frames (page 164, Annual Catalog, but RETIRING! A HUGE BOO!)
Heat Tool (page 128, Annual Catalog)
Embossing Buddy
Gold Embossing Powder (page 128, Annual Catalog)
Stampin' Dimensionals

INSTRUCTIONS:
Fold a 5 1/2" x 8 1/2" piece of brushed gold cardstock in half, creasing it well with a bone folder.
If you don't have brushed gold cardstock, this card can be created using white cardstock.

To this, add a subtle piece of Designer Series Paper. The DSP used in my card is Petal Pink and white.

The next section will be done on a 3 1/2" x 4 3/4" piece of white cardstock. After rubbing the cardstock well with the embossing buddy, stamp the large peony image in VersaMark ink. Add to this gold embossing powder, tapping any excess powder back into its container. Use the Heat Tool to set the embossing powder.

This card would look stunning if left just as gold embossed. I, however, chose to color in my flower. I used Light Granny Apple Green and Dark Petal Pink Stampin' Blends to do so.

Center the flower piece onto the DSP on the card base.

On a scrap of white cardstock, stamp the sentiment in VersaMark ink and emboss it with gold embossing powder.

Use a die from Ornate Frames (if you don't already own this die set, QUICK order it before it retires!) to die cut the sentiment.

Cut a piece of the DSP you used for the the background to 3/4" x 4" and add it to the lower portion of the stamped piece so you have about 1/8" of white cardstock showing under the DSP.

To this, add a 1/4" x 4" piece of the leftover brushed gold cardstock.

Add the sentiment label centered atop this with a few Stampin' Dimensionals.


Have you ever tried embossing? Which, dry or heat, is your favorite? 

Embossed
Smiles.


March 26, 2022

PAPER EASTER BASKETS

Easter is coming; the goose is getting fat. Oops. Easter is coming; the DUCK is getting fat.

Browsing on the Internet the other day, I came across some darling little paper Easter baskets that proved to be oh, so simple -- and fun! -- to make. And they look just so spring-y.

All you need to make these cuties is a single sheet of Designer Series Paper that measures 6" square. Well, over the years, I've accumulated lots of packs of DSP that are 6" square. Using only a few sheets out of a pack, I knew I had lots to choose from, including spring-like designs.

I had lots of fun choosing just six of these papers for my half dozen baskets.


Use your Simply Scored to score at 2" and 4", flip the paper and repeat. Use a bone folder to give those score lines a good crease.

On one side, cut up one of the score lines until you meet the next line. Do that on both score lines on one side. Flip it and repeat on the other side. The middle line of fold lines doesn't get cut at all. 

Once all of the cuts are made, on one side, fold in the center square and fold the other two end squares towards the center until they meet at a point above the center square. Repeat this on the opposite side.


When I was gluing mine, I put green glue on the top portion of the center square, then after meeting the other two at the point, I lifted up the topmost square and sneaked a little glue under that. You may choose to do it differently. Doesn't matter. Just so it holds together.

To make the handles, I cut coordinating solid cardstock to 3.4" x 6". I learned the hard way while trying to attach my first handle. As I tried to maneuver it into place, it buckled and made a crease in the handle. Nuh uh. Not good.

To alleviate this situation, before you try to install your handle, sort of gently curl it with a bone folder. This breaks up enough of the fibers in the paper so it is soft enough to bend nicely without creasing. 

Use glue to adhere the handles inside the basket,.

Once all my baskets were created, the fun part really started. I have years and years worth of buttons and large brads left over from Stampin' Up! purchases. It was pleasant going through all this stash to discover pieces that coordinate with each basket. 

I used buttons, some of which I inserted baker's twine into the holes and tied in either a knot or a bow. Other buttons didn't really need anything. I even found a pair of large brads that I could use on one of them.

The last step was to fill them with crimped paper. Only having four colors of this basket filler, a couple of the baskets presented a little bit of a challenge. But I got the job done. And I am pleased.

Easter

Smiles.


March 22, 2022

BIRD ON A BRANCH

Well, I finally saw my first robin for the spring! To celebrate this big springtime milestone (even though there is STILL snow around!), I am sharing with you a bird/flower-themed card.

The precious bird and branch are both from a set of dies that I had overlooked several times in the Annual Catalog. When, what to my wondering eyes should finally appear, a delightful set of dies that I will be using for all sorts of occasions. I am really incredulous as to why I'd been so blind to the Iconic die set, but when I discovered it -- finally! -- I immediately ordered it. 

The set features dies to cut out several lovely flowers, the bird and branch, two mushrooms (!), two leaves and a fern frond. But, the die that appealed to me most -- and that I have yet to use -- is that of a bumblebee. 


After die cutting the bird/branch from foiled cardstock, I wanted to dress up the panel onto which it would be mounted a little bit, so I deeply embossed the piece of Very Vanilla cardstock with the Painted Texture Embossing Folder. I love the contrast between the shiny bird and the feel-me texture of its background.


A closeup of the bird upon its textured background.


Read on for a tutorial on how to make this card for yourself.

SUPPLIES:
Foiled Cardstock (almost any color will look good)
Very Vanilla cardstock
Flirty Flamingo cardstock
Daffodil Afternoon Designer Series Paper (or any busy cardstock that would look well)

Black ink

Friendly Hello (Retired -- from this year's Sale-A-Bration)

Die Cutting/Embossing Machine
Stitched So Sweetly dies (page 166, Annual Catalog)
Iconic dies (page 163, Annual Catalog)
Painted Textures 3D Embossing Folder (page 155, Annual Catalog)
Stampin' Dimensionals

INSTRUCTIONS:
Fold a 5 1/2" x 8 1/2" piece of Very Vanilla cardstock in half, creasing it well with a bone folder.

To this, add a 4" x 5 1/4" piece of Flirty Flamingo cardstock, and, to this layer, add a 3 3/4" x 5" piece of the colorful Designer Series Paper from the Daffodil Afternoon DSP pack.

Run a 3 3/4" x 2" piece of Very Vanilla cardstock through your embossing machine inside the Painted Texture 3D Embossing Folder.

From a piece of Silver Foiled Cardstock, die cut the bird and the branch from the Iconic Dies set.

Using liquid glue sparingly, add these two pieces to the embossed piece, with the bird's feet resting on the branch.

Adhere the Very Vanilla piece to a 3 3/4" x 2 1/4" piece of Flirty Flamingo cardstock. Using Stampin' Dimensionals, add this to the DSP portion about 1/2" from the top of the DSP.

In black ink, stamp the sentiment on a piece of Very Vanilla cardstock. Die cut the sentiment with the scalloped edge die that measures 1 1/4" x 2 1/2" from the Stitched So Sweetly die set.

Using a sliver of the silver cardstock that measures 1/4' x 3 1/2", adhere this strip centered to the back of the sentiment piece. Add it with Stampin' Dimensionals below the bird section.


Spring-y
Smiles.


March 19, 2022

SILVER AND GOLD

Occasionally Stampin' Up! has beautiful heavy one-sided cardstock on which the design is printed in one of the metallics. In fact, this paper is heavy enough that it makes wonderful and sturdy boxes., which is always my intent to do so when I get some in my hands. But that only happens rarely, leaving me with an abundance of this lovely paper in my stash

Spotting some of this paper recently, printed in silver and gold, I decided to put a bit of it to work in a card.

Because I love using my Stampin' Blends to color on Designer Series Paper, I thought I would give this metallic beauty the Blends treatment. I used Light and Dark Just Jade on the leaves. I then colored the background in Light Balmy Blue. 

After adding the solid blue, the background looked fairly bland and lifeless. So I used my Color Lifter to sort of "lift" some of the color, giving it a muted marbled look. This is a technique that I will use again. It lends the colored image some liveliness that I love.


To show off the silver and gold:


I cut a 1" strip of Balmy Blue cardstock and used an embossing folder to give it a deep design. I then wrapped a piece of silver and white ribbon around the embossed piece. After adding the embossed section to the colored DSP, I adhered it to a Balmy Blue card base.

To pick up on the metallic even more, I used one of the dies from the retired Everything's Rosy bundle and cut a stem that echoed those in the DSP print from gold foiled cardstock and added that over the silver and white ribbon. To further the echo, I die cut a "hello" from the same gold foil for the lower right of the card. The final metallic touch was a couple of Gilded Gems (page 157) on the ribbon.


Metallic 
Smiles.


March 15, 2022

FOREVER BLOSSOMS

Middle of March. Ground still covered in snow. I haven't even seen a robin yet. We need flowers!

So I guess I just had to grow some of my own -- on a card. The flowers on this card are embossed in silver and colored in Polished Pink Stampin' Blends. However, I think it would be equally lovely without any color at all, just the silver embossing. What do you think?


The Old Olive cardstock matting the scallop-edged flower is heavily embossed with leaves to carry through with the flora theme. 


Just trying to catch the light too show off the silver embossing:


Do you want to grow some flowers of your own on a card? Here's how. It requires only seeds of creativity.

SUPPLIES:
White cardstock
Old Olive cardstock

VersaMark ink
Stampin' Blends in Light and Dark Polished Pink and Light Old Olive

Many Messages stamp set (page 42, Annual Catalog)
Forever Flowers stamp set (page 73, Annual Catalog)

Die Cutting/Embossing Machine
Scalloped Contours Dies (page 158, Annual Catalog)
Leafy embossing folder (retired)
Heat Tool
Silver Embossing Powder
Embossing Buddy
Stampin' Dimensionals
Iridescent Sequins

INSTRUCTIONS:
Fold a 5 1/2" x 8 1/2" piece of white cardstock in half, creasing it well with a bone folder.

Cut a piece of Old Olive cardstock to 4" x 5 1/4". Emboss it with a leafy embossing folder. Adhere it to the card base.

From white cardstock, die cut a scalloped edge frame using the Scalloped Contours Dies. It measures 3 1/8" x 4 1/2". Rub the Embossing Buddy over this piece. Stamp the floral stem in VersaMark ink onto it. Emboss the flower stem with the Heat Tool using silver embossing powder, tapping the excess powder back into its container.

At this point, you can leave the flower as is. Or, as I did, you can color in the flower and leaves as you wish. I used Stampin' Blends in Light and Dark Polished Pink and Light Old Olive.

Adhere the colored (or just embossed) piece to the Old Olive on the card.

On a strip of white cardstock that measures 1/2" x 4 1/4", stamp a long sentiment in VersaMark ink after rubbing it well with the Embossing Buddy. Emboss the words with silver embossing powder.

Using Stampin' Dimensionals, attach the strip on the dotted line of the diecut piee.

Add an odd number of sequins to the background.


Do you have any flowers blooming in your area? 

Forever
Smiles.


March 12, 2022

HELLO FRIEND

With St. Patrick's Day coming up quickly, I am bringing you a predominantly green card today. The green is actually Soft Succulent, which is a very subtle green, and not at all the garish green normally associated with St. Patrick's Day, but . . . . 


To make this card requires some careful stamping, but otherwise it's fairly quick and easy to create.

Starting out with a 4" x 4" piece of white cardstock, the challenge comes in lining up the four cute designs from the All Squared Away stamp set (page 117, Annual Catalog) so they all fit nicely into the 4" square. Once that's done, the rest is a piece of cake!


For the sentiment, I used one of the Sale-A-Bration stamps from the Friendly Hello set. I stamped it in Soft Succulent ink upon white cardstock, then fussy cut it, leaving a white margin all around. 

When I finished that, I mounted it to a scrap of Soft Succulent cardstock, then fussy cut that, leaving a nice margin of green.

To finish off the sentiment, I used a Dark Soft Succulent Blend on one of the Basic Rhinestones and added it to the center of the "o". Cutesy, huh?

Using Stampin' Dimensionals, I added it to the center of the four stamped blocks.

Adhered to a 4 1/4" square Soft Succulent card base, my card is finished!


Are you Irish? Whether you are or not, do you celebrate St. Patrick's Day in any fashion? How? Not having a drop of Irish blood in my body, and not being a party girl, I may wear something green that day, but that will be about it. 


Friend-ly
Smiles.


March 8, 2022

BUTTERFLIES GALORE

Here is another example of how Designer Series Paper makes cardmaking quick and simple. 

Do any of you have the Brilliant Wings dies? If you do, you know that one of the dies is a composite of all the outlines of the butterflies from the stamp set, Butterfly Brilliance, that can be found on page 106. Yes, a single die of six butterflies! What a great opportunity to use this die for something other than die cutting stamped images!

Why not use it as the main component of a card, just by adding Designer Series Paper underneath all the butterfly negative spaces?


To cut this single panel of butterflies, you need to start with a (white?) piece of cardstock that measures 4 5/8" x 5 7/8. Yes, the finished card will be somewhat larger than the normal A2 sized card. So you either need to make an envelope to fit, or use one that you may have on hand that is a size up, an A7.


So you don't have to reinvent the wheel by figuring out all the dimensions like I had to, here is a tutorial on making a card such as mine. Have fun!

SUPPLIES:
White cardstock
A suitable Designer Series Paper (You can always die cut your butterfly layer and hold it over various DSPs until you find one that pleases you.)

Black ink

Quiet Meadow stamp set (page 110, Annual Catalog)

Die Cutting/Embossing Machine
Brilliant Wings Dies (page 158, Annual Catalog)
Tailor Made Tags dies (page 166, Annual Catalog)
White 1/4" ribbon
Black and White Baker's Twine (page 140, Annual Catalog)
Coordinating sequins
Stampin' Dimensionals

INSTRUCTIONS:
To decide on the Designer Series Paper I wanted to use for my sample, I first used the butterfly die from the Brilliant Wings dies to cut the "stencil" from white cardstock. I then laid it over several samples of DSP until I found a look I liked.

From a 4 5/8" x 5 7/8" piece of white cardstock, use the butterfly die to cut your top layer.

Cut your chosen Designer Series Paper to 5 7/8" x 5 1/8".

Without overusing adhesive, adhere the butterfly panel over the DSP, matching up the right, top and bottom edges, leaving a 1/2" flap to the right side.

PLEASE NOTE: I adhered my cut out butterflies flat to the DSP. Another good option would be to attach the butterfly panel with a few well-spaced Stampin' dimensionals. After I'd completed my card, I wished I'd gone that route.

Take a piece of white cardstock that measures 4 5/8" x 5 7/8". Add adhesive to the inside of the DSP flap, and slide this white cardstock in place to serve as the back of your card. You may need to trim off a sliver of white that shows at the edges of the card.

From white cardstock, use one of the Tailor Made Tags dies to cut out a tag. On this tag, stamp your sentiment in black ink.

Slip a 4" piece of 1/4" white ribbon through the hole in the tag and tie it off with a piece of black and white baker's twine. Trim the ends as needed.

Attach the tag to the lower right of the card with a couple Stampin' Dimensionals.

Add sequins in the white spaces between the butterflies.


Isn't this an easy and delightful way to make a card? And the butterflies? C'mon, Spring!

Butterfly
Smiles.


March 5, 2022

SEASIDE NOTIONS

Have you ever heard of the retiform technique? Using this technique, you create divided sections on a piece of cardstock in which you can stamp various images.

Through my research into the retiform technique, it appears there are various ways you can achieve this effect. To do the technique on the cards I show below, I used a piece of scrap cardstock, ink and blending brushes.


I sifted through my stamp sets searching for a set that has a variety of related images in a few different sizes. 

With these stamps in mind, I went to work on a piece of light-colored cardstock that measured 4" x 5 1/4". I didn't want any of my lines to be parallel to each other or the edges of the cardstock. I think that by being careful with this, the resulting card will have more of a carefree look rather than being too structured.

My first line was the one that extends from the bottom to the upper right corner. To make this dividing line, I gently sponged Coastal Caban ink against a piece of scrap cardstock held firmly in position. You must be sure that your scrap cardstock is long enough to reach across any expanse of cardstock you will be encountering. 

Once my first line was sponged in place satisfactorily, I moved on to the next one, which was the one that ran from about the middle of the left edge to the lower right corner. In this way, I proceeded to create sponged lines all across the piece of cardstock, always keeping in mind the sizes of the stamps I planned on using in the sections.

When all my lines were created to my satisfaction, I went to work stamping in my images in Soft Suede ink, adding, also in Soft Suede, a small "thank you" within the sand dollar space.

Mounting it onto a Coastal Cabana card base gave me a pretty quick and easy one layer card.


Shown below, I show the Valentines I made 
for my two grandchildren using the retiform technique.


I hope you understand my brief instructions on how to do the retiform technique for yourself. Between my directions and lookiing at my samples, I'm sure you can figure it all out nicely. Otherwise, you can refer to videos on YouTube. In that way, you will also discover other ways of doing this fun technique.

Retiform

Smiles.


March 1, 2022

#dailycreating OCTOBER 2021

Here it is, the long-awaited new installment of #dailycreating! Just kidding. I don't know if any of you really look forward to seeing the next month's worth of drawings I've done as a member of artist Terry Runyan's Facebook group, #dailycreating or not. 

Anyway, it looks like October 2021 was another of my birdbrained months. All 13 of the drawings I have featured in this post are, once again, birds. I find birds of all sorts intriguing and so fun and satisfying to draw. 

During October, one of the members of Terry's group mentioned a challenge that was going on, #birdtober, and shared the daily prompts from this challenge. Since, at the time, birds seemed to be my forte, I thought it would be fun to give some of these daily challenges a try. So that's why you'll find that distinction, #birdtober, above many of the photos. 

As part of Terry's international group, we members are all encouraged to do something creative each day. When I joined her group in August 2018, my intent was to work on improving my drawing skills. 

To some extent, I am still working on that. But, life has so often gotten in the way lately, that more than ever, I have started to let my daily drawing slide somewhat. Oftentimes I find myself creating in some way that doesn't involve drawing in my sketchbook, be it cardmaking or working on a project for a Skillshare class. 

I hope I don't lose my desire to draw completely. Part of what's been getting me down about it is the old "not good enough" syndrome in that I don't get very much approval/affirmation from my social media accounts, mostly Instagram. Put it this way: I have to be content with a whopping 20 hearts on any of my drawings. On occasion, it gets to the high 20s, but not often. If you're interested, you can find me under Paperseedlings on Instagram.

I keep telling myself "it doesn't matter." But I don't listen. It DOES matter. To me. Wah wah wah. 

With all my whining out of the way, I will include above each of the drawings the prompt that I was using, as well as any other pertinent information about the bird I've depicted.

#birdtober bee eater


#birdtober hornbill
southern ground hornbill/africa

#thingonthing
white-throated magpie jay/costa rica

#birdtober railidae
gray-necked wood rail/central and south america

#birdtober grebe
great crested grebe/europe

#birdtober dickcissel
dickcissel/midwest

#birdtober goose
swan goose/eastern asia

#birdtober catbird
gray catbird

#birdtober booby
brown booby/tropical oceans worldwide

#owls
great horned owl

#birdtober tanager
#rainforest
cherry-throated tanager/rainforest

#thing on thing
spoonbill

#birdtober caracara
crested caracara/american tropics

I must admit that it was a thrill to have in front of me a month's worth of bird challenges. I've looked for other such challenges, but so far have been unable to find any more. 

Even though I've said it in the past, Terry has designated each Wednesday as #thing on thing day. She always does some sort of a cat on head drawing. She does such a fabulous job of that on a weekly basis. For myself, I have chosen to consider anything extraneous on a bird's head to be fodder for my drawing whims, be it a crest, messy head feathers, weird additions to a beak -- think turkey! -- or whatever draws my interest. That's what I do each week for the #thing on thing prompt. 

There we have another month's worth of drawings, once again all birds. I hope you don't mind me showing you my drawings at the beginning of each month. 

Please don't use or copy any of my drawings without my permission. Giclee prints are always an option.

Birdbrain
Smiles.