April 28, 2013

FANCY THIS MUM

It is a lot of fun to deviate a bit from the traditional card by switching up the folds. Thus the moniker "fancy fold".

This fancy fold is a variation on the gatefold card where the right and left sides of the card come together to meet in the center, something like a stage curtain.


Although I have created this card as a birthday card, don't you agree that it would make a truly lovely Mother's Day card? I mean, a (chrysanthe)mum for Mum? 


It looks so interesting when it is standing, with all the components freeing themselves from each other. 


Upon first laying my eyes on the beautiful chrysanthemum in the Blooming With Kindness set, many ways of using this image popped into my already-full brain. 

For this card, it was fairly easy to achieve a stunning look. I used heat embossing and -- guess what! -- emboss resist!! 


Loverly, eh?

To recreate your own card, here's how you do it:

Supplies:

Whisper White card stock
Regal Rose card stock (unfortunately Regal Rose is retiring)

Blooming With Kindness

VersaMark Ink
Regal Rose ink

Big Shot
Woodgrain Textured Impressions Embossing Folder
Simply Scored
Bone Folder
Sponge Daubers
Embossing Buddy
Heat Tool
Black Embossing Powder

Instructions:

Using the Simply Scored, score a 5 1/2"  x 8 1/2" piece of Regal Rose card stock at 2 1/8" and at 6 3/8". Crease with a bone folder on these score lines to create a gatefold card.

Place a 3 3/4" x 5 1/4" piece of Whisper White card stock inside the Woodgrain Embossing Folder and run it through the Big Shot. Cut this piece in half vertically so each piece measures 1 7/8". Attach these pieces to each of the gatefold flaps.

Rub a 3" x 3" piece of Whisper White card stock well with the Embossing Buddy. Stamp the chrysanthemum in VersaMark. Cover the stamped image with Black Embossing Powder, tapping the excess powder back into its container. Heat to emboss.

With a Sponge Dauber, add Regal Rose ink to the embossed flower, using a gentle touch at first. You can always darken areas if you want a more dramatic look.

Adhere the finished flower piece to a 3 1/4" x 3 1/4" piece of Regal Rose card stock. DON'T PUT ADHESIVE ON THE LEFT SIDE OF THIS PIECE. Attach to the right flap of the gatefold.

On a 1 1/4" x 3" piece of Whisper White card stock, stamp sentiment in Regal Rose ink. Attach this to a 1 1/2" x 3 `1/4" piece of Regal Rose card stock. DON'T PUT ADHESIVE ON THE RIGHT SIDE OF THIS PIECE. Adhere to the left panel of the gatefold.

Fancy
Smiles.


April 25, 2013

042513

Hmmm. What happened to that "global warming" theory? For that matter, whatever happened to SPRING 2013?

We woke up to this today:

042513
Yes. It IS beautiful. For January 25. But . . . today is APRIL 25, 2013. We haven't been without snow here in Central Wisconsin since November. 

Anyway, to make the best of an absurd situation, I preserved this epic sight with my camera. I then created a 12X12 layout in MDS (My Digital Studio) featuring my favorite photos. 

FYI, speaking of the wonderful MDS digital software, Stampin' Up! will have a special on all things MDS STARTING MAY 1. Watch for further details then. 

Smiles.
Linda

April 24, 2013

FLUTTER -- BYE


Bidding a fond farewell: flutter--bye


Stampin' Up! has released their retiring lists!

Click on any of the following links to see what is on each of the lists:


You can shop from any of these pages. 

The retiring stamps will be available for purchase 
until June 3.
The retiring accessories will be available 
until June 3 or as long as supplies last. 
Some of these accessories disappear F A S T ! 
So, if you have your eye on anything, order it right away!

Please note that my butterfly poster was created in MDS (My Digital Studio) using stamp brushes, punches, and Designer Series Paper (DSP). 

Smiles.


April 19, 2013

BLOGGING THE BASICS

I must admit that as I proceeded deeper into the Stampin' Up! online course, The Basics, I enjoyed the projects more and more.

While (re)learning the basics is essential and fun, especially for the novice stamper, as well as for those who need to be reminded of all the cool things you can accomplish with just the basics in materials and knowledge, digging a little more into the possibilities is increasingly challenging and lots more delightful!

By this point in the course, I have taken liberty after liberty in my interpretations of the projects presented. I definitely remain faithful to the techniques and ideas being taught, but I have been making the projects more and more my own.

In other words, I am enjoying myself tremendously!

project 17

This project introduced (to me anyway) a new way of dressing up those already cool embossed pieces you make in the Big Shot. Love the look!

project 18

I so fell in love with the looks of this card, I decided to revamp the complexity of it and had it as one of the four projects my attendees did at the April Stamp-In. Since making this one as part of The Basics course, I have reproduced it several more times. Don't you love the freshness of it??

project 19

This project was so much fun to create! As you can see from the photo in the foreground (one of the instruction pages from The Basics), I made quite a few changes when it came to making mine. Don't you just love the Delicate Doilies Sizzlits in your Big Shot?? Crisp and clean.

project 20

My take on this project features both heat embossing and dry embossing. Two of my very favorite things to do! 

Ah, partaking of this course presented by Stampin' Up! is proving to be great fun and very therapeutic.

Satisfied
Smiles


April 17, 2013

ROSE-Y OUTLOOK

Mother's Day is fast approaching! I'd like to introduce to you a card that would be ideal to give to Mom  or anyone else mom-like in your life. It would also be appropriate for MANY other occasions.

The technique used in creating this beautiful rose has been dubbed Floating Reinkers. You may know it by many other names besides, but I'll explain it to you nonetheless.


The rose is created on Shimmery White paper from Stampin' Up! In the following photo, you can see the sparkles SOMEwhat. 


I think roses look the most lovely using two colors that complement each other, as in this card. However, you can also get a beautiful look using only one color, as here:


It isn't nearly as dramatic, but still beautiful.

While my card is created using the retired Fifth Avenue Floral set, it would be equally lovely with any of these current sets: Pleasant Poppies (page 72); Stippled Blossoms (page 78); Fabulous Florets (page 83); the leaves from Gently Falling (page 86); Mixed Bunch (page 94); Bordering on Romance (page 120); Secret Garden (page 17 in the current "mini"); or Swallowtail (page 18 in the current "mini"). In fact, now that I've got my brain going with some of these suggested sets, I think I'll give this a try once again!

Use your imagination. Your image just needs several compartments in which the reinker can flow. 

If you'd like to try your hand at making someone happy with this simply breathtaking card, here's how you do it:

SUPPLIES
Fifth Avenue Floral stamp set (retired)

So Saffron card stock
Your choice of green card stock
Pink Pirouette card stock
Whisper White card stock
Shimmery White card stock

VersaMark Ink
Reinkers: Choice of pinks and/or yellows

Heat Tool
Embossing Buddy
White Embossing Powder
Big Shot
Little Leaves Sizzlits Die
Top Note Bigz Die
Paper Snips
Sanding Block
Water spritzer bottle
Aqua Painter

INSTRUCTIONS:
Because it takes awhile (10 minutes) for the color to dry on the rose, do this step first:

On a piece of Shimmery White card stock, stamp your image with VersaMark. Cover the image with White Embossing Powder, tapping excess powder back into its container. Heat to emboss.

Drop a few drips of your chosen reinker colors onto a foam plate. Spritz the embossed image evenly with water. It needs to be uniformly wet, preferably with some small puddles. Use an Aqua Painter to pick up a little of one of the reinkers and drop it onto the wet surface. Move it around haphazardly with the Aqua Painter. (If the reinker stays in any one place too long and becomes concentrated, you will have a darker splotch. See the small yellow bit on the bottom petal of the rose in the first photo.) So, move the color around. 

With the Aqua Painter, pick up a little of the second reinker, and repeat. Move the colors around until they are distributed as you like and up to all edges. Set aside to dry completely.

Cut two sets of leaves with the Big Shot using the Little Leaves Sizzlits Die. Also at the Big Shot, cut one Top Note in Whisper White and one in Pink Pirouette. With Paper Snips, trim along the dotted lines of the Whisper White piece. If your end result is a little rough-looking, use a Sanding Block to even the edges.

Adhere the Whisper White to the Pink Pirouette, then to the center of the card front, made from a 5 1/2" x 8 1/2" piece of So Saffron card stock folded in half, and creased well with a bone folder.

If, by this time, your image is completely dry, carefully cut it out. Place the leaves onto the card front and the rose over the top, just to check for placement. If you are satisfied, pick up the image and tape the leaves in place with scotch tape on the backside. Use two Stampin' Dimensionals to adhere the image to the card.


There, now go make someone happy!

Rose-y
Smiles.


April 13, 2013

FAREWELL FINE FRIENDS

I am saddened by the upcoming departure of three Stampin' Up! colors that I thought played so very well together: Not Quite Navy, Riding Hood Red, and More Mustard. Those who attend my monthly workshops especially know how much two of the colors, Not Quite Navy and More Mustard, mean to me. These two darlings played starring roles in many of my projects throughout the years.

To bid these colors a fond farewell, I decided to create a special card and dedicate it to my very dear and faithful friends I added a touch of <my least favorite> River Rock to tone down the seriousness of the tricolor combo. To add just a touch of whimsy.


I wanted the background to be just as lush and important as the central medallion, so I added some deep embossing to the square More Mustard card front. I also thought the main focus could become even more "main" by adding an appropriately pierced Framelit from the Window Framelits Collection in Not Quite Navy.

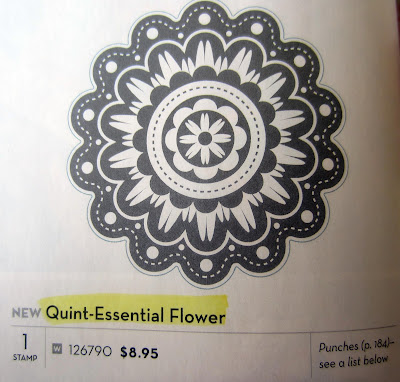
The central flower is made up of layers of just one stamp, Quint-Essential Flower:


Here is a closeup of the popped and stacked Quint-Essential Flower:


A brad in More Mustard sets off the center beautifully. 


Isn't Stampin' Up! smart to make many of our punches and stamps work so well with each other? I love it.

Fond
Farewell
Smiles.


April 11, 2013

STELLA'S HAIR

My husband and I were gifted the past two Sundays in that we were able to see <in person> our little granddaughter, Stella, both days! Usually we just get to see her via Skype on Sundays, but this in-person stuff is great and could get a little addictive.

Stella is such a whirlwind, I have a difficult time capturing her exuberance with my camera. In fact, of the many, many photos I took of her those two days, there is just a tiny handful that would be worth printing out.

However, I did manage to get a somewhat nontraditional image of her this past Sunday. I decided to incorporate it in a scrapbook layout.

I hadn't yet used any of the designer templates that are available for layouts in MDS (My Digital Studio), so I decided to give one of them a try. This is for a 12" x 12" layout, and I made only a few changes.


This turned out to be a fun, quick and easy way to capture a precious memory forever. Once I have it printed by Stampin' Up!'s printing service (which is awesome, by the way), I could easily turn it into a hybrid project by adding various "real" elements, such as buttons, ribbons, die cuts. Those things are all available in MDS, but if you are a real stickler for more "traditional" lumpy scrapbooking, a hybrid page would be a good option.

A cool piece of MDS news is that recently Stampin' Up! reduced the price of the program from its former $79.95 price down to a mere $19.95!! And, if you buy the download, you not only don't pay any shipping, but it arrives in your computer immediately! And you can get right to work -- and FUN!

You can find out more about MDS and purchase it by clicking here. If you have any questions for me regarding this phenomenal product, just drop me a line!

Smiles.

April 9, 2013

THE BASICS AND BEYOND

Here I am -- with the fourth installment of my adventures with the Stampin' Up! online class, The Basics. Have I mentioned that I am having an absolute blast with this course?? I peeked last night, and was sorely disappointed to discover that I only have FOUR MORE PROJECTS to complete. And then I'm FINished!! So sad.

Project 13
May I present to you the project that has taken over the lead for "My Favorite". I ended up doing it a little differently than was described in the project instructions. My first attempt was disAStrous!! It was the first project I nearly gave up on. But, persistence won out, and here is my result. What a cool technique! I will have to use it again because it makes for such a striking card.

Project 14 -- First Attempt
Alright. Confession time. This is the second project I almost gave up on. The technique being taught was the chalkboard technique. My first attempt was pretty much like the directions were given. But completely without success.

Now, be honest. Do any of you ever have problems heat embossing with white on black card stock? C'mon. Be honest! No matter how carefully I use my little Embossing Buddy and then flick off excess powder with a fine paintbrush, I STILL get stray yukky embossed dots everywhere. <insert scream>

I attempted to get good results several times following the project instructions. To no avail.


Project 14 -- My So-Called Success
Finally, I tried it my way. It wasn't so frustrating with excess embossing dots, but I also thought it resembled a chalkboard a little more than in my first example.

Project 14 -- Close-Up of My So-Called Success
Of course, it's not perfect and won't win any awards. Nor will it be seen in broad daylight. But I let it go, chalking it up (no pun intended! OK. I did intend the "chalk" pun.) to experience. It's just not something I will attempt again. I mean, after all, Babe Ruth didn't hit a home run every time either, did he?

OK. Let's move on. Please.

Project 15 -- Horizontal

Project 15 -- Vertical
Now this one I thought turned out bright and cheerful. And like a few others I've posted on Paper Seedlings, it works both ways -- horizontal and vertical. Any personal preference? It was a fun project to do.

Project 16
My final project for today's post is one I changed up quite a bit, of course, due to the lack of all the supplies called for. So, while following the technique being covered, I got a little wild, and I am HAPPY! 

Now, as I proceed through these projects, if you pay attention to the sample pictures in the instruction sheets I show accompanying my own samples, you can see that I am becoming more and more adventurous in my choices and making the projects my own. I can do this while still learning something from the techniques being taught. It is just so much fun to have these parameters in which to work, but then, because you are learning just for YOU, you have the opportunity -- and why waste an opportunity to grow?? -- to work outside the box and make it truly your own.

Such a gift to give yourself. 

If any of you are interested in having so much fun for yourself, the item number for the Stampin' Up! Online Class, The Basics, is 133385. Believe me, you will not regret this purchase one single bit!

Smiles.


April 5, 2013

OH GOODY

Stampin' Up! has announced something so exciting that you won't be able to resist!!

created in MDS


April 6-8 (Saturday through Monday) 
there is FREE SHIPPING on all Stampin' Up! orders!! 
Can you imagine??!! 
(Expedited Ordering excepted)

F R E E   S H I P P I N G ! ! 

For three days only, you don't even have to worry about 
that $6.95 minimum shipping charge!

Just think: NO SHIPPING!! 

SATURDAY
SUNDAY
MONDAY

Take advantage of this limited time offering by placing your order any of these three days and 
don't pay any shipping! 

CLICK HERE and click on SHOP NOW to place your order!

Smiles.

April 3, 2013

ROBIN SPOTTING

Take note of the date today: April 3, 2013.

Normally I see my first robin of the year sometime in the middle of March. It is always such a thrill when that first one is spotted. It means that winter is definitely on the way out. But NOT THIS YEAR!

Well, today, April 3, was my first robin spotting in our area. I had heard that they had been seen in more southerly parts of the State for a few weeks now. But not where I live!

To commemorate this memorable day, I will show you how to make a card spotlighting a ROBIN!

Nature Walk (page 79) is such a beautiful and sophisticated set. I also used it in this card from a January post: http://www.paperseedlings.com/2013/01/caged.html

CAGED

I especially love using this set in subtle shades of blue with creams and Soft Suede, as shown in Caged and this one:


Do you like the lined texture in the background of our robin card? Here is a close-up:


Any idea what the secret of this random, but elegant, background is? I'm sure some of you know, but for others . . . it is 


rubber bands!!

Supplies:
Nature Walk stamp set

Marina Mist card stock
Soft Suede card stock
Whisper White card stock

VersaMark ink
Soft Suede ink
Bashful Blue ink
Marina Mist ink
Pacific Point ink

Heat Tool
Embossing Buddy
Gold Embossing Powder
Gold Brad
Brayer
Piercing Tool
Stampin' Sponge
Stampin' Dimensionals

Instructions:
Fold a 5 1/2" x 8 1/2" piece of Marina Mist card stock in half, creasing well with a bone folder.

Rub the Embossing Buddy well over a 3 7/8" x 4 7/8" piece of Whisper White card stock. 

Randomly wind and twist several rubber bands onto the brayer attachment until you think you have a good solid design. Replace the attachment onto the brayer handle. NOTE:  I used an acrylic attachment on my brayer. However, you can use the rubber attachment. But be sure to clean it off and remove the rubber bands immediately so the tight bands don't make permanent grooves in your rubber.

WARNING: USE A GENTLE TOUCH WITH THE NEXT PORTION OF THE PROJECT! 

GENTLY run the brayer several times through the VersaMark ink. Run it up one side of the card stock. Repeat until the lines fill the card going all in that direction. Dump Gold Embossing Powder over the VersaMark squiggles. Tap excess powder back into its container. Heat with the Heat Tool until all the lines are shiny gold. 

Turn the card and repeat this same process going the other direction. You should now have a "plaid" look.

Starting with the Bashful Blue, sponge ink here and there over the gold lines. Continue doing the same thing with the Marina Mist ink, then with the Pacific Point. Be GENTLE with the Pacific Point. It is a very powerful color and you don't want it to overwhelm your piece.

Finish the background by sponging all the edges with Soft Suede, then softening it with a little Soft Suede sponged here and there over the blues.

Adhere this piece to a 4" x 5 1/4" piece of Soft Suede card stock, then to the card front.

Stamp the robin in Soft Suede ink on a 2" x 3" piece of Whisper White paper. Sponge all the edges with Soft Suede.

Use the Paper Piercer to pierce a corner of holes about 1/4" from the bottom and left side. Also pierce a hole to insert a gold brad. Adhere this to a 2 1/4" x 3 1/4" piece of Soft Suede card stock, then to the card front with a Stampin' Dimensional in each corner and one in the center.

If desired, stamp a sentiment of choice inside the card in Soft Suede ink.

Please consider ordering your Stampin' Up! supplies naming me as your Demonstrator if you enjoy my tutorials!

Spring
Smiles.


April 2, 2013

BASICALLY IT'S LIKE THIS

And, it's back to The Basics!

Have I mentioned how much fun I am having with the Stampin' Up! online class, The Basics? Oh yeah, I think I have mentioned it. There is just something so wonderful about having my homework to look forward to doing at the end of a long, hectic day.

This next batch of four projects continues with learning the ins an outs of using the trusty Stamp-a-ma-jig in the first three, then moving onto a new technique in the fourth.

Project 9
This particular project called for the Natural Composition Specialty paper found on page 162. I, however, do not have that paper, so guess what!? I made my own! Of course, it doesn't look like the DSP, but it was close enough that it substituted nicely in this project. 

And then, I also do not have the Field Flowers set called for in the project supplies. So I dug out an old set featuring a lilac branch that allowed me to do the technique perfectly.

Project 10
Next up is what I consider my favorite creation from this online class thus far. Looking lots different from the class sample, I am very HAPPY with the results. Lacking the called-for supplies, well, you know . . . 

Being able -- and willing -- to substitute is part of the beauty of this online class. You still work through the "problem" of the technique assigned, but you don't need to buy a whole lot of supplies, simply using what you already have and being a little creative. Very satisfying indeed. And, besides that, I am able to resurrect some of my retired supplies that still have a little place in my heart, but I haven't used in awhile.

Project 11
If you're a regular reader of Paper Seedlings, you have already been introduced to this little "poor thing". I asked you in this post http://www.paperseedlings.com/2013/03/can-this-poor-thing-be-saved.html if you thought it could be saved. 

I struggled with this assignment so terribly, and I am still not happy with my results. 

Project 12
After we finished the Stamp-a-ma-jig lesson, we moved on to a technique I usually thoroughly enjoy, but <too> often forget about. It was really nice to have this little reminder chapter on what all you can do with masking. 

Unfortunately, once again I was lacking the Tea Lace Paper Doilies called for, so I made my own doily using the Paper Doily Sizzlits L in my Big Shot. I, of course, also switched up a few other elements, and was happy with my own creation.

Each day as I finish my homework, I am sorely tempted to sneak on to the next lesson. But, I manage to control myself. After all, I vowed to do merely one project each day so the online class lasts me 34 days.

I LOVE IT!

Smiles.