April 29, 2023

PAINTED BIRDS NEST

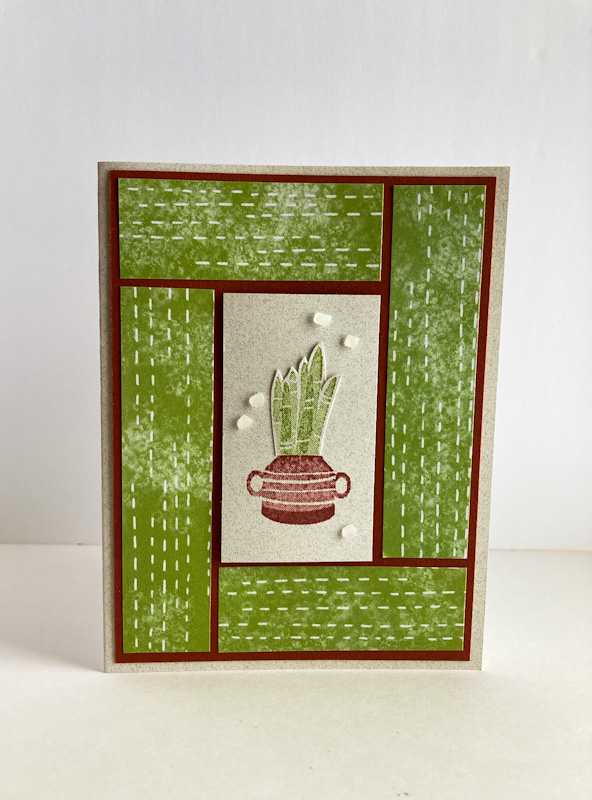
I have a serious confession to make. This is not a current card, nor does it use current product for the most part. In fact, I created this delicate card TEN years ago. I came across it recently, and, to me, it just has this timeless charm. And, especially being that this is nesting season here in Wiesconsin, I thought I'd share it with you today. 

You can make this card using any of a plethora of outline stamps in the new catalog. It doesn't necessarily need to be a birds nest. Any stamp that you can color in would work admirably.


With the exception of the dimension from the embossing and a couple 
Stampin' Dimensionals, this card is fairly flat.


The photo below shows a closeup of the "painting" I did on the nest and eggs.

I think one of the reasons that this particular image and the soft rendering of it reminds me of one of my favorite illustrators, Dutch artist, Marjolein Bastin. If you click on this link and check out her work, you will see what I mean. She was (is?) a Hallmark artist. 


As I said previously, virtually none of the supplies I used in the card are still alive, as in current. With a few exceptions. But, there are so many ways you could get the same look by using current products. Or, if, like me, you still possess these items, yay for you! You're on your way.

Here is a tutorial on how to create this card.

SUPPLIES:
White cardstock
Marina Mist cardstock
Crumb Cake cardstock
Vellum cardstock

Nature's Nest stamp set

Crumb Cake ink
Marina Mist ink
Soft Suede ink
Black StazOn ink

Die cutting/embossing machine
Woodgrain embossing folder
Circle Collection Framelits
Xyron adhesive (or whatever you use with vellum)
Stampin' Dimensionals
Aqua Painters
Blending Brushes

INSTRUCTIONS:
Fold a 4" x 8 1/2" piece of Crumb Cake cardstock in half, creasing it well with a bone folder.

Rum a 3 1/2" x 5" piece of white cardstock through your embossing machine inside the Woodgrain Embossing Folder. Adhere this piece to the card front. 

On a circle of Vellum Cardstock, stamp the nest (or your chosen image) in Black StazOn ink. Wait to do any painting until this ink is completely dry.

To paint the eggs and nest: With an Aqua Painter dipped in the Crumb Cake ink pad, paint the entire nest and leaves in that color for a base. Add darker details with Soft Suede ink. On vellum, the color builds up slowly. So you will have to build it up to your satisfaction in layers, letting each layer completely dry before adding more color. Your patience will pay off! Give the eggs a coat of Marina Mist, leaving the spots on the eggs white. Gradually build up the intensity of the blue in select areas of shadow with layers of more color. Repeat with the spots in Soft Suede. Let this dry completely.

Run the vellum circle through the Xyron machine to put adhesive on the back side of it. Adhere the vellum to a same size white circle. Sponge the edges with Marina Mist ink. Adhere this piece to the larger Marina Mist circle you cut with the next larger die with four Stampin' Dimensionals.

Attach the finished circle to the card front with Green Glue.


^^^^^^^^^^^^^^^^^^^^^^^^^^^

God gives every bird its food,, 
but He does not throw it into its nest.
- J.G. Holland -

^^^^^^^^^^^^^^^^
Painted
Smiles.


April 25, 2023

CHINESE LANTERNS

There are times that you have to  take some liberties on artwork. This stamp called for just that. I found the image very appealing, but was completely unsure what this plant material was. 

So I took some liberties. I designated it a Chinese lantern and went from there.


I stamped the image in Memento Tuxedo Black ink and colored it in with Stampin' Blends.. The Blends I used were SU 900, Light Calypso Coral, Light and Dark Granny Apple Green and Light and Dark Pumpkin Pie.

Once my "Chinese Lanterns" were colored, I fussy cut the image, leaving a generous white margin around it since so many of the stamped portions were wispy.


I found a leftover piece of Designer Series Paper that coordinated really well with my littls plant. A tied loopy bow of Linen Thread atop the fussy cut piece gave it that finishing touch.


I really love the sentiment from the Wildflower Path stamp set to add to the bottom. It would be appropriate for so many occasions.

Have you ever come across a stamp that you love, but you don't have any idea what it actually is -- so you have to use your imagination and make it your own?


In case you don't know what Chinese Lanterns look like: 


^^^^^^^^^^^^^^^^^^^^^^^^^^^^^^^^^^
Without leaps of imagination, or dreaming, 
we lose the excitement of possibilities. 
Dreaming, after all, is a form of planning.
 - Gloria Steinem -


^^^^^^^^^^^^^^^^^^^^^^^^^^

Imaginary
Smiles.


April 22, 2023

KISSED CACTUS

There are ever so many wonderful old stamping techniques out there that I, as well as lots of others I'm sure, tend to forget about. But they are so good that we just have to do our best to keep them alive and thriving.

One of those techniques is that of "kissing". I know it sounds really romantic, but it's really not. It's just a great way to add some wonderful texture to a stamped image that might otherwise have little to no personality.

In my card today, that's how I did the pot in which the cactus grows.


The pot would otherwise have been just a plain solid stamped pot. But, a little kissing added lots of unexpected personality to it.

You can see in the images below  how different each of the pots are. That's part of the beauty of kissing, the unpredictability.

To do kissing, ink up a solid stamp with a color that you want your base color to be. Take a dry -- uninked -- stamp with some line work, as you can see in the rubber stamp in the lower right of the photo. Place the uninked stamp onto the base inked stamp and give it a little twist. Not too much. Too much twisting can remove more of the detail than you'd like.Then lift the uninked stamp straight up. And your pot is finished!! The kissing is complete.


Once my pot was kissed, I fussy cut it and glued it to a piece of cardstock that I was going to use as my focal point. Next step was to plant the cactus inside the pot.


Other than the layers of cardstock, this is basically a one-layer card, not much dimension at all, except for the cactus layer popped up with Stampin' Dimensionals on the DSP layer.


Here's a tutorial on how to make a card similar to this one.

SUPPLIES:
White cardstock
Soft Succulent cardstock
Recycled light-colored cardstock
Designer Series Paper

Forever Fern stamp set (retiring)
Cactus Cuties stamp set (retired)

Melon Mambo ink
Soft Succulent ink
Gray Granite ink

Die Cutting/Embossing Machine
Deckled Recctangle Dies (page 163 in the new Annual Catalog)
Stampin' Dimensionals

INSTRUCTIONS:
Fold a 5 1/2" x 8 1/2" piece of white cardstock in half, creasing it well with a bone folder.

To this card base, add a 4" x 5 1/4" piece of Designer Series Paper that will coordinate with the rest of the card elements.

Set this aside for now while we work on the focal point area.

Using the Deckled Rectangle Dies, die cut from Soft Succulent cardstock a 3" x 4 1/4" rectangle, and from a light-colored neutral cardstock, using the same dies, cut a 2 5/8" x 4" rectangle. Adhere these two together.

On white cardsdtock, in Soft Suffuculent ink, stamp the two pieces of the lined cactus. In Melon Mango ink, stamp the flower. Fussy cut these components, leaving a fine white margin.

On white cardstock, you will be stamping your pot using the kissing technique. Ink up the pot image with Gray Granite ink. Take a clean stamp with lines of interest on it (I used a flower stamp) and place the stamp to the inked pot and give it a quick twist. Stamp the kissed stamp onto white cardstock. This will provide an interesting textured look to the pot. Fussy cut the pot.

On the layered rectangles, lay out your pot and cactus, and, once satisfied, glue the cactus in place and add the pot with a couple Stampin' Dimensionals.

Adhere this completed focal point to the card.


^^^^^^^^^^^^^^^^^^^^^^^^

Close your eyes and I’ll kiss you, 
Tomorrow I’ll miss you.
Paul McCartney -


^^^^^^^^^^^^^^^^^^^^^

Kissed
Smiles.


April 18, 2023

BUTTERFLY SILHOUETTE

This is one of those cards  that looks so much better in real life than it does in the photos. The stunning combination of an embossed gold metallic piece, flecks of gold in the ribbon, the shiny gold pearl and the beautiful teal color of Just Jade is very nice to look at.

The sort of abstract silhouette of a butterfly in flight adds to the prettiness of the card.


Tilting the photo gives a better impression of the gold and the embossiing:


Unfortunately the cool stamp set, Amaziing Silhouettes will be retiring with the end of this Annual Catalog. However, I am happy to report that the beautiful embossing folder that I used on the gold metallic cardstock, Elegant Eucalyptus, is sticking around. Yay!


SUPPLIES:
White cardstock
Just Jade cardstock (retired)
Gold Foil Cardstock

Just Jade ink (retired)

Amazing Silhouettes stamp set (retiring)

Die Cutting/Embossing Machine
Layering Circles dies
Elegant Eucalyptus Embossing Folder (page 168 in the upcoming Annual Catalog)
Just Jade trim with gold flecks
Gold Pearl (page 140 in the upcoming Annual Catalog)

DIRECTIONS:
Fold a 5 1/2" x 8 1/2" piece of white cardstock in half, creasing it well with a bone folder.

Cut a piece of white cardstock to 4" x 5 1/4". Add a 3 1/4" x 4" piece of retired Just Jade cardstock to the top of this white layer.

Cut a 2 1/4" x 4" piece of Gold Foiled Paper. Emboss it with the Elegant Eucalyptus Embossing Folder.

Adhere the embossed piece to the bottom of the white layer. This will probably overlap the Just Jade a bit. Don't worry. The ribbon will cover it.

Take a length of Just Jade trim with gold flecks in it. Cover where the two papers meet, and tape the ends on the back.

Adhere this completed layer to the white card base.

On a 3" x 3" piece of white cardstock, stamp the butterfly silhouette in Just Jade ink. Die cut this into a circle that measures 2 5/8" in diameter.

From the Gold Foil Cardstock, die cut a scalloped edge circle that measures 2 3/4" in diameter. Adhere the butterfly circle to this.

Add a gold pearl to the top of the butterfly's head.

Attach this to the card front wih Stampin' Dimensionals a little raised from the ribbon.


^^^^^^^^^^^^^^^^^^^^^^
Butterflies are nature’s angels. 
They remind us what a gift it is to be alive.
- Robyn Nola -


^^^^^^^^^^^^^^^^^^^^^^^^^^^

Butterfly
Smiles.


April 15, 2023

CHEAP TISSUE AND FAUX SILK

After the Christmas Holidays were over and I was going through gifts, I discovered in one box something that SHOULD have by all rights be tossed directly into the garbage. But, just as I was about to release it from my hand, I thought twice about it. The object in question was a ratty cheap piece of white tissue paper. You know the awful stuff that comes in products from China? As I said, it should have been tossed in the garbage. Without hesitation.

But, then I wondered how it would work in the Faux Silk technique. Hmm. I'd used lots of different tissues in this technique, but nothing quite as awful as this pitiful thing. 

So I decided to give it a chance. And I did. 


Using inks in Flirty Flamingo, Coastal Cabana and Granny Apple Green, I stamped the various flower shapes from the Wildflower Path stamps set randomly across this cheapo tissue paper.

I knew I wanted to place it onto a 4" x 5 1/4" piece of white cardstock, so I made my stamped area a little larger than that size.


After I finished all my stamping, I crumpled the piece of tissue paper in my hands several times, almost flattening it each time.


Once I crumpled it 4-5 times, I flattened it, but NOT COMPLETELY. You need lots of mountains and valleys to provide the interesting texture this technique yields.


I cut a piece of white cardstock to 4" x 5 1/4" and used a glue stick to completely cover one side of the paper with glue --- edge to edge and corner to corner. This is essential in order to achieve maximum results.

After the cardstock was all gluey, I carefully laid my crumpled tissue paper onto the glued surface. 

Without pulling the tissue taut, I simply gently pressed it in place over the glue. It is so important to just press, not pull or flatten.


Once everything was carefully glued in place and none of the edges or corners were lifting away from the cardstock, I trimmed off the edges of the tissue against the cardstock.


As happens so often when I'm creating, the background ends up being the most important part of a card. So as not to cover up just too much of this importance, I made the rest of the card quite simple.


I stamped a simple heartfelt sentiment from the Eden's Garden stamp set in Flirty Flamingo ink and die cut it into a tag. 

A diagonally cut 1/2" strip of Coastal Cabana cardstock that measures 4" long, topped by a snippet of ribbon and attached to the back of the sentiment tag, then popped up with Stampin' Dimensionals, complemented my background so well.

I added a trio of Pool Party gems (one of which migrated off to the upper right, which I didn't realize before I took the photos). 


The final touch was to add this all to a Granny Apple Green cardstock base.

Now, be honest. Would you have thrown away this poor defenseless little piece of papery garbage?


^^^^^^^^^^^^^^^^^^^^^^^^^
If you look the right way, 
you can see that the whole world is a garden.
- Frances Hodgson Burnett -


^^^^^^^^^^^^^^^^^^^^^^^^

Cheap
Smiles.


April 11, 2023

ROCKY PLANT

I really love to use Designer Series Paper in various ways when creating my cards. This card shows one more way that DSP can shine.


The only embellishment on this simple card are the little faux sea glass pieces around the plant.


The plant was stamped, fussy cut, and planted in its pot.


SUPPLIES:
Neutral cardstock
Cajun Craze cardstock
Celebrate Everything Designer Series Paper

Plentiful Plants stamp set

Cajun Craze ink
Granny Apple Green ink

Stampin' Dimensionals
Paper Snips
Faux Sea Glass Shapes

DIRECTIONS:
Fold a 5 1/2" x 8 1/2" piece of light neutral cardstock in half, creasing it well with a bone folder.

Add a 4" x 5 1/4" piece of Cajun Craze cardstock to this card base.

Cut a 1 5/8" x 2 7/8" piece of the light-colored neutral cardstock. About 1/2" from the bottom of this piece, stamp the rounded pot in Cajun Craze ink. On a separate scrap of the same paper, stamp the plant in Granny Apple Green ink. Fussy cut the plant, leaving a small margin, except at the bottom so it can rest nicely atop the pot. Adhere the plant in place.

From Designer Series Paper, cut two strips that measure 1" x 4" and two that measure 1" x 2 3/4". Using the sample card as your guide, add these strips around the edge of the Cajun Craze piece, keeping the pieces as evenly spaced as possible.

Add the plant piece to the center with Stampin' Dimensionals. It should fit just right.

Add five of the Faux Sea Glass Shapes around the plant.


^^^^^^^^^^^^^^^^^^^^^^^^^^^
Like people, plants respond to extra attention.

- H. Peter Loewer -


^^^^^^^^^^^^^^^^^^^^

Growing
Smiles.


April 8, 2023

GLITTER WINGED BUTTERFLY

Even though pretty much of everything used in this card is retired, since we finally have some springlike weather coming up in our forecast, and that means that butterflies will be around in a bit, I thought I would share a tutorial on how to make this happy sparkly butterfly card.

I really like the way the whole card is built upon layers of circles, right down to the shape of the card itself. 


Don't you just LOVE the sparkly butterfly wings!?


Read on to find out how to make a sparkly winged butterfly for yourself!

SUPPLIES:
Pear Pizzazz cardstock
White cardstock
Black cardstock
Designer Series Paper that will coordinate with the color of your butterfly

Die cutting/embossing machine
Butterfly thinlits
Layering Circles dies (page 172, Annual Catalog)
Packing Tape
Glitter of your choice
Metallic gold thread
Fluttering embossing folder
Silicone Craft Sheet (page 127, Annual Catalog)

DIRECTIONS:
Fold a 5" x 10" piece of Pear Pizzazz cardstock in half, creasing it well with a bone folder.

Using the large scalloped circle die, you will be cutting your card base. Lay the folded edge close to one of the edges of the die, moving it just a smidge into the die, so that the top three or so scallops will not be cut. This will form the hinge on your card.

Run this folded card base through your embossing machine inside the Fluttering embossing folder, keeping the card folded. This way, the embossed butterflies will show up on every portion of the card.

Using the circles dies, cut two white circles just a bit smaller than the card base, one black circle, in the next smaller size; and a smaller circle out of Designer Series Paper. All of these circles can be adhered to the card base at any time. Oh, the second white circle goes inside the card; writing on embossing is not fun.

From black cardstock, use the butterfly die to cur a butterfly.

Lay the butterfly upside down on top of the silicone mat. Attach packing tape to the back of the butterfly. One strip doesn't quite fit the butterfly; you will have to add a bit extra. This won't matter because it won't show.

Carefully cut the tape off, following as closely as possible the edges of the butterfly. If done properly,, the only sticky portions will be within the butterfly itself.

Lay the butterfly, sticky side up, on a piece of folded up paper. Choose your favorite color of glitter and sprinkle the glitter over the butterfly. Press the glitter well into the packing tape. Yes, you will get glittery, but there is water in the bathroom. Tap the excess glitter back onto the folded sheet of paper, then funnel it back into its container. Close the container. Have you ever spilled glitter? Eeeeuuuw.

Put a bit of adhesive on the back of the butterfly, and loop the gold cord back and forth three times so the loops extend beyond the butterfly, catching the cord on the tape with each pass. 

With one Stampin' Dimensionals, attach the butterfly to the DSP circle, gently lifting the wings into a "ready to take off: position.


^^^^^^^^^^^^^^^^^^^^^^^^^^^^^
Butterflies are self-propelled flowers.
- Robert A. Heinlein -


^^^^^^^^^^^^^^^^^^^^^^^^^^^^^

Glittery
Smiles.


April 4, 2023

STAMPED DEER IN A CLEARING

Awhile ago I shared a card on my blog featuring a diecut deer in a clearing. It was a white-on-white card. Completely diecut.

I truly loved that card, but this time I wanted to try the components of the same bundle in a card, but this time, both the stamps as well as the dies.


The white-on-white completely diecut card I shared with you previously:


This latest card is very labor intensive. I started out by stamping part of the scene in a neutral color.

Since I needed to do some masking, I stamped the deer image one more time with a temporary adhesive on the back of the paper I'd stamped it on. I then fussy cut this piece, being careful to cut a little bit INSIDE the inked portion. 


If you cut right on the inked line, you get too much of a halo effect around the masked image. I got some of that anyway, but it was fixable.


After fussy cutting my deer mask, I laid it right on top of the deer I had originally stamped. I then stamped the next set of trees, with the stamping going right over the deer. 


By having the mask in place, I didn't get trees going over the stamped deer. In using the mask, once it was removed, it appeared that the deer was standing in front of the trees.


You can see in the previous photo that I have a bit of halo around the deer, where there is no ink. I was able to fix that with a Stampin' Write Marker in the same shade, by drawing in the missing portions.


After the stamping was all finished, I die cut the tree foreground. Placing it in front of the stamping, the deer was fairly lost among the trees. While this is perhaps realistic in spotting a deer in a wooded setting, I didn't want it for my card.

You can see in the photo below that I'd added lines on the trees/branches that I thought should be eliminated so the deer can be more out in the open.


The next photo shows how much of the diecut trees I'd carefully cut away.


I put Stampin' Dimensionals in strategic places on the back of the diecut piece.


The next photo shows how the setting turned out after some pruning of the trees. 


And a closeup:


The card took a lot of time, patience and precision. But I am quite happy with the final result.


^^^^^^^^^^^^^^^^^^^^^^^
How can a deer tell when a leaf falls silent in the forest? 
She hears it breathing differently.
- Richard Bach -

^^^^^^^^^^^^^^^^^^^^^^^^^

Deer
Smiles.