April 30, 2022

SPOTLIGHTED THANKS

 Are you familiar with the Spotlighting Technique? Often in doing this technique, you stamp a larger image in black, then stamp a portion of it again in black. Leaving the main image in black only, you color in the smaller portion. After the coloring is completed, the creator uses a punch or a die to cut out only the colored portion, usually in a circle or square. A narrow border in the same shape is often added. 

Awhile back I'd stamped a group of Christmas-y characters, coloring in only part the Santa, which appeared in the approximate center of the image. By adding the colored Santa over the black and white Santa, it gives that portion of the image more focus and importance. You can see this card here

While I didn't do exactly that with this card, the effect is the same.


I had some gorgeous black and white floral Designer Series Paper that worked very well for this technique. Rather than piecing the colored portion back on top of its identical component, I merely colored in a random section of the DSP, die cutting it and matting it with a scalloped white circle. I then popped it up with a couple Dimensionals so it was evenly spaced at the top and sides of the black and white piece.


A closeup of the coloring:


I finished the card with the beautiful two-layered "thanks" die cut and added to the bottom.


Do you want to discover how to do this take on the Spotlighting Technique? Read on for a tutorial!

SUPPLIES:
White cardstock
Black cardstock
Black and White Designer Series Paper (There is a perfect DSP in the new Annual Catalog, Perfectly Penciled, on page 133!)

Stampin' Blends (I used Dark Pineapple Punch, Light Granny Apple Green, Dark Pale Papaya, Light Flirty Flamingo and Light Cinnamon Cider)

Die Cutting/Embossing Machine
Amazing Thanks Dies (page 169, new Annual Catalog)
Layering Circles Dies (page 172, new Annual Catalog)
Stampin' Dimensionals

INSTRUCTIONS:
Fold a 5 1/2" x 8 1/2" piece of white cardstock in half, creasing it well with a bone folder.

To this card base, add a 4" x 5 1/4" piece of black cardstock.

To this, adhere a 3 3/4" x 5" piece of black and white Designer Series Paper.

Use one of the circle dies from the Layering Circles that measures 1 5/8" and cut out a portion of the black and white DSP. Color this small circle any way you want, using bright stand-out colors. I used my Stampin' Blends. (See above for the colors I used.)

Using the same dies, cut a scalloped circle a little larger than the colored circle from white cardstock.

With the scalloped circle as a frame, adhere the circles together. Pop the completed piece to the card with a Stampin' Dimensional, leaving even spacing at the top and the sides.

Using the Amazing Thanks Dies, cut the detailed "thanks" from white cardstock, and its shadow from black cardstock. Carefully adhere these two "thanks" together.

Adhere the sentiment to the lower portion of the card.


Spotlighted
Smiles.


April 26, 2022

RECYCLED STARBURST

I just love to use surprising materials in my cards. Especially those things that would normally be thrown in the garbage by any other normal human.

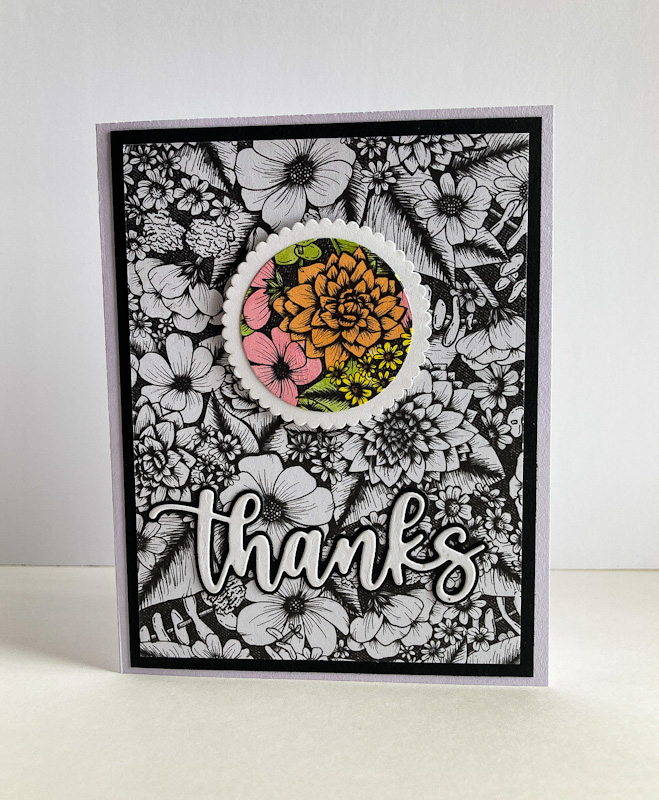
Do you recognized the "Designer Series Paper" I used in the starburst for my card?


I'm sure you guessed, but, just in case you didn't, I used cut up kleenex boxes. Yessss! The prints on these throwaway boxes are so attractive, I just cannot bring myself to throw them away. Anyone else like me out there?

Well, my stash of broken down kleenex boxes was growing, so I thought I should really do something with at least a few of them.

After digging through them, I arrived at an assortment of prints/colors that seemed like they would play well together.


After I had cut them into various widths with pointed ends, I cut a piece of scrap cardstock to 4" x 5 1/4". 

Starting with the central piece, I worked first towards the top, and once I finished that, I worked the bottom half, butting the pieces up to each other.

You can see in the photo below that, where they all met in the center, it was sort of messy and uneven looking. That was OK, because I knew I was going to cover it all up with my sentiment piece.


The next photo shows the scrap cardstock with the glued pieces in place upside down. Notice how they all hang haphazardly beyond the edges of the base cardstock. 


Using sharp scissors and being very careful, I trimmed the kleenex box pieces close to the base cardstock.

You can see in the photo below, flipped right side up, how much improved it all looks.

Now I was ready to proceed with my card.


I discovered that Coastal Cabana cardstock and ink coordinate well with the colors in the boxes.

Unfortunately, the stamps I used for my sentiment piece will be retiring in about a week. <sob>

On a piece of white cardstock, I stamped the watercolored look blob from Textures & Frames. Atop that, in black ink, I stamped the sentiment from the Season's Blessings set.


Two of the Layering Circles dies came in handy, one to die cut the sentiment itself. Then another to die cut a little larger cute scalloped circle from Coastal Cabana cardstock.

To finish off this piece, I added a trio of Matte Black Dots.

With Stampin' Dimensionals, I added the circle over the messy looking central area.


Attached to a white card base, I had a cute -- recycled -- card that I felt good about. 


Now, tell us, and be honest, have you ever used portions of kleenex boxes in a card? Any other crafting project? Do you ever save anything that others would consider garbage for use in a <possible> future project? What? Please share with us!

Recycled
Smiles.


April 23, 2022

THOUGHTS WITH YOU

I love the combination of red, black and white on a card. It's so traditional and striking, I don't think you can possibly go wrong.


To make this card was a bit time consuming, although it looks shockingly simple. You see, each of the stems had to be stamped individually, and turned with each stamp. Thus, it was eight lines of stamping. Then to come in with the individual red flowers. The challenge came in trying to keep the stems evenly spaced. 


I must admit that another huge retirement regret is the loss of the Ornate Frames dies, one of which is shown in red below, as well as the white piece on which the actual sentiment is stamped.. I could honestly just cry every time I think about those dies not be current anymore. I am warning you though that I will be using them forever and forever,, retired or not. If you don't have this die set, it is truly a must have. Quickly grab it before its retirement. Seriously 


This card is completely flat -- so would be a dream to send through the mail -- in that even the sentiment is adhered flat to the card.


Following is a quick tutorial on how this card was made. Enjoy!

SUPPLIES:
White cardstock
Black cardstock
Real Red cardstock

Black ink
Real Red ink

Wildflower Path (Page 106, new Annual Catalog)
Prized Peony (on the retirement list!)

Die Cutting/Embossing Machine
Ornate Frames dies (retiring. sob)

DIRECTIONS:
Fold a 5 1/2" x 8 1/2" piece of white cardstock in half, creasing it well with a bone folder.

To this card base, add a layer of black cardstock that measures 4" x 5 1/4".

Then comes a Real Red layer of cardstock that measures 3 3/4" x 5".

You will be doing the majority of work on a piece of white cardstock that measures 3 3/8" x 4 5/8". Equally distanced, stamp in black ink the branches down the entire piece, flipping the stamp each time.

In Real Red ink, add flowers to the branches.

Adhere this stamped piece to the card.

On white cardstock, stamp a sentiment in black ink. Using the appropriate frame from Ornate Frames dies, die cut the sentiment.

From Real Red cardstock, die cut one of the curly frames.

Adhere the sentiment piece to this.

Attach the completed sentiment to the front of the card, raised somewhat from center.


Thoughtful
Smiles.


April 19, 2022

DUCKY GREETINGS

I realize that the sentiment on this card reads "Happy Easter," but don't you think this card would also be darling for a new baby or a youngster's birthday?

When I spotted Easter Friends in the mini catalog (page 27), I immediately fell in love with these cuddly critters.


The dimension in this card comes from a handful of Stampin' Dimensionals. They pop up the cute swirly circle on which the duck rests, as well as the ducky himself. His baker's twine bow adds a little interest too.


I thought the beautiful spring-y floral of the Daffodil Afternoon Designer Series Paper I got during Sale-A-Bration added just the right touch of whimsy/realism.


I did have a difficult time stamping this duck image. I couldn't get enough detail no matter what combination I tried. I ended up adding a bit of detail with a black Fineliner pen.


If you would like to make a card like this for an occasion other than Easter, here is how to do it:

SUPPLIES:
White cardstock
So Saffron cardstock
Daffodil Afternoon Designer Series Paper

Gray Granite ink
Black ink

Stampin' Blends in Dark So Saffron and Light Pumpkin Pie

Easter Friends stamp set (page 27, Mini Catalog)

Die Cutting/Embossing Machine
Lakeside Framelits dies (retired)
Painted Labels dies (page 172, new Annual Catalog)
Iridescent Rhinestones (page 9, Mini Catalog)
Pink/White baker's twine
Stampin' Dimensionals
Thin black marker
Paper Snips

DIRECTIONS:
Fold a 5 1/2" x 8 1/2" piece of white cardstock in half, creasing it well with a bone folder.

To this add a piece of So Saffron cardstock that measures 4" x 5 1/4".

Add a 3 3/4" x 5" piece of the DSP.

From white cardstock, die cut a squiggly frame using one of the dies from the Painted Labels Dies. Set this aside for now.

On white cardstock, stamp the duck in Gray Granite ink. Color in the duck with So Saffron and Pumpkin Pie Stampin' Blends.

Because the features of the duck don't show up terribly well, use a fine tipped black pen to add in a few lines here and there, especially on his eyes and bill.

Tie a pink and white piece of baker's twine into a small bow and adhere it to the duck's neck.

With Stampin' Dimensionals, add the duck to the squiggly frame. Add this to the card front, keeping even margins at the top and sides.

On white cardstock, stamp the sentiment in black ink. Using the label die from the Lakeside Framelits dies, die cut the label.

With Stampin' Dimensionals, add the sentiment towards the bottom of the card.

Add an Iridescent Rhinestone on each side of the sentiment.


Ducky
Smiles.


April 16, 2022

HOPEFUL DAFFODILS

Middle of April. Day before Easter. Spring is almost a month old. Still snow on the ground here and there. The high for tomorrow, Easter Sunday, 44 degrees. 

WHERE ARE THE DAFFODILS?

Well, I guess I'll just have to create my own:


Digging through retired stamp sets the other day, looking for something specific, I came across this bright and fresh looking daffodil image. It is from the set You're Inspiring.

Wishing to bring at least the feel of spring into my life, I stamped it in Memento Tuxedo Black Ink and went to town coloring it in with my Stampin' Blends. I used Light and Dark Granny Apple Green, Dark DAFFODIL Delight, Dark Pale Papaya and Light Pumpkin Pie.


After I finished with my coloring, I die cut the image with one of the Stitched Rectangles dies. I also die cut a scalloped frame from Granny Apple Green cardstock using one of the Scalloped Contours dies. I cut that frame a little bigger than it needed to be for the size of the daffodil piece. I popped the daffodils up with Stampin' Dimensionals.

The finishing touches were little circle clusters from the stamp set in Daffodil Delight. And then I added a few yellow pearls I'd had left from a past Paper Pumpkin kit. 


Sitting near my computer I feel that spring is SOMEwhere, even if it's not exactly HERE. Maybe before it's summer?

Wishing you a safe and blessed Easter.

Spring-y

Smiles.


April 12, 2022

BUNNY AND EGGS

While scrounging through my kitchen drawer the other day, I came across something I'd completely forgotten that I had. It was a package of treat bags with Easter eggs on them. The eggs were so cute, I decided there and then to use the bags somehow on my Easter cards this year. 


The cute treat bags:


After deciding to use them, the next question was: BUT HOW?? Working with a cellophane bag is just like working with anything clear in that adhesive shows through. Think working with vellum. Yuk.

My first thought was to wrap the cellophane around the edges of a base piece of white cardstock. Making multiples of the card though, I couldn't imagine how much of a challenge that would be. And to try to miter those slippery corners. Nope, I decided that wasn't the way I should go.

I cut a piece of white cardstock to 3 1/2" x 4 3/4". I put a thin strip of dry adhesive along the edges, just enough adhesive to make the cello stick in place. Once that was accomplished, I thought I could trim the excess with my guillotine paper cutter, but that wasn't going to do a neat enough job. So I hand trimmed all the edges with a pair of scissors. 

The photo below shows one completely trimmed 
and another with only one side left to trim away.


I had decided to cover the adhesive with a "frame", and used two dies to accomplish this. The largest of the Scalloped Contours dies was the first step,, cut from white cardstock. I then inserted the proper size of the Stitched Rectangles dies inside the scalloped portion and cut out the inside. That gave me a beautiful white scalloped from.

Since my base cardstock was cut to the dimensions I've mentioned, it was fairly easy to fit the frame cleanly over the egg pieces. You see, the base measurers the same as the squared off portions of the scalloped frame. 

The photo below shows how neatly this worked out. 
The shiny plastic was tricky to work with. 
I just needed to be extra careful.


The star of the card was to be the sad-looking bunny from the Easter Friends stamp set in the Mini Catalog. I chose to stamp him in Melon Mambo because it was a pretty close match to the pink in one of the eggs on the treat bag.

After fussy cutting the bunny, I used a couple Stampin' Dimensionals to mount him atop the egg-y background. I tied a cute yellow bow and added it to the bunny with a Glue Dot.


In the next photo, I tilted the card towards the sun 
so you can see the glare on the plastic.


The only thing left to do was to mount all my work onto a yellow card base. 


I know Easter is actually a religious occasion. I, however, chose to use something funky and fun to express my greetings. 

Easter
Smiles.


April 9, 2022

FOILED BUTTERFLY

Have you ever dry embossed on foiled cardstock? No? If not, give it a try, and you will be in for a delicious surprise. The results are extraordinary.

The background of this card was done in just this way. 


I had some pink foiled cardstock, retired from Stampin' Up!, and I thought I would give it a try, confident that the results would be pretty. I used the Gingham Embossing Folder on it. The embossing is so deep and true. Lush even.


Not wanting to cover up just too much of this loveliness, I decided on a simple strip for my focal point. 

Upon this strip, which is based with a silver/white ribbon (from a past Sale-A-Bration), I added a simple sentiment and die cut it with a die from the retired Lakeside Framelits and embellished with a single Basic Rhinestone.

The butterfly was stamped with the Butterfly Brilliance stamp set (page 116 in the new upcoming Annual Catalog), and cut out with the matching dies, Brilliant Wings (on page 169 in the new catalog). A single Basic Rhinestone serves as the head of the butterfly.


Set off with a border of black cardstock and applied to a white card base, this gives a very satisfying elegant card. And easy to create!

Please try embossing on foil cardstock. Or, as an alternative, try embossing on heavy duty foil right off the roll. It's a bit fragile to work with, but looks wonderful. Another thing I've embossed before, with nice results, is the flat bottom of a foil pan. 

Most of all, have fun with your experimenting! I think you'll have a delightful time.

Foiled

Smiles.


April 5, 2022

AMAZING THANKS

I used two truly wonderful products in this card, both of which appear in the new upcoming Annual Catalog. That makes me really excited, knowing that they will be considered "current" for at least another year.

The two items I am referring to are the beautiful tree stamp -- isn't it amazing?? I guess that's why the name of the set is Amazing Silhouettes. And that "thanks"!! The best ever diecut thanks! 


Snce I popped up the diecut sentiment with a couple Mini Stampin' Dimensionals, the card has a bit of dimension, but not so much as to require extra postage when mailing it. I love that!


Just a closeup of the beautiful elements:


Keep reading for a tutorial on how to create this striking card.

SUPPLIES:
White cardstock
Mossy Meadow cardstock
A piece of Designer Series Paper that features a subtle design on a dark background -- Mossy Meadow

Amazing Silhouettes stamp set (page 72, new Annual Catalog)

Die Cutting/Embossing Machine
Amazing Thanks Dies (page 169, new Annual Catalog)
Mossy Meadow ribbon
Mini Stampin' Dimensionals
Mini Glue Dots

INSTRUCTIONS:
Fold a 5 1/2" x 8 1/2" piece of white cardstock in half, creasing it well with a bone folder.

On a piece of white cardstock that measures 3" x 5", stamp in Mossy Meadow ink the tall tree image from the Amazing Silhouettes stamp set.

Adhere this to a 4" x 5 1/4" piece of your chosen Designer Series Paper.

From Mossy Meadow cardstock, die cut the shadow portion of the "thanks" word, and from white, die cut the main portion of the word. Using liquid glue sparingly, adhere these two word pieces together.

Put a glue dot or two onto the center of a piece of coorinating 1/2" ribbon that measures about 6" long and add it to the lower portion of the tree image, securing the ends on the backside of the DSP. Adding the glue dots keeps the ribbon secure underneath the sentiment, discouraging it from buckling. 

Add this completed section to the white card base.

Using Mini Stampin' Dimensionals, add the sentiment over the ribbon.


Amazing
Smiles


April 2, 2022

#dailycreating NOVEMBER 2021

I am here to present to you some of my drawings from November 2021. As part of Terry Runyan's Facebook group, #dailycreating, we are encouraged to do something creative each day. 

Every Sunday Terry posts a set of prompts for the coming week. These prompts are optional, merely suggestions if you're feeling stuck. Until recently, I've been pretty faithful about following these prompts.

For the drawings shown below, I will include at the top of each one the prompt, if I followed it, and any other pertinent information I may have on my subject matter.

off prompt

blue banded pitta/borneo


#woodland animal
badger

#thing on thing
royal flycatcher/amazon basin

#egyptian
fennec fox/north africa

#duckurday

#freedom
bald eagle

#thing on thing
blond-crested woodpecker/south america

#flight
puffin

#mouseurday

#faces

#orangutanurday

#family
common loon

#thing on thing
black lored tit/himalayas

#thanksgiving
turkey

#canadagooseurday

Hmm. You must be really wondering about some of the prompts.

Terry has designated every Wednesday as #thing on thing day. She usually does some sort of art featuring a cat on a head. I, on the other hand, draw birds with some extra feature on its head, be it a protruberance, crest, weird neck features, whatever. This is my favorite day of the week to draw.

The #urdays? Initially Terry had called every Saturday #caturday. Some of us apparently aren't such cat lovers, so she extended the prompt to #dogurday also. In the last few months, she added #animalurday. So that's why you see weird prompts above some of the drawings.

That's it for November.

Please respect that these are my personal drawings and are not to be used or copied without my express permission. In the case of wanting a specific drawing (or two?) I will have high quality giclee prints made for you. Thanks!

#dailycreating
Smiles.