January 19, 2024

GOLDEN LEAVES

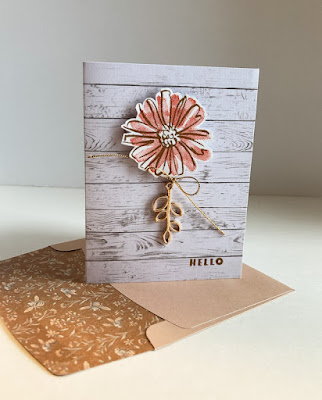
Two of the products that I especially like from Stampin'' Up! are when they put together a card base with a coordinating envelope, as well as the precious charm-like pieces you can find occasionally.

My card today features both of those things.

The card/envelope combination is diminutive, measuring a mere  3 1/4" x 4 1/4". Quite treasurelike. 


The woodtone design on the card base graces both the front and the back, and is very subtle. I wanted a lot of this design to show so I decided to keep my additions to the card quite simple. 

I stamped the outline of the two step flower from the Color & Contour  stamp set in Pecan Pie ink (don't you LOVE that color?!), followed by the solid portion of the flower in Calypso Coral ink. After fussy cutting the flower, I wasn't sure how to proceed.


All of a sudden, I remembered the goldtone leafy stems I'd never used before. Mostly because I wasn't sure how to use them. This seemed a perfect role for one of them -- the "stem" to my flower. First I tied a length of gold metallic cord through the hole in the top of the charm, tying it in a bow. Using a glue dot, I added it under the flower, which I'd popped up with a Stampin' Dimensional.

Following through with the simplicity I wanted, in Pecan Pie ink, I added a small "hello" in the lower right of the card.


The following photo shows finished card sitting atop the coordinating envelope.


SUPPLIES:
Card/Envelope set
White cardstock

Pecan Pie ink
Calypso Coral ink

Color & Contour stamp set (page 25 Annual Catalog)
Cactus Cuties stamp set (retired)

Gold cord
Open Leaf Trinkets
Stampin' Dimensionals
Mini Glue Dots

DIRECTIONS:
On a scrap of white cardstock, using the flower from the Color and Contour stamp set, stamp the lined portion in Pecan Pie ink, followed by the solid portion in Calypso Coral ink.

Fussy cut the flower, leaving a narrow white edge all around. (It really is easy!)

Attach the flower to the card front with Stampin' Dimensionals, about 1/2" from the top of the card.

Take about 8" of gold cord and thread it through the hole in the top of the Open Leaf Trinket, tying the cord into a bow.

Use a Mini Glue Dot, tuck this addition into the space under the flower.

In Pecan Pie ink, stamp the simple "hello" from the Cactus Cuties set in the lower right corner of the card.


Diminutive
Smiles.


January 14, 2024

#365birds SEPTEMBER 2023

I know. I know. I am woefully behind in my blog posts. It seemed that when I was linking up to other bloggers' Link Parties, I was much more committed. I gave that up in May as the result of a medical experience. Since then, I seem to have been merely treading water. 

I HAVE, however, kept up my daily bird drawings I am happy to report.

In this blog post, I would like to share with you a handful of bird portraits I'd done as part of my #365birds challnge during the month of September 2023. As I always do, above each drawing, I will note the type of bird it is and where in the world he/she can be found.

crested kingfisher

southern asia


wompoo fruit dove
australia

house wren
canada throughout the west indies and central america to the southernmost point of south america

northern flicker
north america

black-capped manakin
southern mexico through central america to south america

yellow-billed cardinal
south america

scale-crested pygmy tyrant
eastern honduras to southernmost peru and northern venezuela

boat-billed heron
central and south america

buff-laced polish chicken
europe and brought to the us

hooded warbler
caribbean, mexico and central america

eastern whippoorwill
canada and eastern us

hooded mountain tanager
south america

paradise flycatcher
asia

banded kingfisher
asia

indian roller
tropical asia

lesser white-fronted goose
russia

red-necked tanager
eastern brazil

lilac-breasted roller
africa

And there you have it. Being September, I was still in the midst of trying to conquer my yearlong challenge, which I finally finished in November. Imagine! 365 days of bird portraits!

These are awful snapshots of my drawings. If you would like a print of any of my bird portraits, contact me and I will get you a good quality print. Please remember that these are my personal art works and are not to be used in any way, shape or form (I'd always wanted to say that!) without my express consent. Just let me know if you want a print or two or three . . .

Bird-brained
Smiles.


January 1, 2024

FAUX SHUTTER FISH

I don't know about you, but when I first saw a card made like this, the first question in my head was "how did they get all those DSP pieces just the right size?" I was completely mystified.

But then I watched the video so wonderfully done by Lynn Dunn at Stamptastic Designs on YouTube. 

And the mystery was solved.
 

Following Lynn's instructional video on how to create a Faux Shutter Card or Fractured Card, as she also refers to it, is quite easy.

If you don't feel like watching the video, I will include a tutorial on how to do it yourself. The video is about nine minutes long.


The only dimension to this card is from the popped-up fishbowl. 


SUPPLIES:
Shaded Spruce cardstock
White cardstock
Coordinating Designer Series Paper

Fishin' Around - Retired stamp

Memento Tuxedo Black Ink
Stampin' Blends in: Light Pumpkin Pie, Light Pool Party, Light Mango Melody, Light Cinnamon Cider, Light Crumb Cake and SU 600

Die Cutting/Embossing Machine
Stitched Shapes dies
Stampin' Dimensionals
Paper Cutter

INSTRUCTIONS:
Fold a 5 1/2" x 8 1/2" piece of Shaded Spruce cardstock in half, creasing it well with a bone folder.

Cut a 4" x 5 1/4" piece of coordinating Designer Series Paper. Set this aside for a bit.

Cut four strips of Shaded Spruce cardstock. Three of the pieces will be 1/4" x 4", while the fourth will be 1/4" x about 6". Set these aside for now.

I used the square die from the retired Stitched Shapes dies that was about 2 1/8" to cut a white square. This will be your starting place. Add this, turned like a diamond shape, to the DSP with even margins at the top and the sides.

Take one of the shorter strips and butt it up to the diamond with the left corner of the diamond and the end of the strip together. Glue it in place, letting the end extend beyond the edge of the DSP. Take another of the shorter strips and butt that to the top corner of the diamond and tucking it into place against the first strip. Take the long strip and do the same thing as the first two strips, but running it all the way to the bottom of the DSP. Finally, take the last short strip annd finish the framing process.

Turn the DSP over, and with paper snips, trim off any of the strips that extend beyond the DSP.

Now you can add your completed piece to the card front.

To complete the card, you need something in the center of the framed portion. I opted for this cute fishbowl and fussy cut it when I finished the coloring. If you don't like the fishbowl idea, add anything that appeals to you and fits within that area. It's possible also to do your stamping directly on the white diamond, eliminating the fussy cutting step. I preferred to do it separately and added it with Stampin' Dimenisonals to give an otherwise flat card a little bit of dimension.


There! No more mystery. An easy way to get a complicated look. I'd like to thank Lynn at Stamptastic Designs for her fabulous instructions!

^^^^^^^^^^^^^^^^^^^^^^^^^^^

Focus on the journey, not the destination. 
Joy is found not in finishing an activity but in doing it. 
- Greg Anderson -


^^^^^^^^^^^^^^^^^^^^^^^^

Fractured 
Smiles.