January 29, 2022

HEDGEHOGS IN LOVE

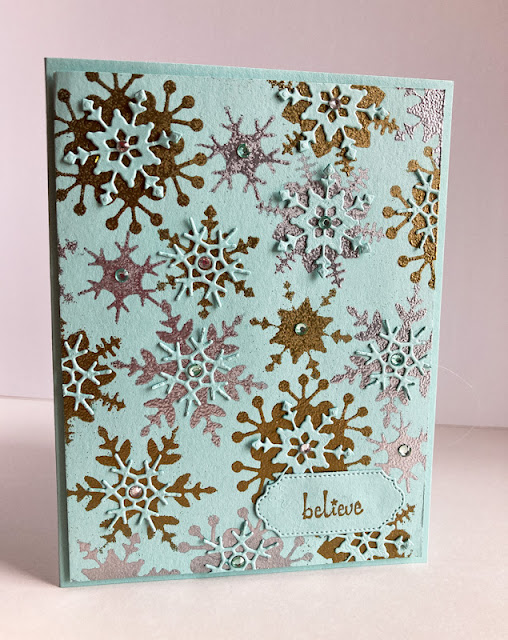
End of January? Uh huh, time to get out the Valentine making supplies!

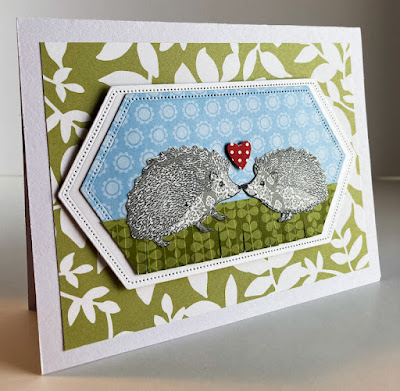
I feel my card for today would be suitable for a few occasions, such as wedding, anniversary, "love you". But, I see it as a perfect Valentine. And the adorable hedgehogs from the Happy Hedgehogs set are perfect to show someone your love on Valentine's Day.


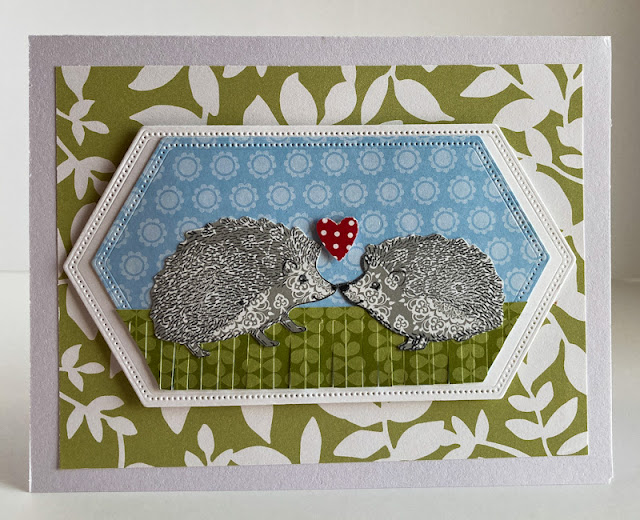
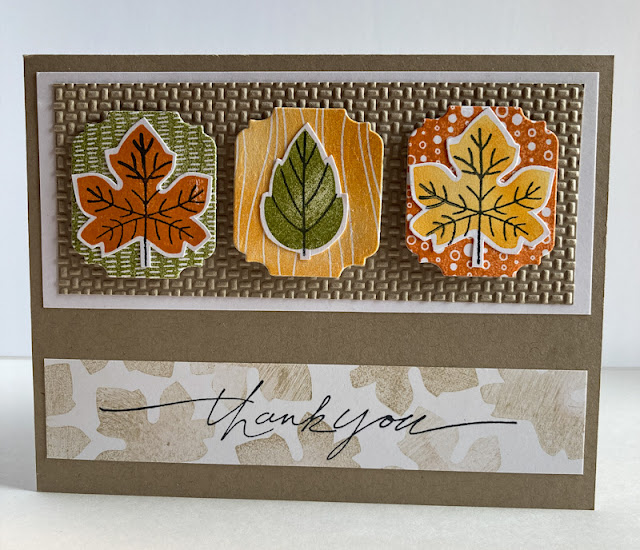
This paper pieced card features Designer Series Paper in suitable prints and colors:


A few Stampin' Dimensionals in strategic places give the card a modest amount of dimension. More dimension can be realized if you snip "grass" into the green on which the hedgehogs stand. 


Keep reading for an easy tutorial on how to recreate this card.

SUPPLIES:
White cardstock
Designer Series Paper suitable for hedgehogs, grass, sky and a heart, as well as for a background

Happy Hedgehogs stamp set (page 64 in the Mini Catalog)

Black ink

Die Cutting Machine
Stitched Nested dies
Retired small heart punch
Stampin' Dimensionals, regular and mini

INSTRUCTIONS:

Fold a 5 1/2" x 8 1/2" piece of white cardstock in half, creasing it well with a bone folder.

To this card base, add a piece of leafy Designer Series Paper that measures 3 3/4" x 5". You want the DSP to be fairly simple in design so as not to interfere with the cuteness of the focal point.

From white cardstock, die cut a frame that measures 4 3/4" from point to point using the Stitched Nested dies.

From the same die set, but using the next smaller die, cut from a Designer Series Paper print that makes a good simple sky.

Cut a strip of Designer Series Paper that would make a good grassy area that measures about 1" x 4". Glue this to the bottom of the sky piece even with the bottom of the sky. Using paper snips, trim the edges of the green to fit with the sky.

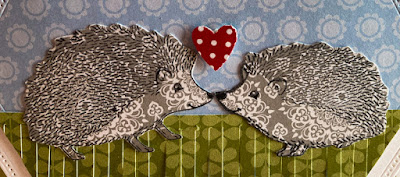
Choose a Designer Series Paper that looks sort of hedgehoggy. I chose a soft gray print. Using the two hedgehog stamps, stamp one of each. Fussy cut the hedgehogs. Place them onto the prepared piece as well as you can so their noses are sort of touching and adhere in place.

With a heart punch, punch a heart from red and white dotted DSP. With a Mini Stampin' Dimensional, place it between the hedgehogs' heads.

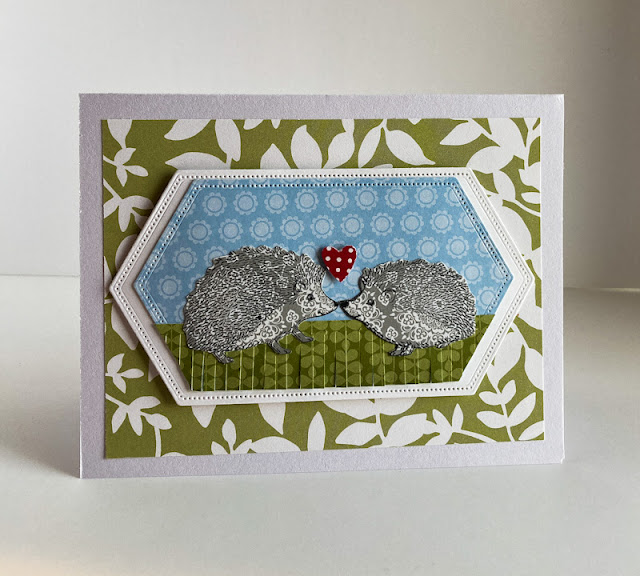
Add the finished scene to the larger whtie label.

Using Stampin' Dimensionals, add this piece centered atop the green DSP background.


Heartfelt
Smiles.


January 25, 2022

NOTEPAD

Of course, I don't know if you are as much a fan of Dollar Tree as I am or not. If you are, do you love to browse through the school/office supplies? 

One thing that I really love is the packs of tiny legal pads that measure 3 1/2" x 5". I have one near my computer at all times for those little notes I always seem to be making. 

While I personally love them just the way they come, I will show you how to dress one up with a minimal amount of materials and effort. So cute, they would make adorable gifts, or one just for yourself to feel extra special. 


A piece of Designer Series Paper that appeals to you, measuring 3 1/2" x 6", and a few other supplies, and you're set to cuten (cuten??) up those naked notepads.


Imagine this little cutie cheering up your workspace!


Here comes a simple tutorial to make one of your own!

SUPPLIES:
Designer Series Paper to your liking
Basic White cardstock
Melon Mambo cardstock (or one that coordinates with your design)

Enjoy the Little Things stamp set (retired, or something fitting)

Mossy Meadow ink (or, once again, a coordinating ink)

Die Cutting Machine
Tasteful Labels dies (Page 166, Annual Catalog)
Mossy Meadow Woven Trim (or coordinating)
Lined 3 1/2" x 5" notepads purchased at Dollar Tree

INSTRUCTIONS:
These instructions are for covering a mini legal pad that measures 3 1/2" x 5".

Cut a 3 1/2" x 6" piece of Designer Series Paper. Holding the bottom of the paper at the bottom of the front of the pad, glue the DSP to the top page of the pad. Hold the pad firmly as you fold the top of the DSP over the top of the pad. It should make a neat binding, with a flap of DSP that you will glue to the back of the pad. Do not glue along the top of the pad, otherwise you won't be able to tear off your pages neatly.

With the long die from the Tasteful Labels die set, cut a piece from coordinating cardstock. In my sample, I used Melon Mambo.

On a scrap of Basic Whtie cardstock, stamp the sentiment in Mossy Meadow ink (or ink that complements the DSP you've chosen for your notepad). Using the same set of dies, cut out the label.

Cut a 6" piece of cord that coordinates with your project and gently fold it in half. Glue it to the long diecut piece with the folded part at the top and the two free ends hanging down.

Sandwiching the trim, add the white sentiment piece over that.

Adhere the decorative sentiment to the front of the tablet, raised slightly above the center point.


Noteworthy
Smiles.


January 22, 2022

WINTER WONDERLAND

January in Wisconsin. What can I say? Either you love it or hate it. Snow, cold, ice, poor visibility. To those who love it, it is the veritable winter wonderland. 

In my card today, I am trying to depict that feeling.


Full of texture to symbolize that of ice and snow, I think you get the idea of what it's like to live in Wisconsin during the winter. Actually, much of the Midwest experiences all these same wonders. I don't mean to claim it only for Wisconsin. But, that's where I am.


Would you like a tutorial on how to create a card such as this, which would be suitable for so many winter occasions?

SUPPLIES:
White cardstock
Shaded Spruce cardstock

Soft Suede ink
Shaded Spruce ink

Christmas Season stamp set (Item # 156293)

Die Cutting/Embossing Machine
Painted Texture embossing folder (page 159, Annual Catalog)
Pretty Pines Thinlits Dies (retired, but you could use any set that has sprigs of greenery)
Seasonal Labels dies (Item #156299)
Paper Snips
Stampin' Dimensionals

DIRECTIONS:
Fold a 5 1/2" x 8 1/2" piece of white cardstock in half, creasing it well with a bone folder.

To the card base, add another piece of white cardstock, measuring 3 3/4" x 5" that has been embossed with the Painted Texture Embossing Folder.

Using one of the dies from the Seasonal Labels Dies, cut a label with a scalloped top and bottom. Emboss this also with the Painted Texture Embossing Folder. Adhere it to the center of the card with Stampin' Dimensionals.

On white cardstock, stamp the two-step pinecones with Soft Suede ink for both steps. In Shaded Spruce ink, stamp three of the evergreen branches. Fussy cut these pieces, leaving small white margins all around.

From Shaded Spruce cardstock, die cut two foliage pieces.

Arrange all these pieces as you wish to the embossed label, popping up components as you see fit with Stampin' Dimensionals.


Share with us what January is like where you live!

Wintry
Smiles.


January 18, 2022

DAFFODIL BIRTHDAY

The Designer Series Papers that a customer can get for free through Sale-A-Bration are so pretty and varied. So much so that I decided to use one more on this card. The paper, which is a mirror image of many daffodils, makes it so easy to make a card that is stunning.

To make this card, simply cut off one side of the daffodils, a piece that measures 5 1/4" x 4". This way, you can get six card fronts such as this from a single sheet of DSP.


Since the DSP is so attractive in its own right, it takes very little to add to make a really wonderful card: a little ribbon, a fitting sentiment on a diecut tag, and a couple baubles are all that are needed.


Here is a tutorial (very simple!) on how to create a card like this.

SUPPLIES:
Very Vanilla cardstock
Daffodil Afternoon Designer Series Paper (Page 4 of the Sale-A-Bration brochure)

Peaceful Moments stamp set (page 24, Annual Catalog)

Black ink

Die Cutting Machine
Ornate Frames dies (Page 164, Annual Catalog)
Basic Rhinestones
Dark Mango Melody Stampin' Blend
Stampin' Dimensionals
So Saffron ribbon

INSTRUCTIONS:
Fold a 5 1/2" x 8 1/2" piece of Very Vanilla cardstock in half, creasing it well with a bone folder.

About 1/2" from the bottom, wrap a length of 1/2" coordinating ribbon around a 4" x 5 1/4" piece of Daffodil Afternoon Designer Series Paper. You may want to add adhesive or a glue dot to the center of the ribbon to hold it in place on the card. Fasten the ends of the ribbon with tape to the backside of the DSP.

Add the piece of DSP to othe Very Vanilla card base.

Using Very Vanilla cardstock and the die that looks like a sign from the Ornate Frames die set, cut a label. On this label, in black ink, stamp a sentiment that fits the space well. My sentimenr came from the Peaceful Moments stamp set.

Use the Dark Mango Melody Stampin' Blend to color two of the Basic Rhinestones. When coloring something hard like embellishments, be sure to use the writing tip of the Blend. Add these rhinestones to either side of the sentiment.

Add the sentiment piecce over the ribbon with a couple Stampin' Dimensionals.


Have you earned anything through Sale-A-Bration yet? Remember, I'm a Stampin' Up! demonstrator and would be happy to help you!

Daffodil
Smiles.


January 15, 2022

YELLOW BIRD

There is something of a trashy backstory to this little yellow bird card. But, don't worry, I'll get to the trash in due time.


The stamp for the little yellow bird on the flowery branch is part of a set you can get for free during Sale-A-Bration. This, along with a lovely pack of Designer Series Paper (not the one in this card, however), can be yours with a $100 purchase (before tax and shipping). Isn't it adorable?

This card measures a cute 4 1/4" square, so it will fit nicely inside a regular A2 envelope. I love square cards, as I'm sure you've heard me mention many times in the past. They just seem to have a little bit more intimacy. Do you agree?


OK. Here comes the dirt. Are you ready?

I'd been working on the most recent Paper Pumpkin kit, Lots of Pun (December 2021), and had just finished pucnhing out some diecut elements. I was about to whip the "garbage" in the wastebasket, but fortunately I glanced at it and discovered it was actually an ART SUPPLY! I trimmed it a little, and used it as the perfect square frame for around the birdy circle! 

So, using this tiny inocuous frame that most people would have tossed in the garbage without a thought, I based an entire card on it. 

There were some scraps of the flowery DSP lying around that I'd used on a recent project, and when I discovered how well the blues in the flowers complemented the subtle design on the throwaway frame, it seemed destined to be. 

After stamping the bird on the branch in Memento Tuxedo Black ink, I took my cues from the colors in the DSP to color the bird and flowers with Stampin' Blends. The colors I used were Dark and Light Pool Party, Light Granny Apple Green and Dark Daffodil Delight. I found one of the Layering Circles dies that cut this to just the right size to fit inside of my square frame.

The photo below shows the piece a little closer. 
Do you notice the fine Pool Party lined design? Perfect, eh? 


All because I didn't toss something into the trash, I have an adorable little card that is suitable for nearly any occasion.


Trashy
Smiles.


January 11, 2022

A LITTLE NOTE

This card features an item that you can get for free as part of Sale-A-Bration. During this time, for every $50/$100 you spend (before shipping and tax), you earn from the selection of free products in the Sale-A-Bration Brochure.

The featured item is the pretty purplish Designer Series Paper I used as the background. You can find out more about it by clicking on the above link. 

One other component of the card that should be mentioned is the pretty diecut flower I used as the focal point. This is created using one of the lovely dies from the Iconic Dies set, found on page 163 of the Annual Catalog. 

As usual, when die sets are introduced, I focus mainly on sets that contain lots of labels, frames, etc. Until Stampin' Up! had a 20% sale on their dies awhile ago, this particular set had escaped my attention. But the dies included -- three different types of flowers, two mushrooms, two leaves, plus a fern frond and a branch, a bumblebee and, best of all, a wonderful bird -- such "iconic" images, I can't imagine why I never saw the set before. I am so glad I bought it, because I think I will be getting a lot of use out of these dies!


I made the most of the design in this DSP 
by adding a few other components to complement it. 
The die cut flower is reminiscent of the flowers in the background.


To accompany the Fresh Freesia flower, 
I added some embossed script on the tag on which it rests.


Following is a tutorial on how to create this card.

SUPPLIES:
White cardstock
Fresh Freesia cardstock
Black cardstock
Friendly Hello Designer Series Paper (page 12, Sale-A-Bration Brochure)

Enjoy the Moment stamp set (Page 26, Annual Catalog)

Black ink

Die Cutting/Embossing Machine
Tasteful Labels dies (Page 166, Annual Catalog)
Iconic Dies (Page 163, Annual Catalog)
Scripty 3D Embossing Folder
White grosgrain ribbon
Stampin' Dimensionals

DIRECTIONS:
Fold a 5 1/2" x 8 1/2" piece of white cardstock in half, creasing it well with a bone folder.

To this card base, add a layer of black cardstock that measures 4" x 5 1/4".

And to this layer, add a piece of Designer Series Paper measuring 3 3/4" x 5".

Set this aside for now.

From Fresh Freesia cardstock, die cut the large flower from the Iconic Dies set.

Using white cardstock, cut the largest label from the Tasteful Labels die set. Then emboss it with the Scripty 3D Embossing Folder.

From black cardstock, cut another of the labels.Add a 3 1/4" strip of the white grosgrain ribbon along the center of this label. Adhere it perpendicularly to the white embossed label.

Add the diecut flower to the center of the white piece.

Use Stampin' Dimensionals to add this to the card front so it is 3/4" - 1" from the top of the DSP.

From the same die set, cut the smaller white label. In black ink, add a sentiment to it. My sentiment is from the Enjoy the Moment set.

Using Stampin' Dimensionals, add it to the lower portion of the card.

Have you checked out all the wonderful products you can earn for free with your purchase(s) through Sale-A-Bration? Good stuff!

Flowery

Smiles.


January 8, 2022

ALL SQUARED AWAY

The CEO of Stampin' Up!, Sara Douglass, usually does a Facebook Live for all demonstrators each Tuesday afternoon. During these sessions, she often creates something using a specific product, maybe pointing out something we demonstrators hadn't thought of doing. It's always interesting, and I usually pick up something new.

During one such session, Sara worked with a stamp set that, until that point, I'd completely overlooked. The set, All Squared Away, can be found on page 117 of the Annual Catalog. Not sure why, but it just didn't catch my attention as I'd been perusing the catalog.

After her demonstration, however, I was determined to add this stamp set to my arsenal. When it arrived, I could hardly wait to use it. My first attempt with this set is the card shown below:


In this card, I combined lots of old and new elements, plus some stamps from a Paper Pumpkin kit. It was a blast to create. 


One of the parts that I think makes this card pop is the unusually vivid embossing in the background.

I always forget about stepping up a sentiment strip with a little of stamped off stamping along the edges. Using one of the stamps found elsewhere on the card succeeds in bringing it all more together.


Just a closeup of the card elements:


Following you will find a list of supplies and a tutorial on how to create a card similar to this one.

SUPPLIES:
Crumb Cake cardstock
White cardstock

Crumb Cake ink
Old Olive ink
Pumpkin Pie ink
Mango Melody ink
Black ink

Stamps from the September 2021 Paper Pumpkin kit (hope you're a subscriber!)
All Squared Away stamp set (page 117, Annual Catalog)

Die Cutting Machine
Ornate Frames dies (page 164, Annual Catalog)
Tasteful Textiles Embossing Folder (page 155, Annual Catalog)
Stampin' Dimensionals
Paper Snips

INSTRUCTIONS:
Fold a 4 1/4" x 11" piece of Crumb Cake cardstock in half, creasing it well with a bone folder.

On white cardstock, stamp three of the four available designs from the All Squared Away stamp set,  one square in each of these colors: Old Olive, Mango Melody and Pumpkin Pie.

Using a die from the Ornate Frames die set, cut each of these squares.

On white cardstock, stamp two maple leaves and one poplar leaf in the same colors. In black ink, add the veins to the leaves. Fussy cut the leaves, leaving a narrow margin of white around them. Adhere the leaves to the die cut squares, alternating colors.

Cut a piece of Crumb Cake cardstock that measures 2" x 5". Run this piece through a die cutting/embossing machine inside the Tasteful Textiles embossing folder. Arranging the leafy pieces, add them with a Stampin' Dimensional to the embossed piece.

Add the embossed piece to white cardstock that measures 2 1/4" x 5 1/4". Add this finished piece to the card base, leaving an even margin at the top and sides.

On a strip of white cardstock that measures 1" x 5 1/4" inches, stamp the larger solid leaf along the edges, stamping off first, so it's not overwhelming.

In black ink, add a sentiment. In my sample, I used a retired stamp because I love how it fills the piece so nicely. Do you still have this stamp set? It's so lovely.

Add this strip to the bottom of the card base so the placement is pleasing to you.


I know I frequently mention the Paper Pumpkin monthly kit. If you are not already a subscriber, you are seriously missing out on so many opportunities! Even if you subscribe for only a few months to get a taste, you can cancel any time if it doesn't please you completely. Check out Paper Pumpkin by clicking on the link. If you do subscribe and I've inspired you in any way through all the years, I would so appreciate it if you could name me as your demonstrator. Honestly, you will not be sorry for trying it. 

Leafy
Smiles.


January 4, 2022

#dailycreating AUGUST 2021

Welcome to the August 2021 installment of my #dailycreating drawings. As part of Terry Runyan's #dailycreating Facebook group, members are encouraged to be creative in some way every single day.

Each Sunday afternoonn Terry posts a list of prompts for the coming week. We are not obligated to follow the prompts, but, sometimes, if we're feeling stuck for ideas, they are a great starting point.

Following you will discover 11 of my August drawings. Above each of them, I will include the prompt (if I followed it) and any other interesting information I may have on my subject matter.

#friendship

Meerkats (I love meerkats!)


#dinosaur

#lemur
Lemur slow loris/southeast asia

#frog-urday
dyeing dart frog/amazon

#international cat day

#lion

#off prompt

#mallard-urday

#thing on thing
blue-eyed cormorant/falkland islands

#thing on thing
bearded vulture/alpine regions

#national dog day
rhodesian ridgeback

Thank you so much for continuing to follow along on my creative drawing journey. I appreciate so much that you allow me to share these drawings with you near the first of each month.

If you have any questions or comments, please reach out!

Please recognize that these are my personal drawings, and not to be copied in any way. Thank you.

#dailycreating
Smiles.


January 1, 2022

BELIEVE

I woke up this morning, the first day of a new year, 2022, with a feeling of something like despair. The feeling that 2022 isn't going to be a good year for me. Not a great way to begin a brand new year. After the last two years we've experienced, I suppose that's not an unusual feeling for some of us to have.

The way I understand it, it's always important to maintain a positive outlook on life. I've been having such difficulty in doing that, especially lately. 

For that reason, I chose to showcase this card today. Because the sentiment is so fitting.

BELIEVE.

I vow to BELIEVE that the  year will be an improvement over the past two years. I BELIEVE the world will be a better place during the year 2022. Do you BELIEVE it will be?


The card is created on Balmy Blue cardstock, a color that I think works so well with snowflakes.

Have you ever created anything using two colors of embossing powder? I think it has a wonderful interesting look that is a step up from single color embossing.


To do multi-color embossing, stamp some of your images in VersaMark ink randomly across the cardstock, leaving ample space in which to stamp more images. 

Cover the initial stamped images in one color of embossing powder and heat set. 

Stamp more images in the spaces in between in VersaMark. This time, sprinkle a different color of embossing powder and heat to set. 

On my card, I only used two colors of embossing powder, gold and silver. If you space things just right, you can do even more colors. The colors need to be embossed separately. 

You can try a few colors of embossing powders in a single stamping, carefully dropping the powders over the stamped images. In this case, however, you will be contaminating any excess powder since they will mix as you tap it off and the powder colors mix. If you don't mind having a mixture of embossing powders, this is a way to get more than one color on a single image.


After the embossing was done, I used snowflake dies from a few sets to cut smaller Balmy Blue snowflakes, which I adhered over some of the embossed snowflakes.

I used a Dark Balmy Blue Stampin' Blend to color some Basic Rhinestones. Others I left in their natural color. I added these rhinestones to the centers of all the snowflakes.

It's the simple sentiment --- BELIEVE -- that gives the real meaning to the feeling behind this snowy card.


How positive do you feel about this new year? Do you BELIEVE that it will be a good one? 

Happiest New Year to all of you!

Believing
Smiles.