August 30, 2022

ART DECO POPPIES

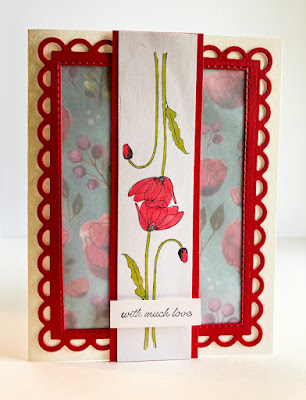
Awhile back I needed two single stems of this beautiful poppy (Painted Poppies, page 29, Annual Catalog). I grabbed a scrap of white cardstock and stamped them in Tuxedo Black Ink head to head because the strip wasn't all that long. When what to my wondering eyes should appear but a MESS. 

In my attempt to fit both poppy stems on the single strip of cardstock, I overlapped the flowers. About to toss the scrap in the garbage, I took a better look at it, and discovered that it looked sort of charming, with almost an Art Deco look.

You ask, "What does Linda mean by Art Deco?" Click on this link about florals in the Art Deco design.


With this realization, I became enamored of my little mistake and decided to go with it. 

Using Stampin' Blends in Light Poppy Parade and Light Old Olive, I colored in my head-to-head poppies, leaving them on the original strip of white cardstock. 

From here on, it became much more complicated than I would have liked it to have been. 

I'd decided to use vellum over a piece of the old poppy Designer Series Paper that originally coordinated with the stamp set. Well, I guess it still does coordinate, but the DSP is retired.


As you probably already know, dealing with vellum and adhesive -- whoa! 

To alleviate that sticky situation (ha!), I cut a Poppy Parade frame using the Scalloped Contours dies (page 174, Annual Catalog). Since this didn't have a hole in the middle to serve as a frame, I used one of the Rectangle Stitched Framelits in a suitable size to cut out the center.

The next step was to adhere the vellum to the back of the frame, then, after cutting the DSP to 3 1/4" x 4", I followed with that right behind the vellum. I then added this to a white card base.


To add a little more security to the vellum/DSP, I mounted the poppy strip to a 1 1/2" x 5 1/2" strip of Poppy Parade cardstock, and adhered that flat to the center of the card.

I popped up a sweet little sentiment (Through It Together, page 69, Annual Catalog) on a strip of white that measures 1/2" x 1 1/2", in Memento Tuxedo Black Ink and popped it up at the bottom with Stampin' Dimensionals.


Do you ever have happy accidents like this that turn out to be little gifts in disguise? Do you always recognize it and proceed with a new plan?

Poppy
Smiles


August 27, 2022

BANNER BIRTHDAY

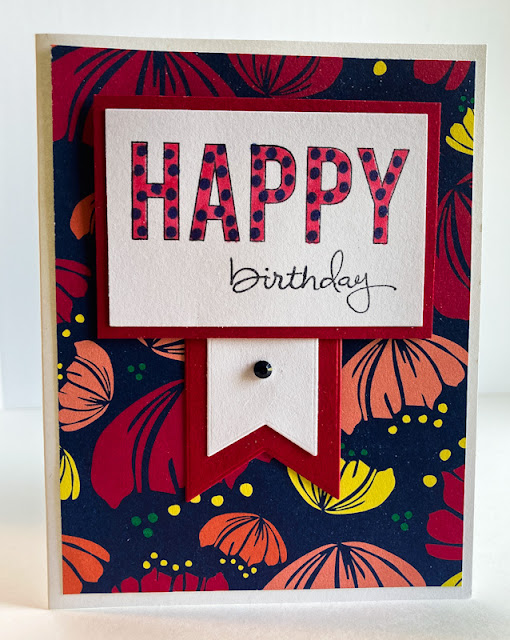
Sometimes just a few elements can make a card extra special. In my opinion, the two elements that pretty much make this card are the striking (retired) Designer Series Paper in the background, and the extra wow in the greeting, in that I added polka dots to an otherwise ho-hum red "happy". 


Once the "happy birthday" was finished, it was just a matter of a few additions to complete a truly happy greeting.


Following is a tutorial to create a card like this one.

SUPPLIES:
White cardstock
Choice of a happy Designer Series Paper
Coordinating cardstock

HAPPY from a Paper Pumpkin kit
A retired "birthday"

Memento Tuxedo Black Ink
Stampin' Blends in: Light Real Red and Light Starry Sky

Die Cutting Machine
Banner dies
Colored jewel to coordinate
Stampin' Dimensionals

INSTRUCTIONS:
Fold a 5 1/2" x 8 1/2" piece of white cardstock in half, creasing it well with a bone folder.

Everything else on this card will depend on the colors in your chosen Designer Series Paper.

Select a Designer Series Paper that you love. Add a 4" x 5 1/4" piece of this DSP to your white card base.

On a 2" x 3" piece of white cardstock, stamp the outlined "happy" from a Paper Pumpkin kit in Memento Tuxedo Black Ink. Color and decorate the word in any way you wish. Because of the colors in my DSP, I used the Light Real Red Stampin' Blend for the base color and added dots in the Light Starry Sky Stampin' Blend.

In black ink, stamp the word "birthday" underneath the "happy" and to the right.

Adhere this piece to a 2 1/4" x 3 1/4" of cardstock in a coordinating color. Set this aside for now.

Using banner dies, cut a larger banner from the same cardstock you used for the mat on the greeting. With a smaller banner die, cut another from white cardstock.

Adhere these two together, leaving an even border along the bottom and sides.

Adhere the completed banners to the back of the sentiment piece, leaving as much extended at the bottom as you wish.

If you don't have a rhinestone in a color that coordinates, use a suitable Stampin' Blend to color one of the large Basic Rhinestones and add it to the top of the banner under the sentiment.

Use Stampin' Dimensionals to add the completed piece to the card front.


Which sentiment do you find yourself reaching for the most often when cardmaking? Happy Birthday? Get Well? With Sympathy? I do love "Thinking of You". It fits several occasions.

Happy
Smiles.


August 23, 2022

SENDING PRAYERS BUTTERFLY

I know. I'm quite obsessed with the Brilliant Wings dies (page 169, Annual Catalog). You are probably tired of having me use them in card after card. They are just simply perfect and one is prettier than the next.


This particular butterfly, as well as a couple of reincarnations, equals the star of this card. Why do I say "reincarnations" you ask? Check it out. I used three separate dies to create my sandwich of butterflies. 

I love the way this sandwich gives the card so much interest and dimension. Other than the stack of butterflies, not too much else was needed to complete this card.


The beautiful marbled paper came from a long ago Paper Pumpkin kit, and I picked up the various colors in this paper to use in the three butterflies.

Centering the card and the butterflies is a strip of Fresh Freesia cardstock which I embossed with the Script Embossing Folder. Initially, I didn't have the strip embossed, and it completely lacked interest and brought the card's effect down. The embossing fixed that.


The pretty sentiment, from Itty Bitty Greetings, was stamped in Blackberry Bliss, another of the colors from the marbled paper.

Although it is retired, I will never, repeat NEVER, stop using the Ornate Frames dies. I used one of these to cut out the sentiment. I popped it up midway between the bottom of the card and the butterfly with Stampin' Dimensionals.

The final touch included a couple of pink rhinestones to bling up the butterfly's body.


Please share with us how you feel about the Brilliant Wings dies and if you use them frequently. While we're on this subject, do you own and use the Ornate Frames dies?  Don't you think they're the BEST?


Marbled
Smiles.


August 20, 2022

POPPY SMILES

How many of you love the stamp set Painted Poppies? Do you use it a lot? Do you still have some of the lovely retired Designer Series Paper that coordinated with the stamp set when it was first introduced? That is one DSP that I admit to hoarding. So gorgeous!

While browsing the Internet, I often come across cards that inspire me.. My resulting card is one of those instances. The fun fold is what I am referring to


Utilizing a couple of the stamps from the set along with a bit of the pretty Designer Series Paper enabled me to make a fairly striking card.


For the poppy and leaf that trim the sentiment portion, I first used Stampin' Blends to color the images. I then fussy cut them, leaving a border of white.


Since the fold is so fun and a little unusual, the following photos show the card in its various open stages so you can see a little more clearly how it works.


Even if you don't have the Peaceful Poppies set (it's still available!) or the DSP, my tutorial will give you dimensions and folds to help you to create a card similar to this one.

SUPPLIES:
Poppy DSP (retired, but you may still have some around!)
White cardstock
Real Red cardstock

Memento Tuxedo Black ink
Stampin' Blends in: Light Blackberry Bliss, Light Mossy Meadow, Dark Real Red

Painted Poppies stamp set (page 29, Annual Catalog)
Forever Fern stamp set (page 73, Annual Catalog)

Paper Snips
Red Rhinestones

DIRECTIONS:
Using a 5 1/2" x 8 1/2" piece of Real Red cardstock for your card base, fold it in half, then fold the front half in half again, with the second fold in the opposite direction. Crease these fold lines well with a bone folder. If you give them a really sharp crease, the card will cooperate and stay closed better.

Cut a strip of poppy DSP that measures 1 7/8" x 5 1/4" and adhere it to the flap that is turned back.

To the inside of the card, part of which will show when the card is closed, adhere a 4" x 5 1/4" piece of white cardstock.

On scrap white cardstock, stamp the single poppy on a stem as well as the single leaf in Memento Tuxedo Black ink. Color them as you wish. I used Dark Real Red and Light Blackberry Bliss Stampin' Blends on the flower and bud, and Light Mossy Meadow for the stems, leaves and single leaf.

Fussy cut all these components, leaving a white margin all around.

On a 2" square of white cardstock, towards the right edge, stamp your sentiment in black ink.

To this piece, add the poppy on the left and the leaf along the bottom.

Adhere the sentiment piece to Real Red cardstock that measures 2 1/2" square.

Mount this completed piece to the left front flap so it is centered when the card is closed. Remember not to add glue to the right side!

Add a Real Red rhinestone to the upper right corner of this piece.


One important thing to remember when making a card with this particular fold is to be careful where you write inside the card. If you don't "hide" the words behind the flap and the sentiment piece, they will show on the white when the card is closed.

Poppy

Smiles.


August 16, 2022

STENCILED THANKS

Awhile back I needed six "thanks" die cut from yellowish cardstock. Luckily I was sort of neat when I did the die cutting. 

For a long time, that piece of holey paper sat around near my die cutting machine, doing absolutely nothing. One day it finally clicked after I had glanced at it more times than I could count. That is an ART SUPPLY! Yay!


Shown below is my fairly neatly piece of die cut scraps. When I finally took note of it, I decided that it would make a great stencil!


I gathered my Blending Brush and inks in Balmy Blue, Pacific Point, Pear Pizzazz and Old Olive. 

Once I had all my materials together, I started to stencil on white cardstock, doing it in sort of an ombre effect. 


After trimming it to 3 3/4" x 5 1/4", I mounted it to a piece of Balmy Blue that measured 5 1/4" x 4". Then, to pick up some of the pretty green, I fitted it all to an Old Olive card base.


So one of the sponged thanks looked more outstanding, I die cut the thin portion of the word with the Amazing Thanks dies (page 169, Annual Catalog) from white cardstock, then carefully layered it atop the second thanks from the bottom.


The final touch was a bit of bling with blue rhinestones I found on the Stampin' Up! Clearance Rack awhile ago. 


Once again, I loved using something other normal people would have simply tossed into the trash to make a wonderful creation!

Scrap
Smiles.


August 13, 2022

STRAWBERRY BIRTHDAY

What a fun card to make -- from the start to the very end! 

You all know that I'm a big saver of anything artsy at all, just in case I can find a project to use it in -- sometime. Case in point was a piece that is normally discarded from a really old Paper Pumpkin kit -- I mean years ago,. The one with strawberries, blueberries, etc. 

I had punched out all the strawberries I needed to do the kit. But failed to throw away the leftovers! Oh no! 

Recently I cane across this nifty piece. You will see the piece a few photos from now.

The background of this card used that throwaway piece as a STENCIL!


Using a Blending Brush and Poppy Parade, Real Red and Powder Pink ink, I haphazardly brushed through all these strawberry-shaped openings, overlapping as much as I liked.

Once I'd finished all this, I was absolutely delighted with the background piece I'd just created.

The rest of the card came together naturally.


In the next photo, you can see my card sitting all proudly upon the "stencil" 
I should have thrown away so many years ago.


Here it is standing on the stencil once again. 
In fact, I STILL haven't thrown it away. 
It is perfectly usable for a future project. 
So, why get rid of it?


I knew I had some of that precious retired strawberry Designer Series Paper still lying around. I was excited when I finally unearthed a piece big enough for my needs. So I added a 4 1/4" x 5 1/2" piece of this to a white card base..

Using two of the words from the Biggest Wish stamp set (page 40, Annual Catalog), I stamped them towards the top of the strawberry piece in Real Red.

To add a little bit of bling, I added three Pear Pizzazz rhinestones.


Moral of my story: Save your garbage!!

Strawberry
Smiles.


August 9, 2022

HANDMADE STAMP

Have you ever had a hankering for a different sort of a stamp? Perhaps one that you'd made yourself? Have you ever looked at one of your open dies and thought, "I think this would make a great stamp!"? 

Well, I'm here today to tell you how you can use one of your favorite open dies and some Fun Foam to do just that.

The card below shows how wonderfully one of these homemade stamps work in creating a good crisp image. Focus on the red flower.


Because these stamps are quite thin, you need to be extra cautious when inking them up. If you mount your stamp onto an old wooden block, you don't have to use such care. But you do run into stamping some of the ink you get on the block if used this way. So use caution.


A close closeup of the image I stamped using my homemade stamp:


Go ahead and choose one of your open dies and get youself some of the thickest Fun Foam you can find. Remember that, as you run it through your die cutting machine, the foam will compress quite a lot.


Follow along for a tutorial on how you can make your own stamps. It's easy and lots of fun! 

This tutorial is to make my sample card. Change things up as you wish.

SUPPLIES:
White cardstock
Black cardstock
Black and White Designer Series Paper

Plentiful Plants stamp set (page 63, Annual Catalog)

Poppy Parade ink

Die Cutting Machine
Fun Foam
Ornate Frames dies (retired)
Iconic dies (for the flower, retired)
Matte Black Dots (page 143, Annual Catalog)
Stampin' Dimensionals.

INSTRUCTIONS:
Fold a 5 1/2" x 8 1/2" piece of white cardstock in half, creasing it well with a bone folder.

To this, add a 4" x 5 1/4" piece of black cardstock.

To this, layer a 3 3/4" x 5" piece of black and white Designer Series Paper. 

To make a stamp:
Using a piece of Fun Foam, die cut it with a die that has quite a lot of detail such as the flower I used in my sample. You may need to run the die/foam through your machine twice so all the pieces are cut through cleanly.

Cut a piece of white cardstock that measures 2 3/4" square (for my stamp). Adjust the size for the stamp you are making.

Lay your new stamp onto a piece of scratch paper and ink it up well with any color. Move the stamp to a clean piece of paper, inked side facing up. Leaving it sit in that position, carefully lay the square of white cardstock over the inked up stamp. Gently use your hands to rub over the cardstock, being sure you don't miss any spots. Carefully lift the stamped cardstock away from the stamp.

Once the ink is completely dry, layer this piece onto a 3" square of black cardstock.

Mount this onto the DSP, leaving even margins at the top and sides, using Stampin' Dimensionals.

For the sentiment, die cut any label that fits well in the blank space at the bottom of the card, In matching ink, stamp a sentiment.

If desired, add embellishments to each side of the words.

Using Stampin' Dimensionals, add the sentiment to the card.


Homemade
Smiles.


August 6, 2022

#dailycreating MARCH 2022

I'm still not sure what happened, but long about March 2022, my drawing as part of Terry Runyan's #dailycreating group became more of a challenge to me, as did many other things in my life. It was a struggle. This is the time that I spent most of my creativity doing pieces based on neurographic art. I found it so calming and stress relieving. 

Now, in August, I am slowly getting more back into the drawing. So, maybe once we progress through into August, I will have more to show you. Until then, regular drawings will be more sparse and I will have more neurographic based creations to share with you. Please be patient with me.

I have found seven drawings that were semi-worthwhile from March that I will share with you today. As always, I will include above each drawing the prompt, as well as any other interesting information I have on the subject matter.

#national pig day


#thing on thing
indochinese green magpie / vietnam

#world wildlife day
quokka / australia

#off prompt

#off prompt
oriental dwarf kingfisher / southeast asia

#animalurday
coatimundi / central/south america

#myths and legends
phoenix

And, there you have it. 

This is my personal artwork. Please don't use or copy it without my express permission. I have prints -- or can have made -- of many of my drawings.

Non-Inspired
Smiles.


August 2, 2022

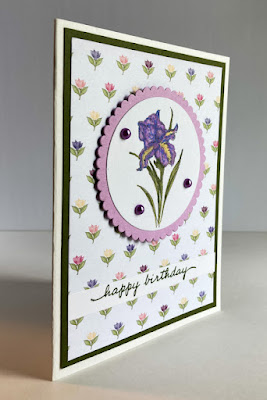
IRIS

I have mentioned it in a previous post, but I will say it again. For Sale-A-Bration (through August), there is a combo Stamp Set/Designer Series Paper called Wonderful World that you can earn for free with a qualifying purchase.

Well, I liked it so much, I made sure I had a qualifying order so I could own it myself.

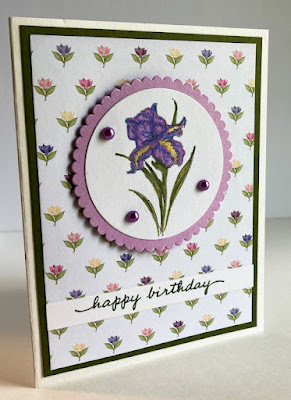
The card today features one of the stamps (the iris) and one of the papers from the DSP (the background). What a cute combination, eh?


Of course, the star of the show is the pretty iris stem, which I first stamped in Smoky Slate, then colored with Stampin' Blends to resemble an iris as well as I could.


Other than the laborious coloring of the flower, 
the rest of the card is a cinch to put together.


My attempt to replicate a real iris:


Other than the three purple pearls and the subtle dimension provided by a few Stampin' Dimensionals, the card is not just too cluttered with dimension.


Following is a tutorial on how to create a card like this, as well as a list of the Stampin' Blends I utilized on the iris.

SUPPLIES:
White cardstock
Fresh Freesia cardstock
Mossy Meadow cardstock
Wonderful World Designer Series Paper (page 14, Sale-A-Bration brochure)

Wonderful World stamp set (page 14, Sale-A-Bration brochure)
Happiness Abounds (page 109, Annual Catalog)

Smoky Slate ink
Stampin' Blends in: Light and Dark Highland Heather, Light Orchid Oasis, Light and Dark Mossy            Meadow, Dark So Saffron, Light Old Olive
Black Fineliner Pen

Die Cutting/Embossing Machine
Layering Circles dies (page 172, Annual Catalog)
Purple Pearls (page 143, Annual Catalog)
Stampin' Dimensionals

DIRECTIONS:
Fold a 5 1/2" x 8 1/2" piece of white cardstock in half, creasing it well with a bone folder.

To this card base, add a 4" x 5 1/4" piece of Mossy Meadow cardstock.

And now add a 3 3/4" x 5" piece of Designer Series Paper. I used some from the Wonderful World DSP pack.

Stamp the iris image from the Wonderful World stamp set in Smoky Slate ink onto a piece of white cardstock that is about 3" square. Color the flower as you wish. See above for the list of Stampin' Blends I used on my sample.

With the die from Layering Circles that measures 2 3/8" in diamter, die cut the colored iris.

Use the next larger circle with scalloped edges with Fresh Freesia cardstock to cut the mat for the white piece.

Adhere these two pieces together and add to the card, leaving equal spacing on the top and sides, with Stampin' Dimensionals.

On a strip of white cardstock that measures 1/2" x 3 3/4", stamp the Happy Birthday from Happiness Abounds in Mossy Meadow ink.

Adhere this flat about 1/2" below the circle.

Add purple pearls to the iris circle.

Flowery

Smiles.