October 29, 2022

TRICK OR TREAT

Are you old enough to remember Caspar the Friendly Ghost? I'm not sure if he's been around lately or not, but I remember him vividly from my long ago childhood.

As soon as I saw the little ghost stamp in the September 2022 Paper Pumpkin kit, I immediately thought of Caspar. I know he doesn't really look like him, but he has just such a cute friendly face.


Digging through my stash of Designer Series Paper, I discovered this haunted house piece from several Halloweens ago. I thought that was perfect, that the ghosties could be flitting around from house to house.


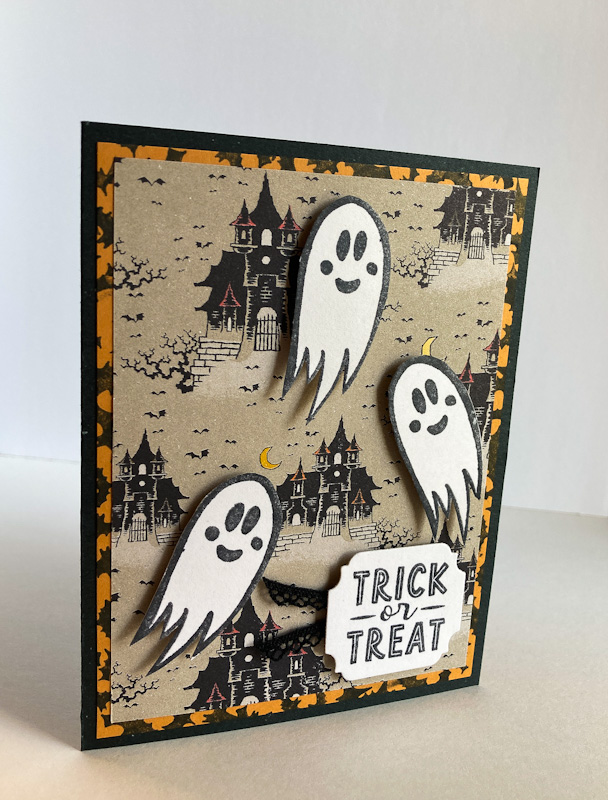
In the stamp set, besides the cute ghost, there was another stamp that was a small group of bats. Interesting fact: Did you know that the proper name for a group of bats is a "cauldron"? How appropriate is that?!? 

Using a golden/orangish piece of cardstock on which to adhere the haunted house piece, I stamped in black ink the cauldrons of bats all around the edge. While you have to inspect it closely to discover that the black blobs around the edge are actually bats, I think it provided an interesting border.


Here you go, a tutorial to create a card like mine:

SUPPLIES:
White cardstock
Black cardstock
Gold/orange cardstock
Haunted House Designer Series Paper

Spooky Treats stamps, Paper Pumpkin, September 2022

Black ink

Die Cutting/Embossing Machine
Ornate Frames dies
Black crocheted trim
Stampin' Dimensionals
Paper Snips

INSTRUCTIONS:
Fold a 5 1/2" x 8 1/2" piece of black cardstock in half, creasing it well with a bone folder.

Cut a piece of gold/orange cardstock to 4" x 5 1/4". Using the bats stamp from the September 2022 Paper Pumpkin kit, stamp the bats haphazardly in black ink around the entire perimeter of this paper. Adhere this to the black card base.

Cut a piece of haunted house Designer Series Paper to 3 3/4" x 5" and adhere this to the bat-edged cardstock.

On scraps of white cardstock, using the ghost stamp from the same kit, stamp three ghosts in black nk. Fussy cut them. Add them to the DSP background, but leave the lower right corner ghostless.

On a scrap of white cardstock, stamp "trick or treat" from the Paper Pumpkin kit. Die cut it with a die from the Ornate Frames set.

Cut a 3-4" piece of black crocheted trim, fold it in half, and tape it to the back of the sentiment on the left side.Trim the ends to angles.

Use Stampin' Dimensionals to add this tag to the lower right corner of the card.

Cut another piece of the gold/orange paper to 4" x 5 1/4" and adhere it to the inside to make writing in the card easier than writing on the black. If you want to (I didn't) you could stamp the cauldrons of bats all around the edges of this piece too. If you did that, the bats would show up better as actual bats.


^^^^^^^^^^^^^^^^^^^^^^^^^^^^^

Since you are like no other being ever created 
since the beginning of time, 
you are incomparable.
- Brenda Ueland -


^^^^^^^^^^^^^^^^^^^^^^^^^^^^

Ghostly
Smiles.


October 25, 2022

CONFETTI

There is a cute, entertaining story behind this card. 

In early July, my family was going to gather at our house for a milestone birthday celebration for me. My oldest daughter called us early that morning to tell us that she wouldn't be able to come -- she had just tested positive for COVID. 

Some weeks later, when she'd recovered and no one else in her family had caught it, they came up to our house for a belated birthday party. They'd saved all the decorations that they'd purchased and brought it all with them to decorate our house. 

While everything they put up was delightful -- and so thoughful! -- a few of the balloons were extra special as they contained potential art supplies! 

The decorations hung around for several weeks, so we could continue to enjoy them. Gradually some of the balloons fell to the floor, much to our 5-year-old grandson's delight. He came over and promptly broke them, mostly by jumping on them. And what a mess he did make -- because all the art supplies went EVERYWHERE!


The art supplies I am referring to are the darling flowers on the background of my card. These flowers were in three "colors", pale pink and creamy tissue paper, and gold mylar. Feather weights they were, and sort of fragile. But I selected a bunch that I thought would look cute on a card. 


By adding a frilly focal point to the center of the flower garden, 
I had a cute -- upcycled -- card.


Although you probably wouldn't need it, following is a tutorial on how to create a card using larger-sized confetti. 

SUPPLIES:
White cardstock
Blushing Bride cardstock
Mossy Meadow cardstock

Mossy Meadow ink

Through It Together stamp set (page 69, Annual Catalog)

Die Cutting/Embossing Machine
Timeless Tags dies
Encircled in Beauty dies
Layering Circles dies (page 172, Annual Catalog)
Mossy Meadow Braided Linen Trim
Gold Sequins
Flower Confetti
Stampin' Dimensionals

INSTRUCTIONS:
Have a birthday and make sure someone brings you balloons with giant confetti inside. Wait until the balloons fall off onto the floor. Have a cute little boy stomp on them to release the confetti. Sweep it all together, because this really makes a mess, being sure you pick out all the little pieces of balloon. Put the confetti into a sealed bag for future use. After you create your card, you can save the leftovers for more projects; they are nonperishable.

If you unfortunately aren't treated to such balloons, you can substitute the confetti with punched 1" flowers in your choice of colors/materials. Proceed as follows.

Fold a 5 1/2" x 8 1/2" piece of white cardstock in half, creasing it well with a bone folder.

To this card base, add a 4" x 5 1/4" piece of Blushing Bride cardstock (or cardstock that matches your confetti).

Next, cut Mossy Meadow (or coordinatiing) cardstock to 3 1/2" x 4 3/4". Place a variety of flower confetti as it pleases you onto this piece, gluing them in place. Trim off flush with the edges of the cardstock any flowers that extend beyond.

Adhere this flowery background to the pink piece.

Using the dies from the Timeless Tags set, cut a solid oval from Mossy Meadow cardstock. Cut a fancy circle using a die from the Encircled In Beauty die set from Blushing Bride cardstock. Adhere these two pieces together. From white cardstock, cut a circle with the smallest of the Layering Circles Dies.

On this piece, add a sentiment that fits with the circle in Mossy Meadow ink. With Stampin' Dimensionals, add this to the center of the pink piece.

Thread a piece of Mossy Meadow Braided Linen Trim through the hole at the top of the tag.

Add this to the card front, a little raised from center, with Stampin' Dimensionals.

Finish it off with a gold sequin on the bottom of the green oval.


OK. Now, be honest. Do you ever do anything crazy like this upcycling of confetti? I love being able to discover my art supplies in unexpected places!

^^^^^^^^^^^^^^^^^^^^^^^^^^^^^^^^

To live a creative life, we must lose our fear of being wrong.
- Joseph Chilton Pearce -


^^^^^^^^^^^^^^^^^^^^^^^^^^^^^^

Flowery 
Smiles.


October 22, 2022

ORNAMENT ON A BRANCH

 Do you make your own Christmas cards? Have you started on them yet? If so, are you making good progress? 

Personally, as soon as I laid eyes on the Decorated With Happiness Bundle in the Stampin' Up! Mini Catalog, I knew that I was going to be using this on my own cards. 


The color scheme for this card is fairly traditional, basically greens and reds. Originally I wasn't going to emboss the cardstock behind all the action, but it was just too plain. It needed a little more pizzazz. So I cut a piece of Soft Succulent cardstock to 4" square and embossed that with small detailed snowflakes. 


For this 4 1/4" square card, I used both stamps and dies from the Bundle


Read on for a tutorial to create a card similar to mine.

SUPPLIES:
Evening Evergreen cardstock
White cardstock
Soft Succulent cardstock

Stampin' Blends in: Dark Poppy Parade, Light Call Me Clover, Dark Daffodil Delight
Memento Tuxedo Black ink

Decorated With Happiness Bundle (Page 74, Mini Catalog)

Die Cutting/Embossing Machine
Snowflake embossing folder
Ornate Frames (retired)
Red ribbon
Sparkly gem
Stampin' Dimensionals

INSTRUCTIONS:
Fold a 4 1/4" x 8 1/2" piece of Soft Succulent cardstock in half, creasing it well with a bone folder.

Cut another piece of Soft Succulent cardstock to 4" square and emboss it with the snowflakes embossing folder (or any other folder that gives a satisfying effect). Add this embossed panel to the card front.

Using the larger evergreen branch from the Decorated With Happiness Bundle, cut one branch from Evening Evergreen cardstock. Using small amounts of glue, adhere this branch to the embossed piece with the tip of the branch landing about halfway along the far left side.

On a scrap of whtie cardstock, stamp in Memento Tuxedo Black ink the sketchy ornament, Color it as you wish. I used Stampin' Blends in Dark Poppy Parade, Light Call Me Clover and Dark Daffodil Delight. Use the die that matches this ornament to cut it out. "Hang" it from the branch as you wish with a Stampin' Dimensional.

From a scrap of whtie cardstock, stamp in black ink the greeting from the same stamp set. Die cut it with one of the dies from the retired Ornate Frames dies.

Fold a 6" piece of red ribbon in half, and use tape to adhere it to the back of the sentiment piece. Angle trim the ends of the ribbon that hang beneath the label.

Use Stampin' Dimensionals to add this underneath the evergreen branch.

Add a sparkly red gem to the top of the greeting.


^^^^^^^^^^^^^^^^^^^^^^^^^^^^^^

Wherever you go, go with all your heart.
- Confucius -


^^^^^^^^^^^^^^^^^^^^^^^^^^^^

Heartfelt
Smiles.


October 18, 2022

MULTICOLORED BIRTHDAY

 Do you like working with stencils -- or masks, as Stampin' Up! refers to them? They are truly fun to work with and can be used in a plethora of ways.


Starting with a 4" x 5 1/4" piece of white cardstock, I used sticky notes to hold the stencil in place over the paper. I used a Blending Brush to add the colors, starting with the lightest color and working towards the darkest. I started out with a light hand so I had room to increase the intensity of the color in certain areas. As you already probably know, it's best to start out light, working to dark because once you have a dark hue laid down, there's no going back.

The ink colors I used were Daffodil Delight, Granny Apple Green, Coastal Cabana and Flirty Flamingo. A few of these colors don't always play well together, so you have to be careful not to create mud. One way you can avoid mud is to let a color dry before you add another. That seems to help a little bit. In this combination of colors, it was the Granny Apple Green and Flirty Flamingo that could have potentially caused problems.


Once I was satisfied with the color I'd added, I carefully pulled the stencil away, and this is what I ended up with:


With careful blending and a nice assortment of pleasing colors, I ended up with a piece that was so cheerful and almost-perfect. In order to maintain that fresh look, I decided to keep the rest of the card simple and uncluttered.

I took three white sequins and used a Stampin' Blend in Dark Parakeet Party to color them in to coordinate well with the card.

I decided to use black for my sentiment so it really stood out from the busy background. The "happy birthday" was made up of stamps from the delightful set, Biggest Wish, found on page 40 of the Annual Catalog. Check out that set! You can get so many wonderful combinations for a sentiment.

To pick up another color from the stenciling, I mounted it to a Flirty Flamingo card base.


With minimal effort and materials, I ended up with a card that is simple, but striking in its appearance.

Have you dug out any stencils/masks lately? How did you use them?


^^^^^^^^^^^^^^^^^^^^^^^

I'm so glad I live in a world where there are Octobers.
- L.M. Montgomery, Anne of Green Gables -


^^^^^^^^^^^^^^^^^^^^^^^

Multicolored
Smiles.


October 15, 2022

QUACKY BIRTHDAY

I am drawn to stamp sets that feature animals, whether they're silly or realistic. Because of the presence of a very sketchy fox and a pair of mallards, I needed to have this Sale-A-Bration set in my arsenal.


For this card, I chose to highlight the mallard ducks in a very simple, fairly masculine setting. I wanted it to be a CAS (Clean and Simple) card, meaning it features lots of white space and not too much going on in the card.


To add to the masculine feel of the card, I cut a strip of woodgrain Designer Series Paper and used the lined folder of the Stripes andd Splatters Embossing Folders to add texture and maybe a more real feel to the "wood".

Below you can see a closeup of the "wood" and how well it complements the ducks.


After stamping the mallards in Memento Tuxedo Black ink, I used Stampin' Blends to color them in as realistically as possible, using photos of actual mallards to do so.

I love the sketchy look of this ducky pair. It adds so much more interest than if they'd been sketched without the extra lines.


The only dimension on this card comes from the slightly elevated piece containing the ducks with the help of Stampin' Dimensionals and then the two mallard green rhinestones that flank the simple sentiment.


Following is a tutorial on how to make a card similar to this one.

SUPPLIES:
White cardstock
Woodgrain Designer Series Paper

Itty Bitty Greetings (unfortunately retired)
Stylish Sketches (from the most recent Sale-A-Bration)

Stampin' Blends in:
     Light and Dark Crumb Cake
     Light and Dark Soft Succulent
     Dark Daffodil Delight
Memento Tuxedo Black ink

Die cutting/embossing machine
Tasteful Labels dies (retired)
Stripes and Splatters Embossing Folders (page 177, Annual Catalog)
Green rhinestones
Stampin' Dimensionals

DIRECTIONS:
Fold a 5 1/2" x 8 1/2" piece of white cardstock in half, creasing it well with a bone folder.

Cut a 1 3/4" x 5 1/2" piece of Woodgrain Designer Series Paper that coordinates well with the colors you will use in your ducks. Emboss it using the stripes folder of the Stripes and Splatter Embossing Folders.

Adhere this strip to the card base about 1/2" - 3/4" from the right edge.

On a 2 1/2" square of white carstock, stamp the male and female mallard ducks from the Stylish Sketches stamp set in Memento Tuxedo Black ink. Color the ducks as desired.

Use the appropriate die from the Tasteful Labes set (or any other label die that you have that will nicely frame your couple) to die cut the ducks. Use Stampin' Dimensionals to add this over the wood look strip about 1" - 1 1/4" from the bottom.

In black ink, stamp the sentiment on a strip of white cardstock that measures 1/2" x 1 3/4". I used the sentiment from Itty Bitty Greetings (or use any other sentiment that will fit the occasion and the label). Add this flat onto the wood strip, so it lands about 1/2" from the bottom,.

To finish it off, add green rhinestones on either side of the sentiment. If you don't have green rhinestones, you can always color a couple of Basic Rhinestones with Stampin' Blends to match.


^^^^^^^^^^^^^^^^^^^^^^^^^^^^^

We are united with all life that is in nature. 
Man can no longer live his life for himself alone.
- Albert Schweitzer (1875-1965) -


^^^^^^^^^^^^^^^^^^^^^^^^^

Quacky
Smiles.


October 11, 2022

TO SHARE WHAT I LEARNED

 Several weeks ago, I wrote a post, Wooden Leaves and Tenth Blogiversary, about how things have changed in the blogging world, my blogging world specifically, and how I'm trying to grapple with these changes and trying to accept them. I questioned whether it was worthwhile continuing to blog and whether or not blogs are slowly dying.

The response to this post was incredible and overwhelming. The love, empathy and advice came pouring forth from so many of you. And in the Comments, I heard from several other bloggers that they had learned from some of this advice and planned on incorporating these ideas into their own blogs.

Since I have received such a vast amount of information and advice from so many of you, I thought I would share with others the bounty of these thoughts so it was not only I who benefited. Many of these ideas require some technical savvy, so I am still trying to work my way through those. Others are common sense, and you may already know some of this.

Below I have compiled all the helpful tips I received. Have fun and run with whichever of these seems to fit your blogging situation. 


On the Instagram platform, check out linktr.ee to add links to other platforms where readers can find you, such as your blog, your Etsy shop, your Facebook page, your Twitter account, and your Pinterest boards. When you figure this out, all of it will appear on your Instagram home page. More links that were mentioned as helpful included linkin.bio and smart.bio. linktr.ee is free to use.

Use YoastSEO to optimize each of your posts for SEO. 

A blogger application that creates links for readers to be able to share your post on social media easily is Add to Any. 

Since it's good to pay attention to SEO and algorithms, Keywords are important to use throughout a blog post.

Fix or change any broken/nonworking buttons on your blog home page. If you have any problems with your page, it looks bad for you and visitors may not come back out of frustration.

If you don't already have these, add buttons for readers to easily follow you on the various social media platforms, such as Pinterest, Facebook, Twitter, Instagram, etc. (I am working on that now, but am having no success whatsoever.)

It's good to have posts on your blog that are considered "evergreen", those that are worth revisiting, as these posts are timeless. Make it possible for your readers to do so.

Add labels/tags so people can find an item of interest they may be searching for.

Create a Gallery Page. 

Provide links to other similar posts that you have written, such as, in my case, other autumn cards I have made. Just for further inspiration.

Keeping readers on your page longer makes Google happy.

Utilize links directly to products you may have been referring to in your post. 

You could explore and get involved with affiliate programs. If anyone buys through your links, you earn a commission.

Attach a shop to your blog or to your Instagram account.

Tag others, in my case, Stampin' Up!, on any card posts on Instagram.

Utilize Instagram better, such as expanding to Reels or Stories, not just still photos. Make Reels using your Smartphone on a tripod to film your creation.

If you have a Facebook Business Account, use the Meta Business Suite to schedule Facebook and Instagram posts.

Search out and become involved in Facebook groups that work together to help build each others' traffic. These groups are also good for brainstorming.

Pin your work often to Pinterest.

Be consistent in your blog posts. For example, if you decide to publish posts on Tuesdays and Saturdays, be faithful about doing so, as your readers will expect to find fresh content from you on those days.
 
^^^^^^^^^^^^^^^^^^^^^^^^^^

That's about it. Many of these hints are still flying right over my head. But, hopefully some of you wonderful bloggers out there will find benefit in one or two of these helpful nuggets. 

If you have any further comments or advice, we would love to hear from you! Thank you to all who have contributed through comments on the Blogiversary post. Not only do I appreciate all you put into them, but I'm sure a lot of us bloggers take to heart what you have shared. GO BLOGGERS!

^^^^^^^^^^^^^^^^^^^^^^^^^^^

If you would like to create a card like the one at the beginning of my post, just go to Pinterest and search for the maple leaf quilting pattern. It took me some trial and error, but I did it!

^^^^^^^^^^^^^^^^^^^^^^^^^^^

Never give up on something that 
you can't go a day without thinking about.
- Winston Churchill -


^^^^^^^^^^^^^^^^^^^^^^^^^^^^^^^^^^^^^^

Sharing
Smiles.


October 8, 2022

WITH MUCH LOVE

It's October in Wisconsin. And we are being treated to a wonderful colorful exhibit! Some of the trees around here, especially the maples, almost look like columns of fire. The intensity literally takes your breath away!

With the beautiful autumn colors in full force, I thought I would share with you a card I made incorporating the varying colors we are experiencing right now.. 


I have been weaning myself away from politics (it is literally driving me crazy!) and have been focusing more on creative videos and blog posts instead. Occasionally I will come across something that really inspires me. 

Thus, I wanted to try using Post-It notes to screen off a strip of a black and white Designer Series Paper and color it in that way. Normally I do all that fussy coloring with Stampin' Blends, which I adore doing. This way, however, is ever so much quicker, and results in a stunning strip of color in an otherwise black and white space.


Using my Blending Brushes with Calypso Coral at the top, gradually blending in to Crushed Curry, and finally, Pear Pizzazz, is the process I used.. 

In the photo below, 
you can see the sticky notes in place with the blending of the inks done.


But then, when the Post-It Notes are slowly peeled away, 
the eyes are treated to a striking stripe of autumn colors.


I found a flower and leaf stamp that sort of echoed the look of the flowers in my DSP and stamped it in Memento Tuxedo Black ink. Using Stampin' Blends in Light Old Olive and Light Calypso Coral, I colored it in, then fussy cut it.


I cut a simple white circle using dies from the Beautiful Shapes dies on page 169. In Calypso Coral, I stamped a lovely sentiment from the Through It Together stamp set (page 69, Annual Catalog) towards the bottom of the circle.

Using Stampin' Dimensionals, I added the flower to the top of the circle, then used more Stampin' Dimensionals to place the flowery circle partially covering the blended in stripe.

Two Basic Rhinestones in Pear Pizzazz completed the focal point and also added a bit of bling.


I added this completed piece to a Crushed Curry card base. 


How are the autumn colors in your neck of the woods? Do you experience a change in the seasons? I always think it's so sad when this happens because the trees had worked so hard in spring to produce all those lovely leaves, only to have them survive just a handful of months.


^^^^^^^^^^^^^^^^^^^^^^^^^^^^^^

Heaven is under our feet as well as over our heads.
- Henry David Thoreau -


I must mention that any photographs I include in my blog posts are my own. 

^^^^^^^^^^^^^^^^^^^^^^^^^^^^^^^^

Autumn
Smiles.


October 4, 2022

FAUX SILK HALLOWEEN

On Friday I was watching a video telling me how to do an age-old technique, only revisited somewhat. The technique, Faux Silk, is one I've been using very often over the past years, most times incorporating the topmost layer of a decorated napkin. 

This take on the technique was different, however. Jessica Taylor from Ink It Up With Jessica, was showing how to do the technique by using plain old white gift tissue paper over DESIGNER SERIES PAPER!

She was doing it over flowered DSP, but I thought that, with the almost spooky look that can be achieved with this technique, I would try it with some Halloween DSP!

With the next day being World Cardmaking Day, I commented on Jessica's YouTube video that I was going to give it a try on this occasion.


The Designer Series Paper I decided to use for my card:


How the DSP looks after applying the Faux Silk Technique to it:


To apply the tissue paper to the DSP -- and this is how you do the Faux Silk Technique -- crush the tissue paper into your hand, sort of flatten it, crush again, sort of flatten it, doing this three times so you have lots of nooks and crannies (?) to give it character. Use a glue stick on the surface of the DSP ALL OVER, CORNER TO CORNER, EDGE TO EDGE. This is so so so important. Then just lay the flattened and crushed tissue paper on top of the glue, gently patting it in place. Be gentle, but firm, about this in order to retain the texture.

Once the piece is dry, use  your paper snips to trim the tissue layer even with the DSP layer. Very easy to do.

I love the almost spider web look -- making it even more spooky -- my card has.


Since I loved the way the background looked, I wanted some sort of focal point that wouldn't detract from it. So I decided on a simple Halloween vignette. 

For the jack-o-lantern I used Pumpkin Pie, Garden Green and Black inks on one of the pumpkins from the old retired Fall Fest stamp set. 

Using the sentiment -- with a great font! -- from the also retired Wonderfully Wicked set, I stamped it in a wicked black. A die from the Stitched So Sweetly die set was perfect for cutting out the sentiment.

After adhering the pumpkin and sentiment together, I looped some Linen Thread (page 145, Annual Catalog) all around the focal point, and added it to my spidery background with Stampin' Dimensionals. A couple Black Matte Dots (page 143, Annual Catalog) finished it off just right.


I noticed that the spidery texture was even more pronounced 
when looking from the top of the card!


Adding this to a layer of black cardstock, then to a Pumpkin Pie card base -- and voila! -- a cool Halloween card!


If you'd like to check out how Jessica made her card, click on either of the links above. One will take you to her blog, where the project is the first one, or the other link, which is her YouTube presentation of the project. Thanks, Jessica, for the wonderful inspiration!


^^^^^^^^^^^^^^^^^^^^^^^^^^^^^^

Make the most of yourself, for that is all there is to you.
- Ralph Waldo Emerson - 


^^^^^^^^^^^^^^^^^^^^^^^^^^^^

Faux
Smiles.