Are you familiar with the Spotlighting Technique? Often in doing this technique, you stamp a larger image in black, then stamp a portion of it again in black. Leaving the main image in black only, you color in the smaller portion. After the coloring is completed, the creator uses a punch or a die to cut out only the colored portion, usually in a circle or square. A narrow border in the same shape is often added.
Awhile back I'd stamped a group of Christmas-y characters, coloring in only part the Santa, which appeared in the approximate center of the image. By adding the colored Santa over the black and white Santa, it gives that portion of the image more focus and importance. You can see this card here
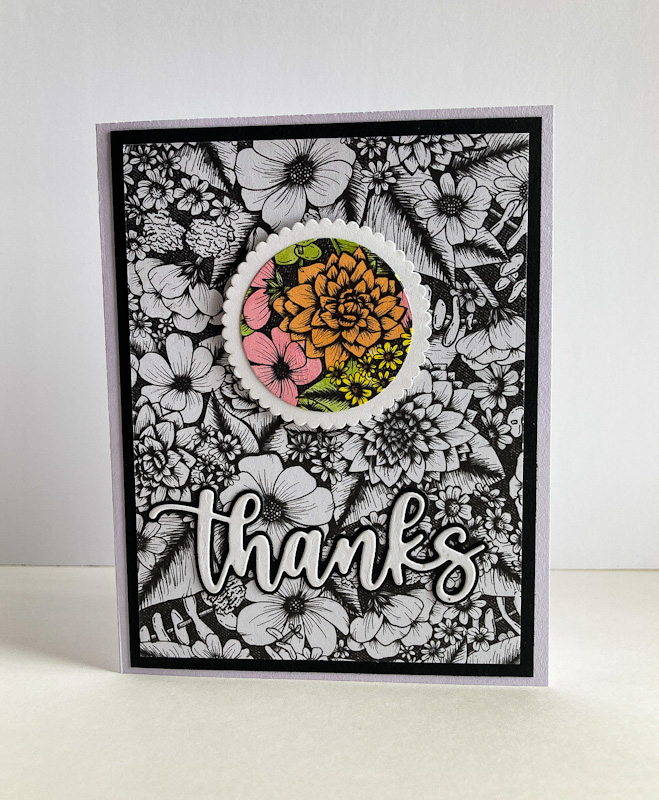
While I didn't do exactly that with this card, the effect is the same.
I had some gorgeous black and white floral Designer Series Paper that worked very well for this technique. Rather than piecing the colored portion back on top of its identical component, I merely colored in a random section of the DSP, die cutting it and matting it with a scalloped white circle. I then popped it up with a couple Dimensionals so it was evenly spaced at the top and sides of the black and white piece.
A closeup of the coloring:
I finished the card with the beautiful two-layered "thanks" die cut and added to the bottom.
Do you want to discover how to do this take on the Spotlighting Technique? Read on for a tutorial!
SUPPLIES:
White cardstock
Black cardstock
Black and White Designer Series Paper (There is a perfect DSP in the new Annual Catalog, Perfectly Penciled, on page 133!)
Stampin' Blends (I used Dark Pineapple Punch, Light Granny Apple Green, Dark Pale Papaya, Light Flirty Flamingo and Light Cinnamon Cider)
Die Cutting/Embossing Machine
Amazing Thanks Dies (page 169, new Annual Catalog)
Layering Circles Dies (page 172, new Annual Catalog)
Stampin' Dimensionals
INSTRUCTIONS:
Fold a 5 1/2" x 8 1/2" piece of white cardstock in half, creasing it well with a bone folder.
To this card base, add a 4" x 5 1/4" piece of black cardstock.
To this, adhere a 3 3/4" x 5" piece of black and white Designer Series Paper.
Use one of the circle dies from the Layering Circles that measures 1 5/8" and cut out a portion of the black and white DSP. Color this small circle any way you want, using bright stand-out colors. I used my Stampin' Blends. (See above for the colors I used.)
Using the same dies, cut a scalloped circle a little larger than the colored circle from white cardstock.
With the scalloped circle as a frame, adhere the circles together. Pop the completed piece to the card with a Stampin' Dimensional, leaving even spacing at the top and the sides.
Using the Amazing Thanks Dies, cut the detailed "thanks" from white cardstock, and its shadow from black cardstock. Carefully adhere these two "thanks" together.
Adhere the sentiment to the lower portion of the card.
Spotlighted
Smiles.


Great technique and pretty results!
ReplyDeleteThank you, Michele!
DeleteI love this technique, but have I done it lately? Noooo... Your card is gorgeous!
ReplyDeleteThanks! I hope you try it again soon!
DeleteVery pretty card!
ReplyDeleteThank you so much, Holly!
DeleteThis is such a pretty card. The colors placed in the center of the black & white image are really striking. I also like how the word "thanks" is in white with an outer edging of black.
ReplyDeleteThanks, Carol! I'm so pleased you like it!
DeleteHello - I'm juist circling back to say:
ReplyDeleteThank you for participating in Talent-Sharing Tuesdays Link-Up 18.
Carol
www.scribblingboomer.com
Thanks for having me, Carol!
DeleteSuch a lovely card! I love the black and white background with the pop of color in the middle. And I love that font!
ReplyDeleteAw, thank you so much!
Delete