July 5, 2022

BEARY WELL

I love the versatility of the Paper Pumpkin kits. Once in awhile I will put the projects together as per the instructions in the kit.

Usually, however, I would rather do something that will make the creations all my own.

OK. I am going to share a stupid little story to you here. Many years ago, I was at a stamping workshop at someone else's house. I'd gone by myself, so I didn't know any of the people there. I was sitting at a table across from a stranger, working diligently on my card. As usual, I had changed it up to my own specifications. I could sense the lady across from me studying what I was doing. All of a sudden, she said, "Um. You forgot . . . " I answered, "I know. But this is the way I want to do it." Looking at me increduously, she shrugged and uttered, "To each his own," and went back to creating her card as per instructed.

I bet that was 15 or more years ago, but I will never forget that exchange. Shame on me for not following instructions!

That is why, when I have workshops, I encourage all my attendees to make their creations their own. Just because my sample was done one way doesn't mean that's the ONLY way.

Anyway, that's how I am with the Paper Pumpkin kits.

The card shown below is a perfect example. I used parts of two different Paper Pumpkin kits to make this little card.


The marble-y background was from a fairly elegant kit. Not caring for what following the kit's instructions would yield, I set these pretty pieces of paper aside until something else came to mind.

The adorable bear was a stamp from yet another Paper Pumpkin kit. I love this little guy and have used him in a few projects since he came into my life.

After stamping little bear in Memento Tuxedo Black ink, I colored him in with the following Stampin' Blends: SU 500, SU 900, and Light Basic Black.

The Blends with the numbers are those that come in the Natural Tones Stampin' Blends set on page 128. This set of five different hues of browns and lighter skin tones is a newfound blessing to me. I absolutely love them! But their names are all numbers.

Anyway, once the bear was colored, I fussy cut him and used Stampin' Dimensionals to adhere him to the marbled background.


Little bear is holding a pretty bouquet that was stamped in Memento Tuxedo Black ink from a past Sale-A-Bration set, Friendly Hello.

For the bouquet, I used Light Old Olive, Light Evening Evergreen, and Light Flirty Flamingo Stampin' Blends. Once the coloring was finished, I fussy cut the bouquet and attached it to little bear so it seemed as if he's holding the flowers.


For the sentiment, which comes from the Through It Together set, found on page 69 of the Annual Catalog, I used Flirty Flamingo ink on a strip of white cardstock that measures 3/8" x 2", flagged on the ends. 

To each side of the words, I added two embellishments I got off the Clearance Rack, Genial Gems.

This strip was adhered below little bear with Mini Stampin' Dimensionals.

The whole finished front was adhered to another Paper Pumpkin component, a dark green card base that is white inside.


As a Paper Pumpkin subscriber, do you tend to make the creations as the kit instructions tell you? Or, do you march to your own drummer like me, and change it all up to make it uniquely yours?

Beary
Smiles.


July 2, 2022

#dailycreating FEBRUARY 2022

Thhe beginning of a month equals my sharing of drawings as part of the #dailycreating Facebook Group, hostessed by artist Terry Runyan. 

At this point, I'd been part of this wonderful group for 2 1/2 years. Members of the group are encouraged to be creative in some way every day. And, if we choose to do so, to share our daily creations with the other members of the group. There is always a prompt list to work from if we choose to. The prompts are optional.

I am sad to say that, along about February, I was starting to become disenchanted with my output for the group. I just don't feel like I'm as driven as I was in the beginning to be creative. I was feeling more and more stress, and the daily drawing of animals/birds -- well, I just wasn't feeling it.

Fortuitously about this time, I came across a form of art that was new to me, although it had been "created" as an art form in 2014. Meant as a stress reliever type of art, it is called Neurographic Art. I watched many videos on this style of creating, and after awhile, I'd become smitten, deciding that this is exactly what I need during this stressful time of my life. So, I started to dabble in it, generally following the instructions I had gleaned from the videos. 

Two of the pieces that I am showing you today are what would be loosely considered Neurographic Art. I will label them as such, although they are immediately reccognizable as a departure from my normal work.

Since these first Neurographi Art pieces I dabbled with in February, I have tweaked the way I do it to make it all my own. Soo I just say my work is based on Neurographic Art. Each one takes a few days to finish. In the coming months, I will show you more of these pieces. 

As always, I will add above each piece the prompt, if I followed it, as well as any other pertinent information you may find interesting. 

Suffice it to say that I am still creating every day; it's just not always in tune with Terry's wonderful prompts. 

#thing on thing

ornate hawk eagle / mexico and belize


#red

#thing on thing
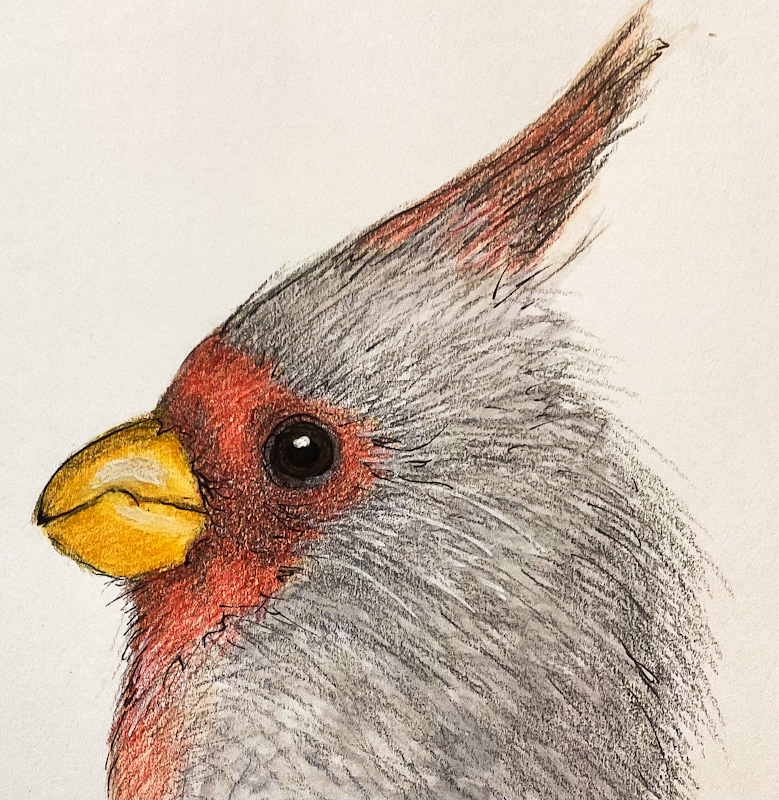
pyrrhuloxia (desert cardinal) / southwest united states - northern mexico

#off prompt
neurographic art

#off prompt
neurographic art

#thing on thing
red-legged honeycreeper / southern mexico south to cuba

#favorite color
red-necked tanager, south america

#caturday

Oh my. This is truly pathetic. In the coming months (after February), my actual drawing becomes even more sparse as I work my way through whatever this is. I hope my drawing muse comes back from vacation soon.

I have prints of some of my drawings, and could get others made. Please don't use any of my artwork without my express permission.

Well, off to do a little stress relieving -- and it's not drawing an animal or a bird.

#daily
Smiles.


June 28, 2022

TRIPLE TREAT

I'm not sure if I invented this take on a well-known technique or not, but using Designer Series Paper this way just popped into my head.

Not even aware of what this particular triple layered technique is called, it is usually done with stamping on the three layers. I decided to skip the stamping step and utilize the beauty and versatility of Designer Series Paper. And this is how it looks: 


I opted to adhere the layers flat on top of each other. The only dimension comes from the popped up sentiment layer with its folded over White Flax Ribbon.


I actually tried several different combinations of DSP with the black layer. They all looked great, but I was most taken with this particular combo.


Following is an easy tutorial on how to pull off this look.

SUPPLIES:
Your choice of Designer Series Paper
A neutral card base  
Black cardstock

All Squared Away stamp set (retired)

Black ink

Die cutting/embossing machine
Layering Circles Dies (page 172, Annual Catalog)
White Flax Ribbon
Stampin' Dimensionals

DIRECTIONS:
Cut a 5 1/2" x 8 1/2" card base of neutral cardstock. Fold it in half, creasing it well with a bone folder. You will be building your layers on top of this, so you will only see the inside and the back of this cardstock.

From your selection of Designer Series Paper, cut three pieces that measure: 2 x 3 1/4", 3 x 4 1/4" and 4 x 5 1/4". 

From black cardstock, cut three pieces that measure: 2 1/4" x 3 1/2", 3 1/4" x 4 1/2" and 4 1/4" x 5 1/2".

Layer these pieces all together, going from the largest to the smallest. When they are all glued together, stack them in the same order, gluing them.

When all three layers are together, adhere the whole piece to your neutral card base. Unless you were very very accurate in your cutting, you may need to trim a bit at the edges.

On a scrap of white cardstock, stamp a sentiment that fits well inside a 1 3/8" circle in black ink. Use the 1 3/8" die from Layering Circles to cut out the sentiment. From the same die set, use the scalloped die as a mat for the white circle. Adhere these together.

Fold a 6" piece of white flax ribbon in half, snipping the ends to angles and adhere this to the back of the circles, with the folded portion extending above the sentiment.

Use Stampin' Dimensionals to add this to the card front.


Triple 
Smiles,


June 25, 2022

ANNIVERSARY BOUQUET

I used components from two different past Paper Pumpkin kits to create this anniversary card for my husband.

With few exceptions, Paper Pumpkin kits are versatile and loads of fun. And Stampin' Up! is so generous with their supplies in these kits that you always have lots left over to play with in other projects.


The Paper Pumpkin components I used in my card are the gorgeous tone on tone vellum in the background, as well as the adorable bouquet stamp. 

After stamping the bouquet in Memento Tuxedo Black ink, I used Stampin' Blends in: SU 500 (one of their new neutral colors), Dark Pale Papaya, Dark Pink Pirouette (retired, but I still use it on occasion), Dark So Saffron, Light Parakeet Party (a new In Color!) and Dark Granny Apple Green, a color I grab frequently.

I fussy cut the bouquet, leaving a narrow white edge all around.

The pretty backdrop for the bouquet was cut with one of the Stitched So Sweetly dies. It was the perfect shape and size to set off the flowers just right.


I completed the look with a looped piece of Bumblebee Gingham Ribbon. 


If you're a Paper Pumpkin subscriber, do you make sure you use up all the supplies that come with the kits? How do you store your supplies until you are ready to use them?

Leftover
Smiles.


June 21, 2022

BETTER DAY

If you've been reading my blog, Paper Seedlings, for any length of time, you've probably already read about a catastrophic disaster that befell my husband and me several years ago.

In case you have never enjoyed this story, here it is:

Before we moved to our present house, which is located in a neighborhood, we lived in our dream house that we designed and built on about ten acres of wooded land. Very rural. Very beautiful. Our sanctuary. 

With the help of a local landscaper, we had wonderful landscaping done on the sloping terrain at the back of the house. Part of this beauty was a waterfall. At the top was a small pond, and from there the water cascaded over ledges of rocks downwards. It was so beautiful. 

The pond at the top was so serene, with its water plants in and around the water, we decided we would add a few koi to the pond. 

Living in Wisconsin, we, of course, could not leave them outside for the winter. So, we invested in a large aquarium with filtration, etc., in which they could live in comfort throughout the cold months. In that way, one of the koi that we had purchased at only about 4", grew until he was a gorgeous monster about a foot and a half long, with beautiful black, orange and white coloring. He was my spoiled baby. There were a couple others in there too, but this was my special one.

About 1:30 in the morning one summer, we woke to a racket outside. My husband grabbed a flashlight (brave man) and went out to see what was going on. When, what to his wondering eyes should appear, was a fat raccoon running away into the woods and fish heads lying on the ground by the pond. And nary a live koi in sight.

So, when people talk about how adorable raccoons are, I think to myself, yeah, they're cute -- in looks. Those vicious assassins. 

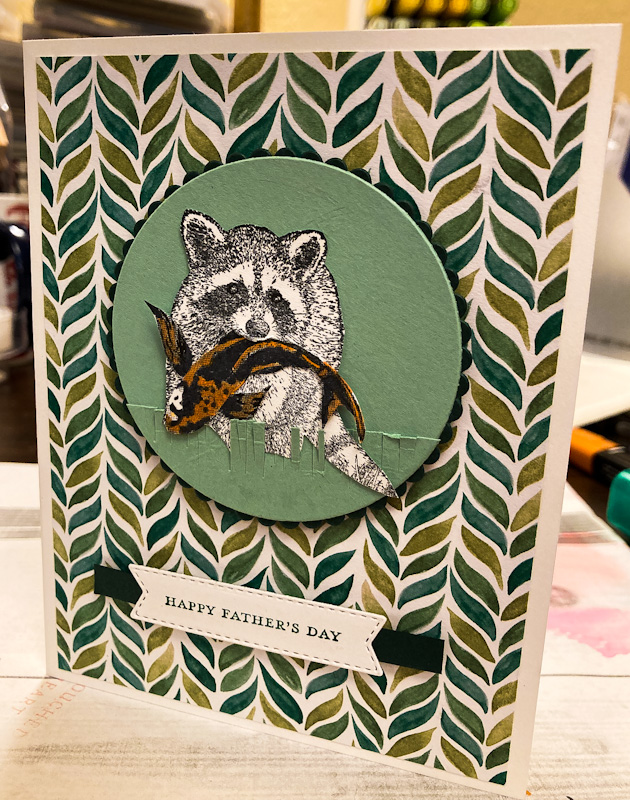
So, when Stampin' Up! came out with the cute set Wild and Sweet (page 87 in the Annual Catalog), I decided to  pair the raccoon up with one of the koi from a retired set.


I snipped open the greedy little cuy's mouth and added an approximation of my beloved koi. Grrr.
I fussy cut both the raccoon and the fish, and added them to some weird grass (because the raccoon's feet looked funny when fussy cut outside the context of the rest of the stamp).


I cheekily added a cheery "Happy Father's Day" at the bottom of the card. BUT . . . 

Inside the card, I wrote "Hope your day is better than this koi's." 

While my husband is usually sort of nonresponsive to my creations, he loved this one. We both had a good laugh over it.

Editor's note: We never replaced our koi. Sad, but true story.


Killer
Smiles.