July 23, 2022

EUCALYPTUS FLOWER

My brother-in-law sent me flowers for my birthday earlier this month. It was a lovely lush bouquet that smelled so wonderfully those first few days. And, much to my delight, there were lots of varied greenery stems.

Several days after I received the bouquet, a leaf from one of the eucalyptus stems fell onto the counter. I picked up the leaf to throw it away. However, it never made it to the garbage. Once it was in my hand, I felt the leaf, enjoying the feel of it, and, of course, simultaneously wondering if I could use a few of these lovely leaves in a creation.

In the photo, you can see how I utilized this leaf, along with three of its brothers.


Since each of the four leaves is a good size -- approximately 2 1/4" across -- I needed to use a flower that wouldn't be overwhelmed by these leaves.

I ended up using the large flower stamp from the retired set, Beautiful Day. 


I started by stamping the flower twice in Memento Tuxedo Black ink. One of them I colored in completely with Stampin' Blends in Dark Mango Melody, Light Mossy Meadow and Light and Dark Calypso Coral. 

For the second stamped flower I only colored in four petals.


After coloring all the bits, I fussy cut the whole flower as well as the four extra petals.  I carefully popped the four petals over their counterparts on the whole flower with Stampin' Dimensionals. You can see in the whole flower below that the four petals were fairly naked since they were going to be covered up with the four separate petals.


I used Green Glue to adhere the leaves to a 4 1/4" square of Mossy Meadow cardstock because this was the color that matched the leaves closest. I did consider embossing this piece, but decided against it because I felt the lovely leaves would give it the interest the creation requred.


Then, using Stampin' Dimensionals in a couple of spots, I adhered the flower on top of the leaves.


The final step was to mount it to a piece of Calypso Coral cardstock that measures 4 1/2" square.

Since the bottom eucalyptus leaf extends beyond the edge of the piece, I show it on a small easel.

I do not plan on using this as a card that will be mailed out or given to someone. I will be using it as a decor piece in my living room. Sort of a little lasting gift to myself.


So, there you have another example of upcycling. Most people would have picked up the fallen leaf and tossed it in the garbage. As per my personality, I weighed the possibilities of using it in a craft project. To be honest, the bouquet is now all gone to the garbage heap, except a handful of eucalyptus leaves. My mind is already planning.

Upcycled
Smiles.


July 19, 2022

HAPPINESS ABOUNDS

I just love the look of stamping on Designer Series Paper, then fussy cutting.

For this card, I used the large flower from the Happiness Abounds stamp set on a subtle tone on tone piece of Designer Series Paper. After the stamping, I fussy cut the flower.


I created a circular hole in the outer layer of the card 
and popped the flower inside its circle for presentation.


Just a modest amount of dimension. 
The textured background keeps the solid Flirty Flamingo layer 
from being too boring.


The scalloped circle framing the opening for the flower 
gives the card a bit of frivoloty. 
And, of course, the wonderful word from the Amazing Thanks die set!


Following is a tutorial on how to make a card similar to this one. Of course, any color combination at all would work beautifully!

SUPPLIES:
Flirty Flamingo cardstock
White cardstock

Happiness Abounds (page 109, Annual Catalog)

Black ink

Die Cutting/ Embossing Machine
Layering Circles dies (page 172, Annual Catalog)
Amazing Thanks Dies (page 169, Annual Catalog)
Painted Textures embossing folder (page 177, Annual Catalog)
Stampin' Dimensionals, both regular and small

INSTRUCTIONS:
Fold a 5 1/2" x 8 1/2" piece of white cardstock in half, creasing it well with a bone folder.

Choose a subtly designed piece of Designer Series Paper, preferably tone on tone. Stamp the largest flower from the Happiness Abounds stamp set onto this DSP in black ink. Fussy cut the flower. Set it aside for now.

Cut a coordinating piece of cardstock to 4" x 5 1/4". Emboss it with the Painted Textures Embossing Folder.

From the Layering Circles die set, select the die that measures 2 1/8" in diameter. Center this die on the embossed piece, leaving even margins at the top and sides, and die cut it.

Choose the scalloped circle just a size up from the first circle and, from white cardstock, die cut one of these. Run it through the die cutting machine once again with the first circcle die centered inside to create a scalloped frome. Adhere this scalloped frame even with the circle cut in the colored cardstock.

Center this piece onto the card base and adhere it in place with Stampin' Dimensionals.

With Dimensionals once again, secure the fussy cut flower in the center of the circle.

From white cardstock, die cut the less detailed portion of the Amazing Thanks "thanks". Die cut the detailed part of the word from the matching cardstock you chose. Attach this to the bottom of the card with Mini Stampin' Dimensionals.


Fussy
Smiles.


July 16, 2022

WILD AND SWEET

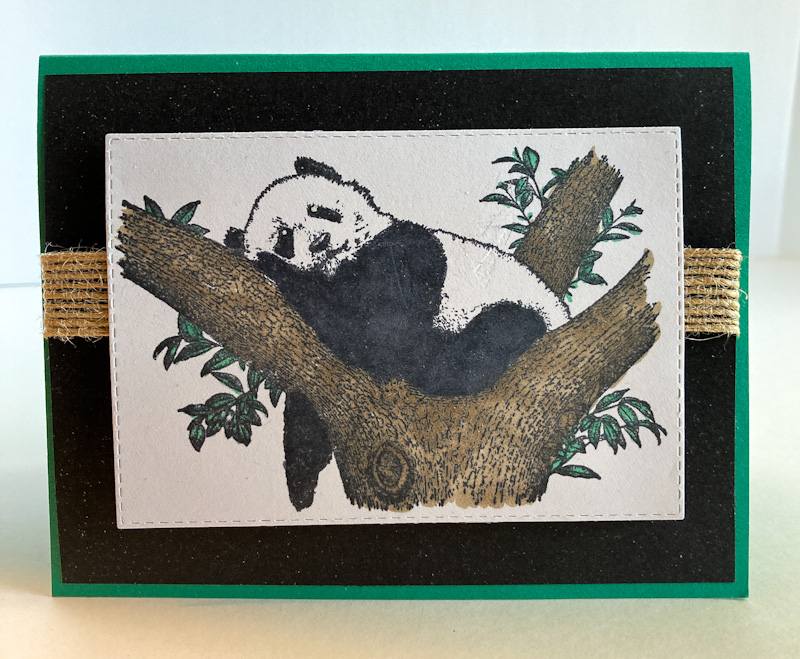
Being a lover of animals of any kind, when I spotted the Wild and Sweet set in the Annual Catalog (page 87), I was immediately smitten and couldn't wait to get my hands on these cute stamps.

As soon as it arrived on my doorstep, I brought it down to my Creation Station and went to work with all three of the images.

Do any of you have this set -- and, if you do, have you used it? What did you think of the stamped quality of the images? 

I was disappointed.


I stamped each of them with different black inks, but failed to get any satisfactory images. So I worked with what I had, using black pens and Stampin' Blends liberally to make them look a little better.

These images are actually stamped in Memento Tuxedo Black ink so I could use my Stampin' Blends on them. The colors I used were Light Gray Granite, Dark Crumb Cake, Light Basic Black, Light Smoky Slate and Light Shaded Spruce.

To pick up on the Shaded Spruce for unity on all three, I added the black layer onto a Shaded Spruce card base.

The three characters were die cut with the Stitched Rectangles dies. I added a strip of burlap trim to each one so they looked like a set.

Comment on the set?

Wild
Smiles.


July 12, 2022

FEEL GOOD WISHES

I must say that foil cardstock is tons of fun to play with. But . . . horrible to photograph. So I did my best to share with you the beauty of embossed foil cardstock.


I am talking about the cool backdrop for the Rich Razzleberry flower:


In the following photo, you can see the embossed foil cardstock a little better. It is also apparent that I used the same embossing folder on the white layer. I felt it really needed  that texture to add more interest and to echo the look of the embossing on the gold.


Here's a tutorial on how to make a card similar to this one.

SUPPLIES:
White cardstock
Rich Razzleberry cardstock
Gold Foil Cardstock

Color and Contour stamp set (page 97, Annual Catalog)

Rich Razzleberry ink

Die Cutting/Embossing Machine
Layering Circles dies (page 173, Annual Catalog)
Script Embossing Folder
Gold Gems
Stampin' Dimensionals

INSTRUCTIONS:
Fold a 5 1/2" x 8 1/2" piece of Rich Razzleberry cardstock in half, creasing it well with a bone folder.

Cut a piece of white cardstock that measures 4" x 5 1/4" and emboss it with the script embossing folder. Add this to the card base.

Cut a 3" square of gold foil cardstock. Run this through the embossing machine. Add this to a 3 1/4" square of Rich Razzleberry cardstock.

Adhere this square to the card front with even margins at the top and the sides.

On a scrap of white cardstock, stamp the flower from the Color and Contour set in Rich Razzleberry ink. Fussy cut the flower.

From Rich Razzleberry cardstock, die cut a 1 7/8" circle using the Layering Circles die. Adhere the fussy cut flower to the center of this circle.

Add a 1/4" gold gemstone to the center of the flower.

Use Stampin' Dimensionals to add this slightly raised from the center of the gold embossed piece.

In Rich Razzleberry ink, stamp a sentiment onto a 1" x 3 1/4" strip of white cardstock.

Adhere a strip of the gold foil cardstock that measures 3/8" x 3 7/8" to the back of the sentiment piece, with the two ends extending evenly at the sides.

Add this to a 1 1/4" x 3 1/2" piece of Rich Razzleberry cardstock.

Use Stampin' Dimensionals to attach the sentiment piece to the bottom of the card.


Foiled
Smiles.


July 9, 2022

BOUNTIFUL BUTTERFLY

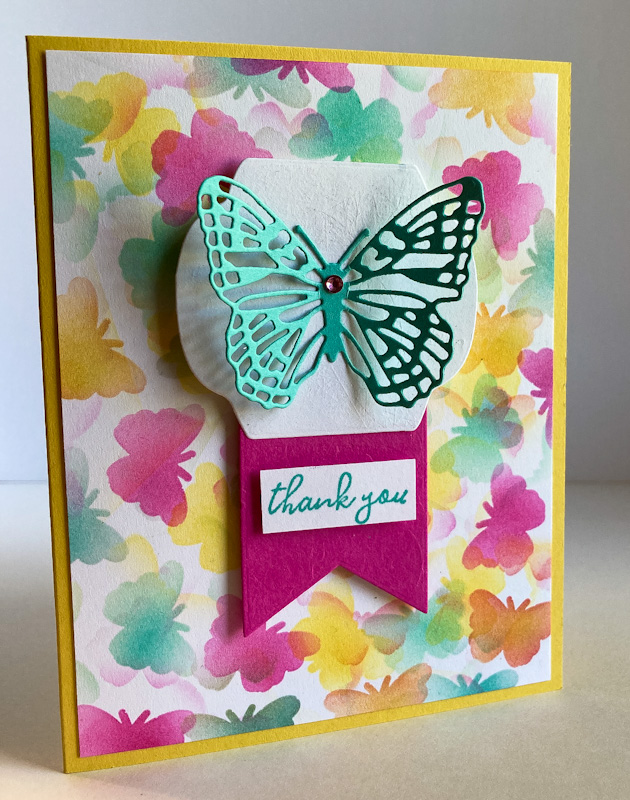
Thanks to another Paper Pumpkin kit, I got a FREE STENCIL! And that stencil enabled me to make the bright and fluttery card below.


Shown in the photo that follows is the stencil I used. As you can tell, it was the left over piece after punching out a plethora of butterflies. Yay.

I'm sure it's obvious which of the butterflies I used for my stenciling. I chose to use one of the butterflies in the top two rows as compared to those in the last four rows, as my chosen butterfly has a bit more detail. Can you see that?


To do the stenciling was actually oodles of fun and so liberating! Not being careful at all, I used a Blending Brush to add Daffodil Delight, Magenta Madness and Coastal Cabana inked butterfliesall hither and thither.

Some of the butterflies were only partial, while there is a lot of overlapping going on. I was careful to choose three colors that played well together without giving me muddy looking butterflies.


The card practically planned itself once the butterfly background was finished.


The finished card proudly sitting atop the stencil:


I  did all the stenciling on a 4" x 5 1/4" piece of white cardstock, added to a card base of Daffodil Delight.

In fact, I incorporate all the colors I used in the butterflies elsewhere on the card. The die cut butterfly, using the Brilliant Wings die set on page 169 of the Annual Catalog, is cut from Coastal Cabana cardstock. The pink banner is die cut from Magenta Madness cardstock, and then, of course, the Daffodil Delight card base.

A die from the Seasonal Labels dies (page 174, in the Annual Catalog) gives a good landing spot for the butterfly, whose wings are gently uplifted. Is he just landing -- or ready to take off?


Have you had a chance to use any free stencils lately? What fun!


Fluttery
Smiles.