November 15, 2022

SUNFLOWER THOUGHTS

If you are a follower of my blog, you probably realize that I am a real lover of sunflowers. Aren't they simply glorious?

So, when a new Stampin' Up! or Paper Pumpkin sunflower stamp comes out, I am totally on board. 


The precious sunflower I used in this card was one of the stamps that came in the August 2022 Paper Pumpkin kit, called Sweet Sunflowers.

I found some adhesive-backed cork at Dollar Tree. Thinking it looked quite fallish, I incorporated a circle of it in my card. I cut this circle of the cork with a die, so easy and quick.

Added to a fall-themed piece of retired Designer Series Paper -- isn't it a great combination? -- the look was complete.


Here you go, a tutorial on how to recreate this card. Oh, FYI, the cork comes in a sheet in a plastic wrapper and can be found in the crafting section at Dollar Tree.

SUPPLIES:
White cardstock
Daffodil Delight cardstock
A fallish-looking piece of Designer Series Paper

Sweet Sunflowers stamp (Sweet Sunflowers, August 2022 Paper Pumpkin kit)
Quiet Meadow stamp set (page 68, Annual Catalog)

Memento Tuxedo Black ink
Stampin' Blends in: Dark Daffodil Delight, Light and Dark Old Olive, Light Soft Suede and Light Pumpkin Pie

Die Cutting/Embossing Machine
A sheet of adhesive-backed cork
Layering Circles dies (page 172, Annual Catalog)
Old Olive/White Bakers Twine
Stampin' Dimensionals

INSTRUCTIONS:
Fold a 5 1/2" x 8 1/2" piece of white cardstock in half, creasing it well with a bone folder.

Choose a fallish-looking Designer Series Paper, cut it to 3 3/4" x 5", and adhere this to a piece of Daffodil Delight cardstock that measures 4" x 5 1/4". 

Around the lower portion of this piece, wrap green and white bakers twine three times, taping the ends to the back. Arrange the twine so it is not just straight across to give it a little personality.

Add this piece to the card base.

On white cardstock, stamp the sunflower from the Sweet Sunflowes Paper Pumpkin kit in Memento Tuxedo Black ink, as well as the center of the flower and two of the leaves. Color these images as you wish.

Fussy cut all the components and put them together. NOTE:The center doesn't fit snugly. Before adhering this in place, use a fine line black marker to extend a few of the flower lines to the center, then color in a little further than the stamped center of the flower.

From an adhesive-backed cork sheet, use a circle die that measures 3" in diameter to cut a circle on which your sunflower can rest. Add the sunflower. Adhere this to the DSP, with equal margins at the top and sides.

On a 1/2" x 2 1/4" piece of white cardstock, stamp a sentiment in black ink. Use Stampin' Dimensionals to add this over the bakers twine strands.


^^^^^^^^^^^^^^^^^^^^^^^^^

Confidence is contagious; so is lack of confidence.
- Vince Lombardi -


^^^^^^^^^^^^^^^^^^^^^

Sunny
Smiles.


November 12, 2022

PLANTY BIRTHDAY

Nearly 50 years ago, I used to be a real "plant lady". When we moved from one town to another about 100 miles away, we moved all 125 of my plants with us. At the time, when we were first married, we called them our kids.

That new apartment didn't have great lighting, so my kids gradually moved away from home. Over the years, I did have plants, but nothing even close to the 125 we were raising way back then.

Anyway, back to the purpose of my blog post. When I discovered this planty set, with the wonderful-looking plants and their decorative pots, I was smitten -- and sort of brought back to the olden days.


After stamping the plants in Shaded Spruce ink and the pots in Cajun Craze, I fussy cut all the components.

Rather than placing them against a solid (Soft Succulent) background, I thought it would be cool if it looked like they were against a backdrop with some interest. So I embossed the cardstock with the Stripes and Splatter 3D Embossing Folder. I like the way it looks because it is reminiscent of a textured painted wall.

I matted this piece onto Cajun Craze, then to a white card base. This took up only 3" at the top of the card, leaving a nice 1" of clean white space. Perfect for adding the sentiment in bold letters. I used the words from the Biggest Wish set on page 40.


This set, Plentiful Plants (page 63), is one of a Stampin' Up! selection they have named Dist.ink.tive. They are supposed to be ultra realistic. Maybe it's because of the severe arthritis in my hands, but I can never get my images to look realistic. I am so curious to hear what you who have used any of these sets think of them, and whether you are successful with your stamping. 

Shown in the photo below is a closeup of the stamped plants and pots:


Unless you really hate fussy cutting, this is a very easy card to make.

Please share with us how you feel about the Dist.ink.tive stamp set line. If you are successful in your stamping with these, can you divulge your secrets?


^^^^^^^^^^^^^^^^^^^^^^^^^^

Time is the coin of your life. It is the only coin you have, 
and only you can determine how it will be spent. 
Be careful lest you let other people spend it for you.
- Carl Sandburg -


^^^^^^^^^^^^^^^^^^^^^^^^^^^

Instinctive
Smiles.


November 8, 2022

SUNFLOWER WITH RIBBON

I guess it's still sunflower season, so I'm bringing you a card with a smaller size sunflower on it. As you can see, it's a very simple card, with all of the important stuff above the halfway mark.


Actually, the most time consuming part of this card, is, you guessed it, coloring in the flower. The rest of it comes together easily. Using Stampin' Blends to do this part at least makes it fun!


I added a simple piece of Designer Series Paper, a strip of ribbon around the end of this, and, along with the colored portion, created one 2 1/2" strip that fits across the entire width of the card.

An appropriate sentiment stamped in black ink to echo the outlines of the flower, centered underneath the flower portion, finishes off the card nicely and simply.

I must admit that my original intent was to have just the sentiment. However, as luck often has it, since the sentiment was the LAST thing I did, of course, I messed up. I don't know what happened, but I ended up with two little dots of black ink exactly where I didn't want it. I tried everything to remove it, but nothing worked. Thus, two golden spots of bling to cover up the mishap. I really think the card would be nicer and more effective without this, but . . .


Here's a tutorial for dimensions and all you need to make a card similar to this one. Simply change things up to coordinate with what you decide to work with.

SUPPLIES:
So Saffron cardstock
White cardstock
Coordinatiing piece of Designer Series Paper

Memento Tuxedo Black ink
Stampin' Blends in: Dark So Saffron, Dark Daffodil Delight, SU 400, SU 300, Light Old Olive

Quiet Meadow stamp set (page 68, Annual Catalog)
Celebrate Sunflowers (page 35, Annual Catalog)

Checked Ribbon
Gilded Gems 

DIRECTIONS:
Fold a 5 1/2" x 8 1/2" piece of So Saffron cardstock in half, creasing it well with a bone folder.

Select a piece of Designer Series Paper that coordinates with the So Saffron cardstock (or whichever color you choose) and cut it to 1 3/4" x 2 1/2".

Wrap a coordinating piece of ribbon measuring about 3 1/2" long around the very edge of the right side and tape the ends in place on the back of the DSP.

Set this aside for now.

Cut a piece of white cardstock to measure 2 1/2" square. In the center of this piece, stamp in Memento Tuxedo Black ink the smaller sunflower from the Celebrate Sunflowers stamp set. Color in the flower as you wish.

Add the DSP piece flush with the fold about 1" from the top of the card.

Adhere the colored piece to the card front so it touches the DSP piece. If you have a bit of excess cardstock at the open edge, trim it off. Technically it should fit perfectly.

In black ink, stamp a sentiment of your choice under the sunflower and to the right. NOTE: I did not intend to have the two gems to the right of the sentiment. However, I messed up there and used them to cover my mess-up. Feel free to not add the embellishments.


^^^^^^^^^^^^^^^^^^^^^^^^^

He that lieth down with dogs shall rise up with fleas.
- Benjamin Franklin -


^^^^^^^^^^^^^^^^^^^^^^^^^
Sunny
Smiles.


November 5, 2022

#dailycreating AUGUST/SEPTEMBER 2022

Even though at this time (August and September), I was drawing a little more than I had in the winter/early spring months, I still was not up to my old standard of one-a-day. So, once again, I am going to condense my #dailycreating drawings into two months. I am bringing you August and September 2022 today.

As part of Terry Runyan's #dailycreating group, we are strongly encouraged to create something every day and then <if we want> to post it on the group's site. Each week, Terry posts a list of daily prompts for the coming week. The prompts are just suggestions, with Terry telling us to create whatever moves us.

On October 3, a member of the group -- knowing how much I love to draw birds -- asked me if I was going to participate in #birdtober, #birdtober2022. Not knowing of its existence, I was excited to check it out, and, upon seeing the month's prompts, I jumped in with both feet. So, just warning you, for October, you will see birds, birds, birds from me. And since I'd missed the first two days of the challenge, I did Days 1 and 2 after I finished Days 3-31. I didn't miss one day of the challenge -- and enjoyed every single minute of ite.

In fact, . . . hmmm, I will let you in on my plans at the end of this post.

For now, above each of my drawings in this post, I will include the prompt, as well as any other information on my subject matter that you may find interesting.

 #thing on thing

white-crested turaco, africa


#thing on thing
black-crested coquette, mexico/south america

#thing on thing
crested owl, central and south america

#thing on thing
spinifex pigeon, australia

#red
northern cardinal

#caturday

#thing on thing
sultan tit, asia

#green
javan green magpie, indonesia island of java
critically endangered

#black and gray
peregrine falcon, all continents except antarctica

#world rhino day

#shampoo

#goose

#thing on thing
golden-crowned kinglet, north america

And, there you have it.

Now, I will fill you in on my plans. Since I enjoyed #birdtober so much, I set a grand goal for myself. I am going to draw a bird each day for a year. Yes, 365 birds! I spent a few days compiling my list of all these birds from all over the world, typing it up, and cutting them into skinny strips. I then threw all 365 bird names into a big jar. The first thing I do when I get up in the morning is randomly choose my bird of the day. I started this on November 3. After I finish writing this post, I will draw my fourth bird for this personal challenge. Gulp. I know this is quite an undertaking, but I think I'm up for it.

If you are on Instagram, where I post my drawings each day, I would love for you to follow me. I can be found under #paperseedlings. 

Please respect that these are my personal drawings and photographs (always seen at the end of each post with a quote). If you ever would like a print, I would be happy to have one (or more?) made for you. Just let me know.

^^^^^^^^^^^^^^^^^^^^^^^^^^

The future belongs to those 
who believe in the beauty of their dreams.
- Eleanor Roosevelt -


^^^^^^^^^^^^^^^^^^^^^^

Drawn
Smiles.


November 1, 2022

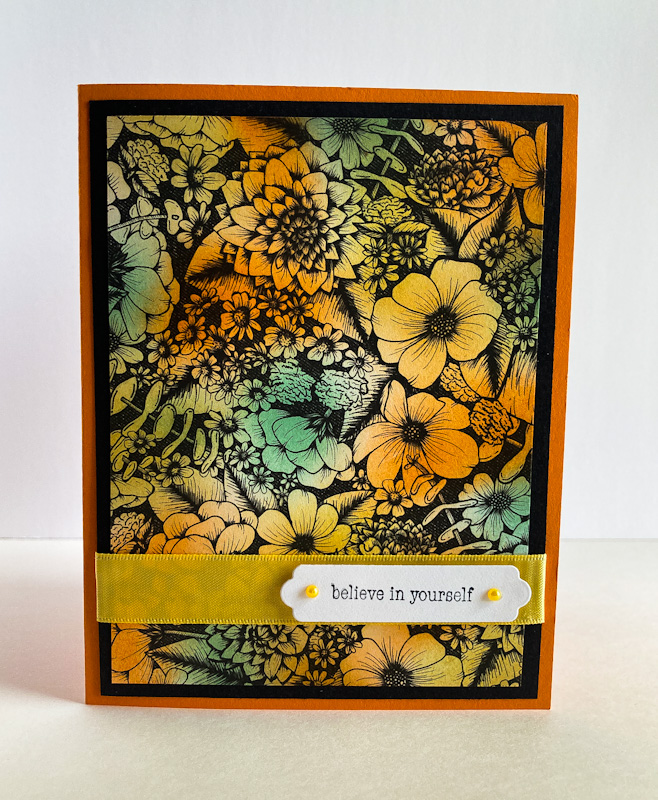
BELIEVE IN YOURSELF

Do you ever need to make a quick and easy -- but beautiful and impressive -- card? Do you have any black and white Designer Series Paper or even a detailed coloring sheet around? If so, you're in luck.


By gathering three different colored inks that play pretty well together, as well as a Blending Brush and a little elbow grease, you're almost done with your project! It's that easy.

I cut my piece of black and white Designer Series Paper to 3 3/4" x 5" and went to work with my lightest color first, which happened to be So Saffron. I used the Blender Brush to add a little color here and there, followed by Mint Macaron ink in a couple of blank spots. I finished with Pumpkin Pie in more of the empty areas. Then I went back with the colors, darkening in areas, linking up areas, etc., until I was satisfied with the effect. 

When sponging like this, always always start out very lightly. If you begin with a heavy hand, you have to accept what you get because once the color is down, you can't remove it. But, if you start softly and sparely, you can always add to it. 


After the sponging looks good to you, mount the colored piece onto a 4" x 5 1/4" piece of black cardstock, since the image was printed in black. This helps make it look more complete. At this point, I wrapped a pretty golden satin ribbon around the lower portion.

For my card base, I picked up the orange and used Pumpkin Pie cardstock. I added my colored piece to the card.


Using a die from the Seasonal Labels dies (page 174, Annual Catalog), I cut out a sentiment that I'd stamped in black. This sentiment is from a very versatile set called Through It Together, which can be found on page 69 in the Annual Catalog. 

I had a couple of golden pearls left over from a long ago Paper Pumpkin kit and added them to either side of the sentiment. I attached the tag far to the right over the ribbon with Stampin' Dimensionals.


^^^^^^^^^^^^^^^^^^^^^^^^^^^^

People become what they expect themselves to become.
- Mahatma Gandhi -


^^^^^^^^^^^^^^^^^^^^^^^^^

Sunny
Smiles.