December 3, 2022

#dailycreating OCTOBER 2022

I really hope that you like birds! Because I have a whole flock for you today!

I'm sure you know by now that I love to draw birds, usually their faces, and usually in profile.

About two  months ago, after I'd posted another of my birds onto Terry Runyan's  #dailycreating group, a fellow artist in the group asked me if I was going to be participating in #birdtober2022. Not knowing anything about it, I quickly checked it out and . . . I WAS IN! Unfortunately, it was October 3, so I'd already missed the first two prompts, but I jumped in anyway, fully planning on finishing the two birds I'd missed at the end.

And that is what I did!

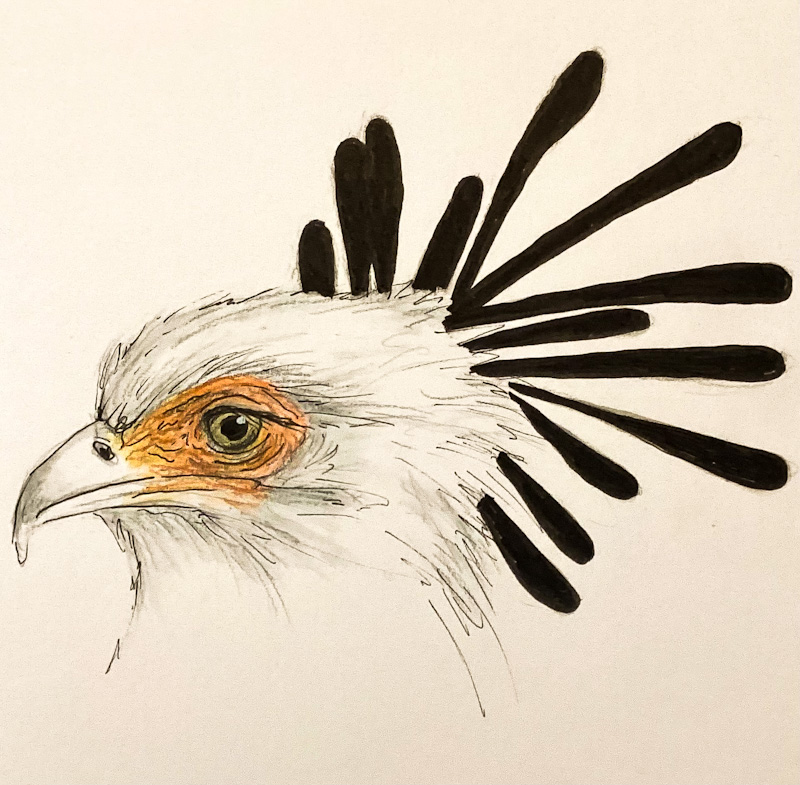
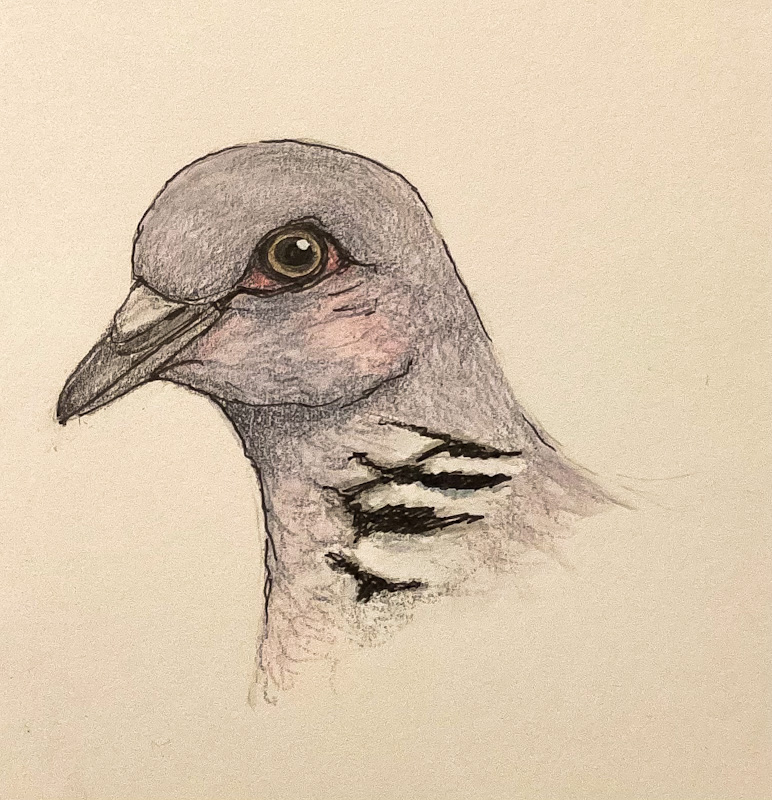
In this post I am sharing 20 of my OK birds from #birdtober2022 with you. As always, I will note above each drawing what the day's prompt was, as well as any other pertinent information I'd learned about the bird.

macaroni penguin
subantarcttic islands

hummingbird


swan

zebra finch
australia

secretary bird
africa
sun conure
northeastern south america

saffron finch
south america

black drongo
tropical southern asia

turtle dove
europe
philippine eagle
four philippine islands

masked lapwing
australia

spix's macaw
brazil
this bird came back from extinction!

snow bunting
arctic tundra

cerulean warbler
north america

kakapo
new zealand

eurasian jay
europe/asia/africa

bullfinch
europe/asia

yellow-crowned night heron
central US to north of south america

white-browed tit-warbler
asia/russia/the himalayas

barn owl
everywhere except antcartica

And, that's it for #birdtober2022. 

I have to be honest here. I truly enjoyed being enmeshed with birds every single day for a whole month. Thus, I decided to take on a humongous challenge for myself. I haven't been able to find anything like this on the Internet. Perhaps it's out there, but I am not aware of it. Anyway, I have set up a challenge for myself and I have named it #365birds. Yes, you read that correctly. I am going to draw a bird every.single.day for a YEAR!

I spent a few days compiling a list of 365 birds. Once I had my list, I typed them all up, printed out the document,, and cut them into 365 skinny pieces of paper. I put my bird name slips into a nice-looking glass jar. Every morning, I fluff them all up in the jar and select one at random. And that's the bird of the day for me. 

Since November 3, this has been my new place in life -- in love with a year-long challenge. Do you think I will be able to complete this?

Next month, I will share with you a selection from my first month of birds. How thrilling, eh?

Remember that if you would like a priint of any of my drawings, don't print it out or anything like that. This is my original art. I will gladly have a print made for you. Just let me know!

^^^^^^^^^^^^^^^^^^^^^^^^^^^^^^^

Hold fast to dreams, for if dreams die, 
life is a broken-winged bird that cannot fly.
- Langston Hughes -


^^^^^^^^^^^^^^^^^^^^^^^

Feathered 
Smiles.


November 29, 2022

LEAFY BIRTHDAY

Recently I was visiting my mom, and she had a card on display made by my sister several years ago. I picked it up to examine it because I'd noticed that she had used vellum on it. To be perfectly honest, the vellum didn't look just too healthy in that the torn edges had all curled quite unattractively. This had happened because the piece of vellum had been attached to the card front with brads, leaving too much freedom for the edges to curl. 

I liked the look of the torn vellum, took a photo of the card, and decided I was going to create a card with the same look, but with the vellum edges covered.


A closeup so you can see the torn edges, not of the vellum, but of the DSP.


After I'd attached the vellum to the two torn pieces of the DSP, 
I cut a strip of white cardstock to add to the back of the vellum. Big mistake.


How I put everything in place:


The finished look. 
At this point, I asked myself why I put the white behind the vellum? 
Stupid. Stupid. Stupid. 
Doing it this way, it was nearly impossible to tell 
that the embossed greeting was on VELLUM. 


I decided to change things up a bit and not include white cardstock, 
so the Poppy Parade cardstock showed through, 
making it obvious that the red was showing through vellum.


New and improved:


I really don't know why the photos for this blog post were of the card with the white cardstock, and not with the red showing through. One of life's little mysteries, when living inside my wonky head.


Here's a tutorial. If you make a card like this one, you can do it either way. If you want it to be obvious that you are doing a good trick with vellum,, do it  the new and improved way, and forget the extra piece of white cardstock:

SUPPLIES:
White cardstock
Poppy Parade cardstock
Celebrate Everything Designer Series Paper (page 87, Mini Catalog)
Vellum

Happiness Abounds stamp set (page 109, Annual Catalog)

VersaMark ink

Heat Tool
Black Embossing Powder
Green Gems

INSTRUCTIONS:
Fold a 5 1/2" x 8 1/2" piece of white cardstock in half, creasing it well with a bone folder.

To this, add a 4" x 5 1/4" piece of Poppy Parade cardstock.

Cut a piece of vellum to 3 3/4" x 2 1/2". About halfway up and centered, stamp "happy birthday" in VersaMark ink. With black embossing powder, heat emboss this sentiment.

Tear a 3 3/4" x 4 1/2" piece of Designer Series Paper about an inch or so from the bottom.

Adhere the top of the vellum to the back of the bottom of the largest torn piece of DSP.

Adhere the top of the DSP onto the Poppy Parade leaving even borders at the top and sides.

Add adhesive to the back of the smaller piece of DSP. Making sure everything is even on the sides and the bottom border is good, adhere this piece to the card.

Add two glittery embellishments to either side of the sentiment.


^^^^^^^^^^^^^^^^^^^^^^^^

A winner never quits, and a quitter never wins.
- Knute Rockne -


^^^^^^^^^^^^^^^^^^^^^^^^^^^

Leafy
Smiles.


November 26, 2022

WASHI TAPE ORNAMENT

I realize that Washi Tape isn't as in vogue -- at least at Stampin' Up! -- as it was in the recent past, although you can find it in stores and online everywhere. But it is still a very valid art supply and can be used in a plethora of ways.

Admittedly I don't always use it as often as I used to, but occasionally I do grab it for a project, and have lots of fun with it while I am working on the project.


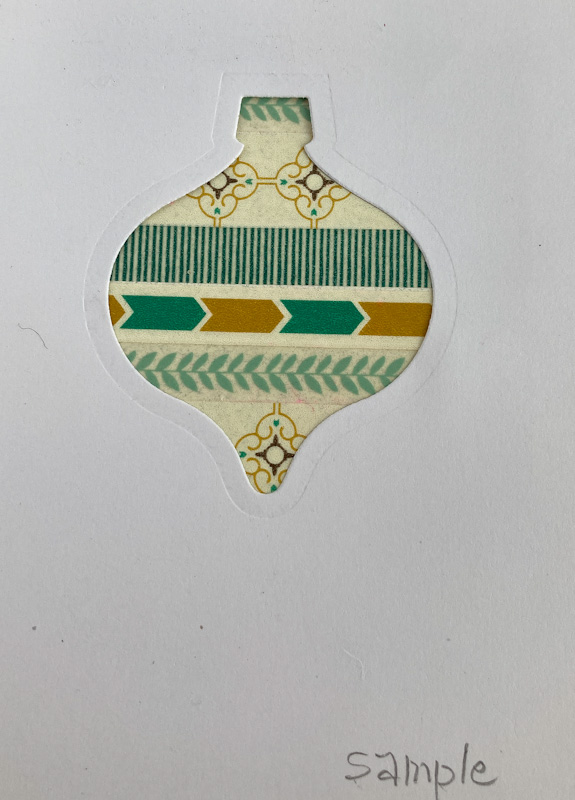
One wonderful way to use Washi Tapes is to "decorate" an ornament as I did in the photo below.


A closeup of the ornament on my card. Isn't it fun? 
And you can create an infinate array of variations!


To make a viable ornament, start out with a template. I used an ornament-shaped die on a piece of cardstock.


The next step is to build a background for your ornament by lining up strips of various Washi Tapes on a piece of scrap cardstock that is larger than the ornament template.


You can make sure you like the design by placing the template over your strips. If it's a good look, you use the same die on a 4" x 5 1/4" piece of light-colored cardstock. 

Because I thought this large piece of cardstock could use a bit more zip, I embossed it with the Subtle Embossing Folder.


Here is a tutorial on how to make a card similar to this.

SUPPLIES:
Very Vanilla cardstock
Gold Metallic cardstock

Die Cutting/Embossing Machine
A die of a larger size ornament
Seasonal word die
An embossing folder to give a little interest to the die layer of cardstock
Various Washi Tapes
Gold Cord
Stampin' Dimensionals
Glue Dots

DIRECTIONS:
Fold a 5 1/2" x 8 1/2" piece of Very Vanilla cardstock in half, creasing it well with a bone folder.

Take a piece of the same cardstock that measures 4" x 5 1/4" and run it through your die cutting machine with the ornament die about an inch from the top. After cutting out the ornament, run it through the Embossing Machine inside the Subtle Embossing Folder.

The next step will be done on a scrap piece of white cardstock that measures 2 1/2" x 3". From a selection of Washi Tapes, choose a combination that you would like to use for your ornamemmt. With the chosen tapes, starting at the top of the scrap piece, cover the entire piece with tape, butting them tightly to each other, until the entire piece of scrap is filled. Either wrap the ends of the tapes to the back or snip them off at the edges.

Place the taped piece onto the card front. Once you have the ornament where you need it to show through the ornament diecut, adhere it in place onto the card front.

Add the embossed piece to the card base with Stampin' Dimensionals.

Tie a piece of gold cord into a bow and add it to the top of the ornament with a Glue Dot. You may have to scrunch the Glue Dot a bit so it doesn't show.

From gold metallic cardstock, cut your seasonal word of choice. Using tiny drops of glue, adhere the word to the card underneath the ornament.


^^^^^^^^^^^^^^^^^^^^^^^

Shoot for the moon. 
Even if you miss it, you will land among the stars.
- Les Brown -


^^^^^^^^^^^^^^^^^^^^^^^^^^

Washi
Smiles.


November 22, 2022

MANY SNOWFLAKES

Recently I was going through some stuff. Yes, stuff. And I came across a handful of cards I'd created and never posted to my blog. I decided that they were still relevant, even if some of the product has retired. So, periodically I am going to include them in blog posts. You will probably never even know the difference, that they were from awhile ago. I hope you enjoy and benefit from them!


The technique used to make the gigantic snowflake on this 4 3/4" square card is called Reverse Masking. Using this technique, a creator is able to get results with a real wow factor.


A closeup of the snowflake and all its imperfections:


Here's a tutorial on how to make a card similar to this one, and to teach you how to do the Reverse Masking Technique. Have fun!

SUPPLIES:
White cardstock
Pacific Point cardstock
Silver Glimmer Paper

Retired snowflake stamps (I used a variety of stamps)

Pacific Point ink

Die Cutting/Embossing Machine
Snowflake dies 
Layering Circles Dies (page 172, Annual Catalog)
Stampin' Dimensionals

INSTRUCTIONS:
Fold a 9 1/2" x 4 3/4" piece of Pacific Point cardstock in half, creasing it well with a bone folder.

Make a template from a 5" x 5" piece of copy paper using a large snowflake outline die. Dispose of the snowflake itself, or save it for another project. Center the square piece that you die cut from copy paper over a 4 1/2" x 4 1/4" piece of white cardstock. Tape the edges securely. 

Starting with one of the larger, more open snowflake stamps, stamp randomly withint the snowflake shape in Pacific Point ink. Fill in some more spots with another open snowflake. Once these are distributed nicely, take a smaller snowflake stamp and finish filling in the space, leaving little bits of white showing. Be extra careful on the tips of the snowflakes. If you don't have stamping filling in those tips, the finished product will look spotty in those places.

You can pick up a few of the taped edges and peek underneath to check on your snowflake-producing progress. If you need a bit more stamping, simply press the tape back in place, and finish up.

Once you are happy with your reverse masked snowflake (made from MANY snowflakes!), adhere this to the card base.

Using the Layering Circles dies, choose one that measures about 1 3/4" across and cut a Pacific Point circle. With a die about 1 3/8" across, make a white circle. Adhere these circles together. 

Using a snowflake die, cut a snowflake from silver Glimmer Paper. Using tiny drops of glue, adhere the sparkly snowflake to the center of the adhered circles. Attach this with a Stampin' Dimensional over a part of the large snowflake.

This card could be used for any winter occasion. If you wish, use Pacific Point ink to stamp a tiny sentiment in the lower right corner of the card, or else, inside the card.


^^^^^^^^^^^^^^^^^^^^^^^^^^

Remember to be gentle with yourself and others. We are all children of chance, and none can say why some fields will blossom while others lay brown beneath the August sun. Care for those around you. Look past your differences. Their dreams are no less than yours, their choices in life no more easily made. And give. Give in any way you can, of whatever you possess. To give is to love. To withhold is to wither. Care less for your harvest than for how it is shared, and your life will have meaning. And your heart will have peace.
- Kent Nerburn, from "Letters to My Son" -


^^^^^^^^^^^^^^^^^^^^^^^^^

Wishing you and yours a safe and peaceful Thanksgiving. 

Thankful
Smiles.


November 19, 2022

STAR ORNAMENT

The Christmas bug bit me a bit early this year for some reason. I wasn't even offended by the cartoons about The witch, the turkey and Santa all in their vehicles going down the road and the first two yelling at Santa to stay in his own lane. 

I am almost finished with my Christmas shopping. All my handmade cards are ready and waiting for me to write them out. I have been listening to Christmas music for weeks now. And I have been experimenting with other Christmas cards. 

The card below is one that I've come up with, using the darling Decorated Pines dies featured in the Stampin' Up! Mini Catalog. This bundle, including the stamp set, immediately set my heart aflutter. It is just so so happy.


I used the die without the cute ornament stamp that coordinates with it. I simply used a smidgen of paper from the Celebrate Everything Designer Series Paper. Just the shape of the ornament is adorable; adding the poofy star embellishment finishes it off.

The paper in the background, with even MORE ornaments, is also from the same Celebrate Everything DSP pack. I love how colorful this card is!


A closeup of all the fun stuff going on in this card:


When I was putting the card together, wanting to have a white background for the ornament and branch, so they didn't get lost among the busy ornament DSP, I realized that a flat white cardstock was not conducive to a good look. I fixed that by embossing the large tag with the splatters from the Stripes & Splatters 3D Embossing Folder.


Here's a tutorial on how to make a card sort of like mine. Of course, you can always substitute something you already have if you don't possess all the supplies I've used.

SUPPLIES:
White cardstock
Celebrate Everything Designer Series Paper (page 87, Mini Catalog)
Shaded Spruce cardstock
Poppy Parade cardstock

Itty Bitty Christmas stamp set (retired)

Shaded Spruce ink

Die Cutting/ Embossing Machine
Decorated Pines dies (page 27, Mini Catalog)
Stitched Nested Labels (retired)
Adhesive Star (retired)
Stripes & Splatters 3D Embossing Folder (page 177, Annual Catalog)
Stampin' Dimensionals

INSTRUCTIONS:
Fold a 4 1/4" x 11" piece of white cardstock in half, creasing it well with a bone folder.

To this card base, add a 4" x 5 1/4" piece of Christmas Designer Series Paper.

Using dies from the Decoraed Pines dies, cut an evergreen branch from Shaded Spruce cardstock, one of the ornaments from the DSP, as well as a bow from the Poppy Parade cardstock.

From white cardstock, and using the retired Stitched Nested Labels dies, cut a label that measures 4 3/4" from point to point. Inside the splatter of the Stripes & Splatters 3D Embossing Folder, run the pointed label through your embossing machine.

Arrange your Christmas tableau atop this label so it pleases you. I adhered everything flat to the label.

Add a gold star embellishment to the center of the ornament.

Stamp in Shaded Spruce ink a sentiment on a 1/2" x 1 1/2" piece of white cardstock. With Stampin' Dimensionals, adhere this to the lower right portion of the label.

Add the finished label flat to the card front.


^^^^^^^^^^^^^^^^^^^^^
If you aren't happy in one place,
chances are that you won't be happy in another place.
- Ernie Banks -


^^^^^^^^^^^^^^^^^^^^^^

Seasonal
Smiles.