
Here is another example of how Designer Series Paper makes cardmaking quick and simple.
Do any of you have the Brilliant Wings dies? If you do, you know that one of the dies is a composite of all the outlines of the butterflies from the stamp set, Butterfly Brilliance, that can be found on page 106. Yes, a single die of six butterflies! What a great opportunity to use this die for something other than die cutting stamped images!
Why not use it as the main component of a card, just by adding Designer Series Paper underneath all the butterfly negative spaces?
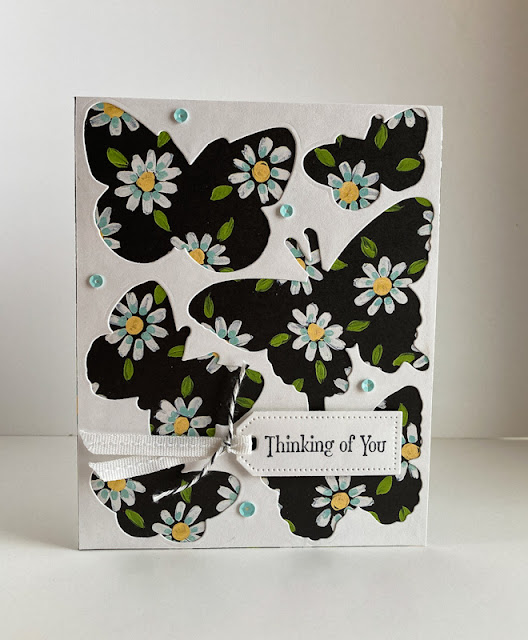
To cut this single panel of butterflies, you need to start with a (white?) piece of cardstock that measures 4 5/8" x 5 7/8. Yes, the finished card will be somewhat larger than the normal A2 sized card. So you either need to make an envelope to fit, or use one that you may have on hand that is a size up, an A7.

So you don't have to reinvent the wheel by figuring out all the dimensions like I had to, here is a tutorial on making a card such as mine. Have fun!
SUPPLIES:
White cardstock
A suitable Designer Series Paper (You can always die cut your butterfly layer and hold it over various DSPs until you find one that pleases you.)
Black ink
Quiet Meadow stamp set (page 110, Annual Catalog)
Die Cutting/Embossing Machine
Brilliant Wings Dies (page 158, Annual Catalog)
Tailor Made Tags dies (page 166, Annual Catalog)
White 1/4" ribbon
Black and White Baker's Twine (page 140, Annual Catalog)
Coordinating sequins
Stampin' Dimensionals
INSTRUCTIONS:
To decide on the Designer Series Paper I wanted to use for my sample, I first used the butterfly die from the Brilliant Wings dies to cut the "stencil" from white cardstock. I then laid it over several samples of DSP until I found a look I liked.
From a 4 5/8" x 5 7/8" piece of white cardstock, use the butterfly die to cut your top layer.
Cut your chosen Designer Series Paper to 5 7/8" x 5 1/8".
Without overusing adhesive, adhere the butterfly panel over the DSP, matching up the right, top and bottom edges, leaving a 1/2" flap to the right side.
PLEASE NOTE: I adhered my cut out butterflies flat to the DSP. Another good option would be to attach the butterfly panel with a few well-spaced Stampin' dimensionals. After I'd completed my card, I wished I'd gone that route.
Take a piece of white cardstock that measures 4 5/8" x 5 7/8". Add adhesive to the inside of the DSP flap, and slide this white cardstock in place to serve as the back of your card. You may need to trim off a sliver of white that shows at the edges of the card.
From white cardstock, use one of the Tailor Made Tags dies to cut out a tag. On this tag, stamp your sentiment in black ink.
Slip a 4" piece of 1/4" white ribbon through the hole in the tag and tie it off with a piece of black and white baker's twine. Trim the ends as needed.
Attach the tag to the lower right of the card with a couple Stampin' Dimensionals.
Add sequins in the white spaces between the butterflies.
Isn't this an easy and delightful way to make a card? And the butterflies? C'mon, Spring!
Butterfly
Smiles.
Yes...come here right now, Spring! I love this idea, and it looks great! I'm not sure I have a butterfly die, but the technique could be done using any kind of small-ish dies! Wonderful idea!
ReplyDeleteThanks! The cool thing about this particular card is that the die is in ONE piece, with all the butterflies in a natural looking flying position. I love it!
DeleteThat is such a great idea for a card front! Pinned.
ReplyDeleteThanks, Joanne! I'm so glad you like it!
DeleteI love butterflies so your post caught my eye! LOvely! Today I received a beautiful card from a friend who moved into a new home. Her crafty card was so cute. I Love handmade gifts like that. I hope you have a wonderful weekend.
ReplyDeleteOh, I'm so glad that the butterflies on my card caught my eye and could maybe make your day a little better! I hope your weekend is wonderful too!
DeleteThese butterflies are so cheerful! Anyone would be thrilled to receive such a lovely card. Thank you for participating in Talent-Sharing Tuesdays Link-Up 11.
ReplyDeleteCarol
www.scribblingboomer.com
Thanks, Carol! Thanks also for letting me link up!
DeleteIt is definitely the season to start enjoying butterflies. These are so pretty with the paper you used. #HomeMattersParty
ReplyDeleteThanks so much, Donna!
DeleteCute little daisy print! What a sweet card!
ReplyDeleteThanks for sharing this at the Sunday Sunshine Blog Hop
Laueie
Thanks so much, Laurie! The daisy print seemed perfect for use with the butterflies.
Delete