
Are you ever in a store and spot a package of napkins that just seems too beautiful to just wipe your mouth on or to sop up food? This very thing has happened to me countless times. Maybe that explains why I have several packs of pretty napkins in my stash. Remember? Everything is a potential art supply! Right?
Recently, when I spotted this really old-fashioned looking pack of flowered napkins, I simply had to have them. Luckily I was at Dollar Tree, so they didn't cost very much.
Read on to discover how you can make the most of a pretty napkin.

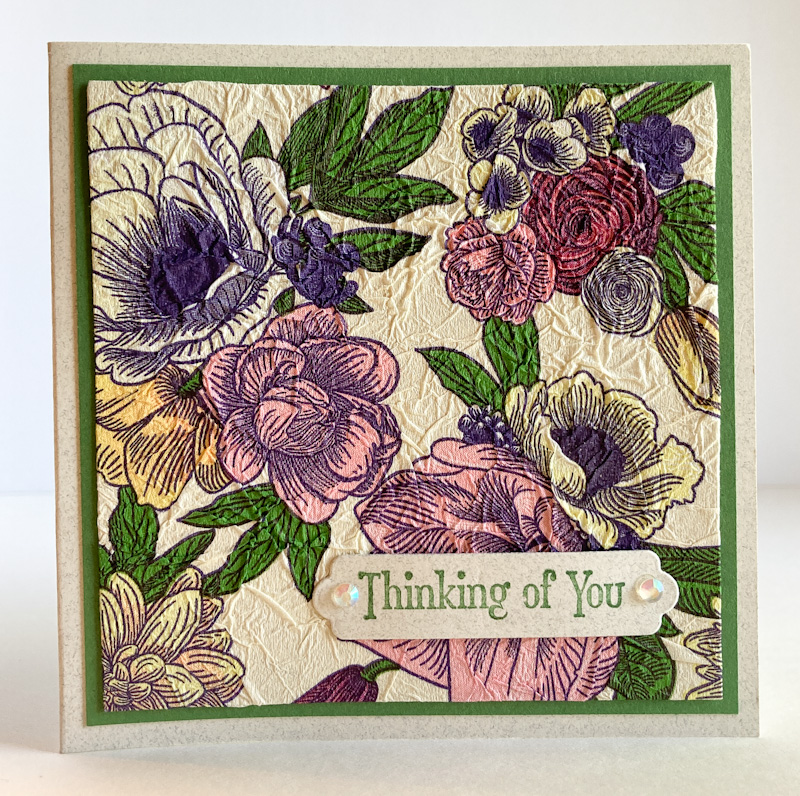
Making your napkin base is the fussiest part of this card. But, even so, it is easily accomplished. Doesn't it look elegant?

Once your napkin base is finished, of course, you will want to preserve the prettiness as much as possible. So, like I did, simply adding a small sentiment with a bit of bling is all it needs.

Here's how you do it:
SUPPLIES:
A neutral cardstock for the card base
A light-colored cardstock to which the napkin is adhered
Garden Green cardstock (to match this particular napkin)
The TOP PLY of a napkin.
Garden Green ink
Quiet Meadow stamp set (page 68, Annual Catalog)
Die Cutting/Embossing Machine
Seasonal Labels dies (page 174, Annual Catalog)
Iridescent Rhinestones (page 142, Annual Catalog)
Glue Stick
Stampin' Dimensionals
INSTRUCTIONS:
Fold a 4 1/4" x 8 1/2" piece of cardstock that matches the napkin you are using for this project in half, . creasing it well with a bone folder.
Carefully peel off only the top ply of a decorative napkin. If you have trouble getting the process started, rub one of the corners well with your bone folder. This will release the area where the layers are fused together. Move slowly when separating the layers so as not to tear the napkin.
Cut a base piece of white cardstock that measures 3 3/4" x 3 3/4". Crumple up the napkin in your hand, and flatten it out slightly, but not completely. Do this process 3-4 times, retaining attractive creases and wrinkles. This is what gives your creation character.
Use a glue stick to cover one side of the base cardstock, corner to corner and edge to edge. This is important! Gently center the back of the napkin to the glued cardstock. Without flattening the napkin, carefully press all over it so you retain the wrinkles. When you are finished pressing it in place, secure the edges to the back of this piece, mitering the corners neatly.
With the napkin I used, Garden Green coordinated well, so I adhered my napkin covered piece to a 4" squaare of this cardstock.
Add this to the card base.
On a scrap of your card base color, stamp in coordinating ink a sentiment. Die cut this with a die that works with the size of your sentiment. I used a die from the Seasonal Labels Dies.
Add it to the lower right of the card with Stampin' Dimensionals.
Add two Iridescent Rhinestones to either side of the label.
Have you ever tried this technique before? Now, that you see how to do it, will you give it a try?
Crumpled
Smiles.
The napkin makes such a gorgeous background. Love your card!
ReplyDeleteI love the napkin! Thanks for liking the card!
DeleteSuch a clever idea-thx!
ReplyDeleteYou're welcome! Thanks for saying so!
DeleteOh my gosh I bought these same napkins! I had a decoupage project in mind but your idea was marvelous. It's a beautiful card. Isn't the pattern gorgeous? Thanks for sharing at Vintage Charm. xo Kathleen
ReplyDeleteHow funny! Yes, I was immediately drawn to the design as soon as I spotted it, knowing it would be so lovely -- and so old-fashioned looking -- used as I did on a card. Did you use yours for your decoupage project? I am so glad you like the way it turned out. Thank you!
DeleteBrilliant idea Linda! I'm totally going to try this with one of my zillion stashed napkins soon. Thanks!
ReplyDeleteYay! I'm so glad that I could inspire you, Barbara! Have fun!
DeleteThe colors and floral design of the napkin provide a lovely background for the card.
ReplyDeleteThank you for participating in Talent-Sharing Tuesdays Link-Up 23.
Carol
www.scribblingboomer.com
Thank you, Carol. I fell in love with it immediately for its vintage feel.
DeleteI've had the same thought about some napkins being too pretty. So, I love your idea and it turned out so nice!
ReplyDeleteThank you, Donna! Give this a try?
DeleteWhat a beautiful card Linda! I can't go near the pretty napkin section anymore because I collect them, never use them up! Congrats - your lovely card is featured at today's Inspire Me Monday party at Create With Joy!
ReplyDeleteYeah, I'm a sucker for cool napkins too! Thanks for the Feature!
Delete