November 5, 2022

#dailycreating AUGUST/SEPTEMBER 2022

Even though at this time (August and September), I was drawing a little more than I had in the winter/early spring months, I still was not up to my old standard of one-a-day. So, once again, I am going to condense my #dailycreating drawings into two months. I am bringing you August and September 2022 today.

As part of Terry Runyan's #dailycreating group, we are strongly encouraged to create something every day and then <if we want> to post it on the group's site. Each week, Terry posts a list of daily prompts for the coming week. The prompts are just suggestions, with Terry telling us to create whatever moves us.

On October 3, a member of the group -- knowing how much I love to draw birds -- asked me if I was going to participate in #birdtober, #birdtober2022. Not knowing of its existence, I was excited to check it out, and, upon seeing the month's prompts, I jumped in with both feet. So, just warning you, for October, you will see birds, birds, birds from me. And since I'd missed the first two days of the challenge, I did Days 1 and 2 after I finished Days 3-31. I didn't miss one day of the challenge -- and enjoyed every single minute of ite.

In fact, . . . hmmm, I will let you in on my plans at the end of this post.

For now, above each of my drawings in this post, I will include the prompt, as well as any other information on my subject matter that you may find interesting.

 #thing on thing

white-crested turaco, africa


#thing on thing
black-crested coquette, mexico/south america

#thing on thing
crested owl, central and south america

#thing on thing
spinifex pigeon, australia

#red
northern cardinal

#caturday

#thing on thing
sultan tit, asia

#green
javan green magpie, indonesia island of java
critically endangered

#black and gray
peregrine falcon, all continents except antarctica

#world rhino day

#shampoo

#goose

#thing on thing
golden-crowned kinglet, north america

And, there you have it.

Now, I will fill you in on my plans. Since I enjoyed #birdtober so much, I set a grand goal for myself. I am going to draw a bird each day for a year. Yes, 365 birds! I spent a few days compiling my list of all these birds from all over the world, typing it up, and cutting them into skinny strips. I then threw all 365 bird names into a big jar. The first thing I do when I get up in the morning is randomly choose my bird of the day. I started this on November 3. After I finish writing this post, I will draw my fourth bird for this personal challenge. Gulp. I know this is quite an undertaking, but I think I'm up for it.

If you are on Instagram, where I post my drawings each day, I would love for you to follow me. I can be found under #paperseedlings. 

Please respect that these are my personal drawings and photographs (always seen at the end of each post with a quote). If you ever would like a print, I would be happy to have one (or more?) made for you. Just let me know.

^^^^^^^^^^^^^^^^^^^^^^^^^^

The future belongs to those 
who believe in the beauty of their dreams.
- Eleanor Roosevelt -


^^^^^^^^^^^^^^^^^^^^^^

Drawn
Smiles.


November 1, 2022

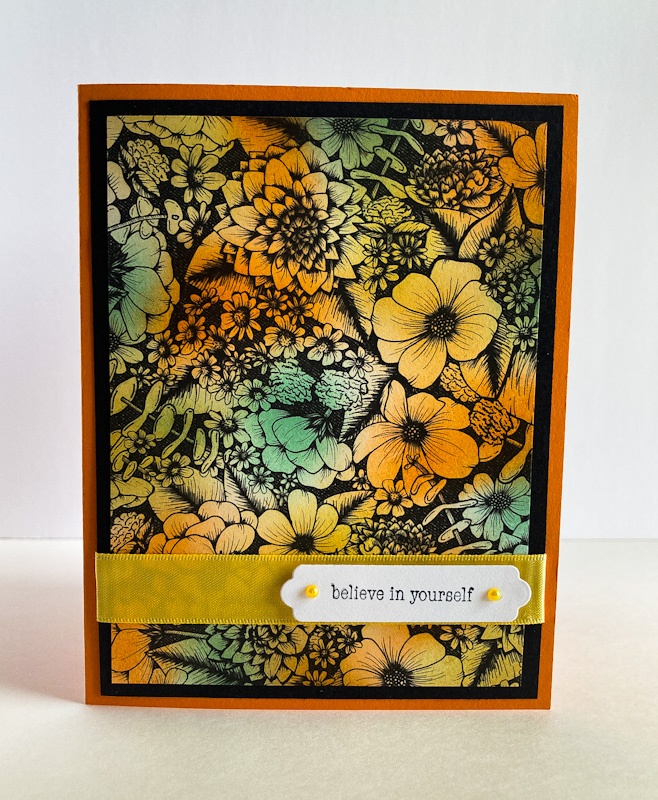
BELIEVE IN YOURSELF

Do you ever need to make a quick and easy -- but beautiful and impressive -- card? Do you have any black and white Designer Series Paper or even a detailed coloring sheet around? If so, you're in luck.


By gathering three different colored inks that play pretty well together, as well as a Blending Brush and a little elbow grease, you're almost done with your project! It's that easy.

I cut my piece of black and white Designer Series Paper to 3 3/4" x 5" and went to work with my lightest color first, which happened to be So Saffron. I used the Blender Brush to add a little color here and there, followed by Mint Macaron ink in a couple of blank spots. I finished with Pumpkin Pie in more of the empty areas. Then I went back with the colors, darkening in areas, linking up areas, etc., until I was satisfied with the effect. 

When sponging like this, always always start out very lightly. If you begin with a heavy hand, you have to accept what you get because once the color is down, you can't remove it. But, if you start softly and sparely, you can always add to it. 


After the sponging looks good to you, mount the colored piece onto a 4" x 5 1/4" piece of black cardstock, since the image was printed in black. This helps make it look more complete. At this point, I wrapped a pretty golden satin ribbon around the lower portion.

For my card base, I picked up the orange and used Pumpkin Pie cardstock. I added my colored piece to the card.


Using a die from the Seasonal Labels dies (page 174, Annual Catalog), I cut out a sentiment that I'd stamped in black. This sentiment is from a very versatile set called Through It Together, which can be found on page 69 in the Annual Catalog. 

I had a couple of golden pearls left over from a long ago Paper Pumpkin kit and added them to either side of the sentiment. I attached the tag far to the right over the ribbon with Stampin' Dimensionals.


^^^^^^^^^^^^^^^^^^^^^^^^^^^^

People become what they expect themselves to become.
- Mahatma Gandhi -


^^^^^^^^^^^^^^^^^^^^^^^^^

Sunny
Smiles.


October 29, 2022

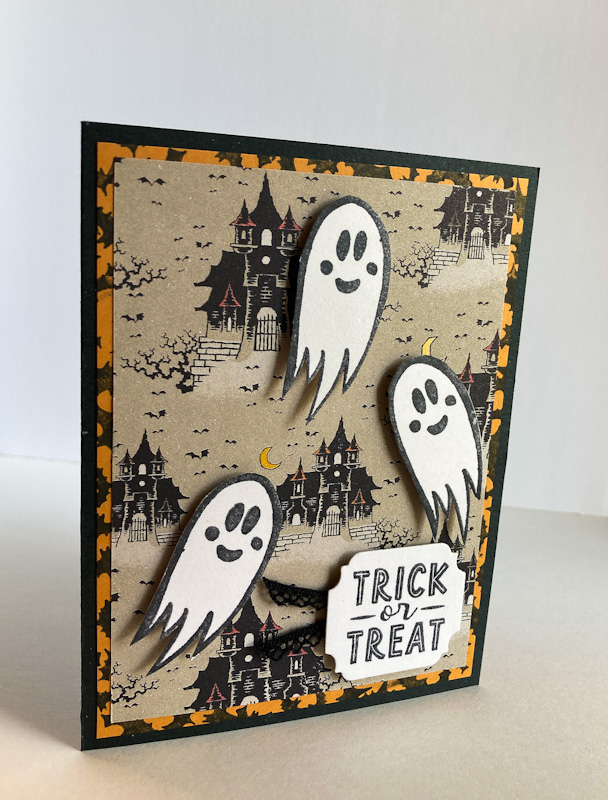
TRICK OR TREAT

Are you old enough to remember Caspar the Friendly Ghost? I'm not sure if he's been around lately or not, but I remember him vividly from my long ago childhood.

As soon as I saw the little ghost stamp in the September 2022 Paper Pumpkin kit, I immediately thought of Caspar. I know he doesn't really look like him, but he has just such a cute friendly face.


Digging through my stash of Designer Series Paper, I discovered this haunted house piece from several Halloweens ago. I thought that was perfect, that the ghosties could be flitting around from house to house.


In the stamp set, besides the cute ghost, there was another stamp that was a small group of bats. Interesting fact: Did you know that the proper name for a group of bats is a "cauldron"? How appropriate is that?!? 

Using a golden/orangish piece of cardstock on which to adhere the haunted house piece, I stamped in black ink the cauldrons of bats all around the edge. While you have to inspect it closely to discover that the black blobs around the edge are actually bats, I think it provided an interesting border.


Here you go, a tutorial to create a card like mine:

SUPPLIES:
White cardstock
Black cardstock
Gold/orange cardstock
Haunted House Designer Series Paper

Spooky Treats stamps, Paper Pumpkin, September 2022

Black ink

Die Cutting/Embossing Machine
Ornate Frames dies
Black crocheted trim
Stampin' Dimensionals
Paper Snips

INSTRUCTIONS:
Fold a 5 1/2" x 8 1/2" piece of black cardstock in half, creasing it well with a bone folder.

Cut a piece of gold/orange cardstock to 4" x 5 1/4". Using the bats stamp from the September 2022 Paper Pumpkin kit, stamp the bats haphazardly in black ink around the entire perimeter of this paper. Adhere this to the black card base.

Cut a piece of haunted house Designer Series Paper to 3 3/4" x 5" and adhere this to the bat-edged cardstock.

On scraps of white cardstock, using the ghost stamp from the same kit, stamp three ghosts in black nk. Fussy cut them. Add them to the DSP background, but leave the lower right corner ghostless.

On a scrap of white cardstock, stamp "trick or treat" from the Paper Pumpkin kit. Die cut it with a die from the Ornate Frames set.

Cut a 3-4" piece of black crocheted trim, fold it in half, and tape it to the back of the sentiment on the left side.Trim the ends to angles.

Use Stampin' Dimensionals to add this tag to the lower right corner of the card.

Cut another piece of the gold/orange paper to 4" x 5 1/4" and adhere it to the inside to make writing in the card easier than writing on the black. If you want to (I didn't) you could stamp the cauldrons of bats all around the edges of this piece too. If you did that, the bats would show up better as actual bats.


^^^^^^^^^^^^^^^^^^^^^^^^^^^^^

Since you are like no other being ever created 
since the beginning of time, 
you are incomparable.
- Brenda Ueland -


^^^^^^^^^^^^^^^^^^^^^^^^^^^^

Ghostly
Smiles.


October 25, 2022

CONFETTI

There is a cute, entertaining story behind this card. 

In early July, my family was going to gather at our house for a milestone birthday celebration for me. My oldest daughter called us early that morning to tell us that she wouldn't be able to come -- she had just tested positive for COVID. 

Some weeks later, when she'd recovered and no one else in her family had caught it, they came up to our house for a belated birthday party. They'd saved all the decorations that they'd purchased and brought it all with them to decorate our house. 

While everything they put up was delightful -- and so thoughful! -- a few of the balloons were extra special as they contained potential art supplies! 

The decorations hung around for several weeks, so we could continue to enjoy them. Gradually some of the balloons fell to the floor, much to our 5-year-old grandson's delight. He came over and promptly broke them, mostly by jumping on them. And what a mess he did make -- because all the art supplies went EVERYWHERE!


The art supplies I am referring to are the darling flowers on the background of my card. These flowers were in three "colors", pale pink and creamy tissue paper, and gold mylar. Feather weights they were, and sort of fragile. But I selected a bunch that I thought would look cute on a card. 


By adding a frilly focal point to the center of the flower garden, 
I had a cute -- upcycled -- card.


Although you probably wouldn't need it, following is a tutorial on how to create a card using larger-sized confetti. 

SUPPLIES:
White cardstock
Blushing Bride cardstock
Mossy Meadow cardstock

Mossy Meadow ink

Through It Together stamp set (page 69, Annual Catalog)

Die Cutting/Embossing Machine
Timeless Tags dies
Encircled in Beauty dies
Layering Circles dies (page 172, Annual Catalog)
Mossy Meadow Braided Linen Trim
Gold Sequins
Flower Confetti
Stampin' Dimensionals

INSTRUCTIONS:
Have a birthday and make sure someone brings you balloons with giant confetti inside. Wait until the balloons fall off onto the floor. Have a cute little boy stomp on them to release the confetti. Sweep it all together, because this really makes a mess, being sure you pick out all the little pieces of balloon. Put the confetti into a sealed bag for future use. After you create your card, you can save the leftovers for more projects; they are nonperishable.

If you unfortunately aren't treated to such balloons, you can substitute the confetti with punched 1" flowers in your choice of colors/materials. Proceed as follows.

Fold a 5 1/2" x 8 1/2" piece of white cardstock in half, creasing it well with a bone folder.

To this card base, add a 4" x 5 1/4" piece of Blushing Bride cardstock (or cardstock that matches your confetti).

Next, cut Mossy Meadow (or coordinatiing) cardstock to 3 1/2" x 4 3/4". Place a variety of flower confetti as it pleases you onto this piece, gluing them in place. Trim off flush with the edges of the cardstock any flowers that extend beyond.

Adhere this flowery background to the pink piece.

Using the dies from the Timeless Tags set, cut a solid oval from Mossy Meadow cardstock. Cut a fancy circle using a die from the Encircled In Beauty die set from Blushing Bride cardstock. Adhere these two pieces together. From white cardstock, cut a circle with the smallest of the Layering Circles Dies.

On this piece, add a sentiment that fits with the circle in Mossy Meadow ink. With Stampin' Dimensionals, add this to the center of the pink piece.

Thread a piece of Mossy Meadow Braided Linen Trim through the hole at the top of the tag.

Add this to the card front, a little raised from center, with Stampin' Dimensionals.

Finish it off with a gold sequin on the bottom of the green oval.


OK. Now, be honest. Do you ever do anything crazy like this upcycling of confetti? I love being able to discover my art supplies in unexpected places!

^^^^^^^^^^^^^^^^^^^^^^^^^^^^^^^^

To live a creative life, we must lose our fear of being wrong.
- Joseph Chilton Pearce -


^^^^^^^^^^^^^^^^^^^^^^^^^^^^^^

Flowery 
Smiles.


October 22, 2022

ORNAMENT ON A BRANCH

 Do you make your own Christmas cards? Have you started on them yet? If so, are you making good progress? 

Personally, as soon as I laid eyes on the Decorated With Happiness Bundle in the Stampin' Up! Mini Catalog, I knew that I was going to be using this on my own cards. 


The color scheme for this card is fairly traditional, basically greens and reds. Originally I wasn't going to emboss the cardstock behind all the action, but it was just too plain. It needed a little more pizzazz. So I cut a piece of Soft Succulent cardstock to 4" square and embossed that with small detailed snowflakes. 


For this 4 1/4" square card, I used both stamps and dies from the Bundle


Read on for a tutorial to create a card similar to mine.

SUPPLIES:
Evening Evergreen cardstock
White cardstock
Soft Succulent cardstock

Stampin' Blends in: Dark Poppy Parade, Light Call Me Clover, Dark Daffodil Delight
Memento Tuxedo Black ink

Decorated With Happiness Bundle (Page 74, Mini Catalog)

Die Cutting/Embossing Machine
Snowflake embossing folder
Ornate Frames (retired)
Red ribbon
Sparkly gem
Stampin' Dimensionals

INSTRUCTIONS:
Fold a 4 1/4" x 8 1/2" piece of Soft Succulent cardstock in half, creasing it well with a bone folder.

Cut another piece of Soft Succulent cardstock to 4" square and emboss it with the snowflakes embossing folder (or any other folder that gives a satisfying effect). Add this embossed panel to the card front.

Using the larger evergreen branch from the Decorated With Happiness Bundle, cut one branch from Evening Evergreen cardstock. Using small amounts of glue, adhere this branch to the embossed piece with the tip of the branch landing about halfway along the far left side.

On a scrap of whtie cardstock, stamp in Memento Tuxedo Black ink the sketchy ornament, Color it as you wish. I used Stampin' Blends in Dark Poppy Parade, Light Call Me Clover and Dark Daffodil Delight. Use the die that matches this ornament to cut it out. "Hang" it from the branch as you wish with a Stampin' Dimensional.

From a scrap of whtie cardstock, stamp in black ink the greeting from the same stamp set. Die cut it with one of the dies from the retired Ornate Frames dies.

Fold a 6" piece of red ribbon in half, and use tape to adhere it to the back of the sentiment piece. Angle trim the ends of the ribbon that hang beneath the label.

Use Stampin' Dimensionals to add this underneath the evergreen branch.

Add a sparkly red gem to the top of the greeting.


^^^^^^^^^^^^^^^^^^^^^^^^^^^^^^

Wherever you go, go with all your heart.
- Confucius -


^^^^^^^^^^^^^^^^^^^^^^^^^^^^

Heartfelt
Smiles.