October 1, 2022

#dailycreating JUNE/JULY 2022

I am finally able to report that I seem to have reluctangly climbed back onto the drawing train a bit -- at least, more than I had been of recent months. During those intervening months, I had done a lot of Neurographic Drawing, necessary as a wonderful stress reliever. Now, on October 1, it's been a few weeks since I've indulged in that sort of soul searching creativity, and have started drawing normally a little more.

As a part of Terry Runyan's #dailycreating group for more than three years now, up until about January, I'd been a faithful follower of her daily prompts. Since then, it's been a struggle to get back on the daily prompt train again. But, I am slowly but surely doing it.

Once again though, I don't have enough non-Neurographic Art to show you so I've combined June and July to come up with a respectable ten drawings to share with you in this post.

As always, I will note above each drawing what the day's prompt was (if I followed it) along with any other pertinent information I may have gleaned about the subject matter.

#world parrot day

alexandrine parrot / asia


#ladybug-urday

#frog-urday
albino green frog

off prompt
rose-crowned dove - australia/indonesia

#cow

#llama-urday

#thing on thing
osellated turkey - yucatan peninsula/mexico

#dragonfly

#thing on thing
great crested grebe - everywhere except the americas

#blue
black-naped monarch - tropical southern asia

A few explanations: Terry has designated every Wednesday's prompt as #thing on thing. I had decided a long time ago that I would do birds with something extra on their heads, be it a crown, a little something hanging off the beak, etc., for my #thing on thing prompt.

Also, she originally designated Saturdays as #caturday, then she extended it to #dogurday. But several months ago, she also included any animal-urday. 

I do have prints of many of my drawings. So, if you're interersted, just let me know.

These are my original pieces of art and are not to be copied or used in any way without my express permission. Thank you for your cooperation in this.

^^^^^^^^^^^^^^^^^^^^^^^^

May you live all the days of your life.

- Jonathan Swift - 


^^^^^^^^^^^^^^^^^^^^^^^^^^^^^

Creating
Smiles.


September 27, 2022

INPUT NEEDED

OK, all of you Paper Seedlings readers. Let's get a conversation going on this card. I have worked with vellum a million times. Alright, maybe that's a bit excessive. But, I have had a lot of experience with vellum. So I feel a bit flabbergasted about all of this.

This card was somewhat complicated to figure out and put together. But, when I finished, I was quite satisfied with the result. 


Shortly after I finished the card -- uhem, after the glue dried -- I discovered something that made me go "OH NO!" THE VELLUM HAD BUCKLED! 


It's so noticeable that I can barely stand to look at it.

I'm sure lots (most?) of you have used vellum in your papercrafting. I know it's a challenge workiing with it so the adhesive doesn't show. With vellum, that's a given. We know we need to be creative with the adhesive aspect. This card is no exception and I guess I wasn't successful.

I thought I'd done everything right on my card, but apparently that is not really the case.

Have you ever had buckling vellum occur with any of your creations? If so, how did you rerctify it? Let's get a vellum conversation going in the comments.


For what it's worth, here is a tutorial on making this card. Maybe, as you're working through it, you will have a better way of handling the vellum portion.

SUPPLIES:
White cardstock
Blackberry Bliss cardstock
Vellum
Designer Series Paper (from Sale-A-Bration)

Rich Razzleberry ink

Watercolor Shapes stamp set (page 102, Annual Catalog)

Die cutting/embossing machine
Brilliant Wings dies (page 169, Annual Catalog)
Stitched Rectangles dies (page 174, Annual Catalog)
Iridescent Purple Sequins

DIRECTIONS (flawed as they may be)
Fold a 5 1/2 x 8 1/2" piece of white cardstock in half, creasing it well with a bone folder.

Cut a piece of vellum to measure 3 3/4" x 5".

Choose a color palette for your card. My main color was Rich Razzleberry.

Find a piece of Designer Series Paper that coordinates with this chosen palette (or choose your DSP first, then coordinate your colors to that), and cut it to 4: x 5 1/4".

Grab the Stitched Rectangle die that measures 2 5/8" x 4" and cut a rectangle into the center of this DSP. Be sure all the outer edges are the same width.

Carefully adhere the vellum to the back side of this rectangle.

From the Watercolor Shapes stamp set, select the rectangle that measures 1 5/8" x 3". Ink this stamp up well with your chosen color and stamp it in the center of the vellum that shows through the diecut window in the DSP. Set this aside so it can dry completely. Ink on vellum has a tendency to smear if it's not dry enough. You can also hit it briefly with a heat tool.

Add this piece to the white card base.

I used Blackberry Bliss for the butterfly, which I die cut using the largest detailed butterfly die from the Brilliannt Wings Dies.

After checking that the ink is completely dry, add the butterfly by putting glue only on the body. This will also take a little bit of time to dry on the vellum.

Once the butterfly is firmly in place, add an Iridescent Purple sequin near the head of the butterfly.

If you are displaying this card, gently tilt the wings into an upward position, as if he is ready to take off.


I seriously hesitated about putting this card in a blog post. But then, none of us are perfect, right? And I thought maybe someone would come up with a really great idea so this doesn't happen to me or anyonne else again. Thanks in advance!

^^^^^^^^^^^^^^^^^^^^^^^^^^^^^^

I like living. I have sometimes been wildly, despairingly, 
acutely miserable, racked with sorrow, but through it all, 
I still knew quite certainly that just to be alive is a grand thing.
- Agatha Christie -


^^^^^^^^^^^^^^^^^^^^^^^^^^^^^^^^^

Vellum

Smiles.


September 24, 2022

FUSSY CUT FLOWERS

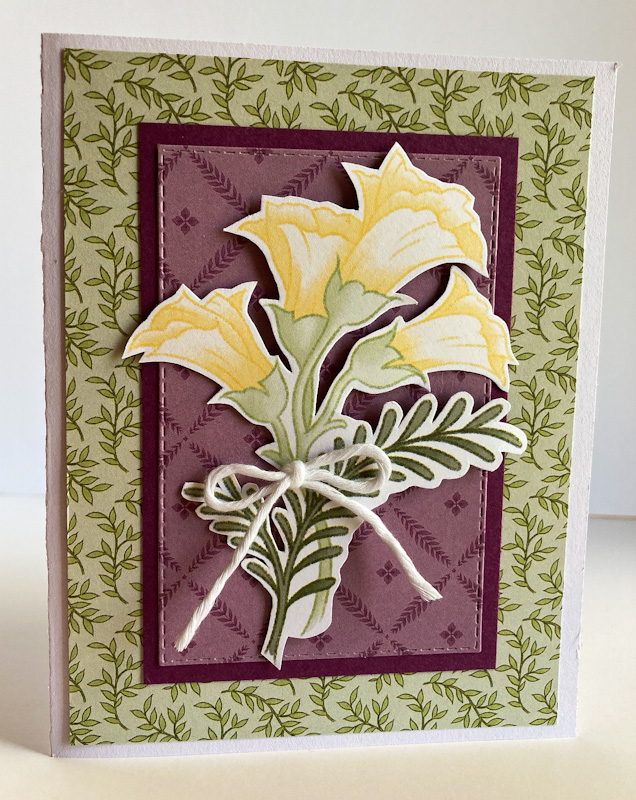
Have you ever had a sheet (or two) of Designer Series Paper where the images are so huge that you hesitate to use it for anything at all because the grand scale of the images would completely overwhelm whatever you wanted to create? Besides, when you cut the sheet into a smaller size, for example, 4" x 5 1/4", all these beautiful images are reduced to pieces of images. 

The only way I can see to get around this situation is to . . . yes! Fussy cut the beautiful oversized images.

To create this set of six cards, that's exactly what I did. One fine summer day, I sat on my deck with a sheet of this DSP, which, by the way, came from a Sale-A-Bration pack, and snipped away. Ah. Bliss. 

After I'd finished the fussy cutting, I wasn't sure how I wanted to use these lovely floral stems. But, following are the photos of what I finally came up with.


I'm actually not a crafter who combines two very different Designer Series Papers, but I happily discovered that it really worked in this case. The two papers are from the same set of DSP. 

Die cutting the putple layer gave the Rich Razzleberry it that lovely stitched line. Adding a bow made from thick white baker's twine and attached with a mini glue dot gave me an easy-to-put-together set of cards.

I purposely didn't add a sentiment to the card because they can be used for almost any occasion, and I figured that that can be addressed on the inside of the card. 

If you get your hands on a piece of Designer Series Paper with oversized images, how do you work with it? Or do you just add it to your paper stash?

^^^^^^^^^^^^^^^^^^^^^^^^^^^^^

Count your age by friends, not years.
Count your life by smiles, not tears.
- John Lennon -


^^^^^^^^^^^^^^^^^^^^^^^^^^^^^^^^^^^^

Flowered
Smiles.


September 20, 2022

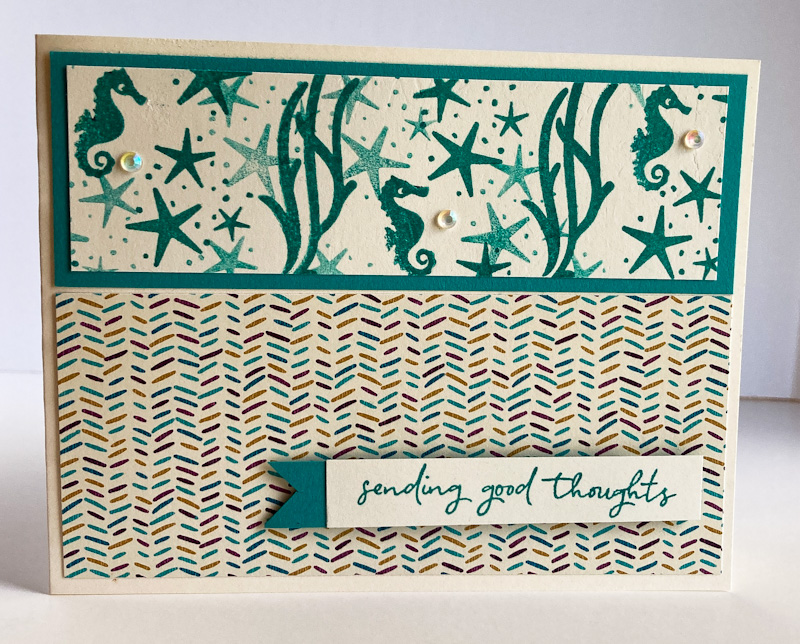
SENDING GOOD THOUGHTS

The July 2022 Paper Pumpkin, Sending Good Thoughts, had some wonderful little sea themed stamps that I found completely irresistible.

I have to admit that I still haven't put the kit together as per the instructions, but I certainly have been having a lot of fun with the seahorse (isn't she precious??), the starfish, the dots and the sea weeds.

To make my card, I stamped these tiny stamps randomly all over a Very Vanilla panel, stamping some lighter than others by stamping off first.


I searched through my Designer Series Paper stash in an attempt to locate a design that would be reminiscent of the sea. While the DSP I ultimately decided on does not meet that criteria, I still like it as a pleasing contrast to the undersea panel.

To create some faux bubbles to the scene, I added some beautiful Iridescent Rhinestone Basic Jewels.

That sentiment though. It is such a versatile and encouraging stamp! I know I will be grabbing it often. Imagine all the occasions that it will be great for!


SUPPLIES:
Bermuda Bay cardstock
Very Vanilla cardstock
Designer Series Paper

Stamps from July 2022 Paper Pumpkin kit, Sending Good Thoughts

Bermuda Bay ink

Iridescent Rhinestone Basic Jewels (page 142, Annual Catalog)
Stampin' Dimensionals

DIRECTIONS:
Fold a 4 1/2" x 11" piece of Very Vanilla cardstock in half, creasing it well with a bone folder.

Choose a color palette. I used all Bermuda Bay ink.

To this card base, add a piece of Designer Series Paper that coorddinates with the color palette that measures 2 1/4" x 5 1/4", leaving even margins at the bottom and the sides.

Take a strip of Very Vanilla cardstock that measures 1 1/2" x 5". Use underwater stamps to decorate this piece, stamping off first before stamping in a few areas.

Adhere the stamped strip to a piece of Bermuda Bay cardstock that measures 1 3/4" x 5 1/4".

Add this to the top of the card, leaving even borders at the top and sides. It should butt up well with the DSP that you've already adhered.

In Bermuda Bay ink, stamp a suitable sentiment onto a 1/2" x 3" strip of Very Vanilla cardstock.

Cut a short strip of Bermuda Bay cardstock to measure 1/2" x 1 1/2". Flag one end of the strip. Tuck it behind the sentiment strip, leaving the flagged end extending to the left.

Add this finished sentiment strip with Stampin' Dimensionals about 1/4" from the right edge of the DSP and about 1/2" from the bottom.

Add a trio of Iridescent Rhinestones Basic Jewels onto the stamped portion.


^^^^^^^^^^^^^^^^^^^^^^^^^

Doubt is a virus that attacks our self-esteem, 
productivity and confidence.
- Sean Stephensen - 


^^^^^^^^^^^^^^^^^^^^^^^^^

Underwater
Smiles.


September 17, 2022

DOUBLE CARD

Surfing the Web recently, I came across a card with a really interesting fold. I changed it up quite a lot to make it my own, but I did borrow the essence of the folds. I'd like to thank Jessica Taylor for her wonderful idea. A video of hers can be seen HERE. 

I call it a Double Card because that's what it really is: one part of the card opening normally, the other portion opening unexpectedly backwards. Confused? Read on!


I know the following photo isn't the greatest and seems to be at a weird angle. But I wanted to illustrate how the double card actually opens.


This next photo shows the card from an even different angle, lying down. If you look carefully, you can see the left flap, normally 4 1/4" wide, is only 2" wide. When that flap is closed, the flap from the second card on the right flips over onto it.


Now, standing up, you can see once again how charming this double card is.


SUPPLIES:
Flirty Flamingo cardstock
Pear Pizzazz cardstock
Wonderful World Designer Series Paper (Retired, from Sale-A-Bration)
White cardstock

Quiet Meadow stamp set (page 68, Annual Catalog)

Mossy Meadow ink

Die Cutting/ Embossing Machine
Merry Tags Framelits dies (retired)
Pear Pizzazz ribbon
Pear Pizzazz/White Baker's Twine
Bone Folder
Stampin' Dimensionals

INSTRUCTIONS:
Cut a piece of Flirty Flamingo cardstock to 5 1/2" x 6 1/4. Score the piece at 2". This 2" section will be the "front" of the card.

Cut a piece of Pear Pizzazz cardstock to 4 1/4" x 6 1/4". Score this at 3 1/8". Crease it well with a bone folder.

The green piece forms another "card", but will open backwards. Fold this "card" closed with the creased fold at the right. With the card folded, center it onto the larger section of the Flirty Flamingo piece. Adhere this in place. Now your card unfolds twice. The 2" gate will fold down first, followed by the backwards green card.

It is important to crease these scores well with a bone folder. Otherwise, the gates will flap open too much.

Now, we will decorate the top section of the green gate, the "front" of the card.

Cut a 2 7/8" x 4" piece of Designer Series Paper. Mine came from the Wonderful World DSP, available during Sale-A-Bration. Adhere this DSP to the backwards fold.

In Mossy Meadow ink, stamp a sentiment on white cardstock. I used an old tag die that had a "hanger" in the top.

Thread a 5" piece of Pear Pizzazz ribbon through the hole at the top and finish it off with a piece of baker's twine, tied in a bow. If you don't have the tag die, you can use an appropriately sized circle die to cut out your sentiment. Punch a hole in the top of the circle for the ribbon.

Use Stampin' Dimensionals to adhere this on top of the DSP layer.


^^^^^^^^^^^^^^^^^^^^^^^^^^^^^^^^^^^^^

A pessimist sees the difficulty in every opportunity; 
an optimist sees the opportunity in every difficulty.

- Winston Churchill -


^^^^^^^^^^^^^^^^^^^^^^^^^^^^^^^^

Double
Smiles.