
Well, I finally saw my first robin for the spring! To celebrate this big springtime milestone (even though there is STILL snow around!), I am sharing with you a bird/flower-themed card.
The precious bird and branch are both from a set of dies that I had overlooked several times in the Annual Catalog. When, what to my wondering eyes should finally appear, a delightful set of dies that I will be using for all sorts of occasions. I am really incredulous as to why I'd been so blind to the Iconic die set, but when I discovered it -- finally! -- I immediately ordered it.
The set features dies to cut out several lovely flowers, the bird and branch, two mushrooms (!), two leaves and a fern frond. But, the die that appealed to me most -- and that I have yet to use -- is that of a bumblebee.
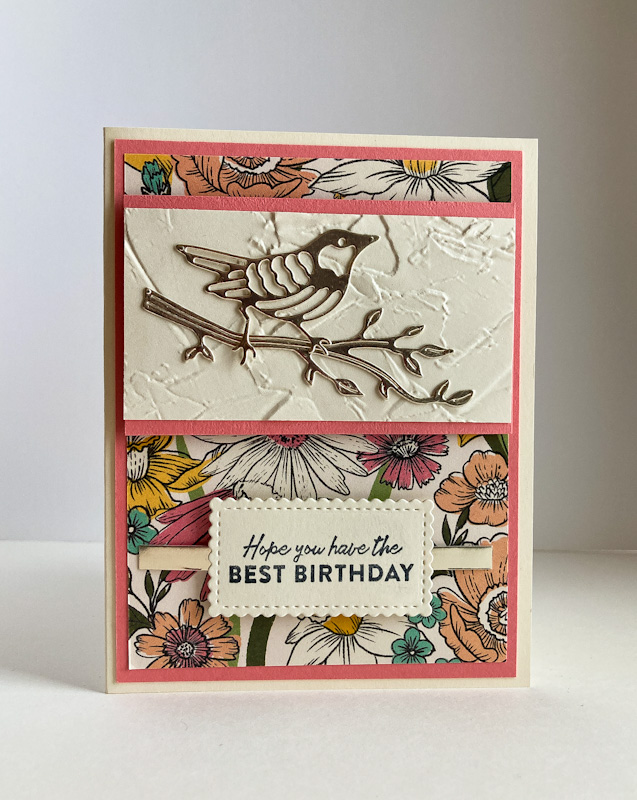
After die cutting the bird/branch from foiled cardstock, I wanted to dress up the panel onto which it would be mounted a little bit, so I deeply embossed the piece of Very Vanilla cardstock with the Painted Texture Embossing Folder. I love the contrast between the shiny bird and the feel-me texture of its background.

A closeup of the bird upon its textured background.

Read on for a tutorial on how to make this card for yourself.
SUPPLIES:
Foiled Cardstock (almost any color will look good)
Very Vanilla cardstock
Flirty Flamingo cardstock
Daffodil Afternoon Designer Series Paper (or any busy cardstock that would look well)
Black ink
Friendly Hello (Retired -- from this year's Sale-A-Bration)
Die Cutting/Embossing Machine
Stitched So Sweetly dies (page 166, Annual Catalog)
Iconic dies (page 163, Annual Catalog)
Painted Textures 3D Embossing Folder (page 155, Annual Catalog)
Stampin' Dimensionals
INSTRUCTIONS:
Fold a 5 1/2" x 8 1/2" piece of Very Vanilla cardstock in half, creasing it well with a bone folder.
To this, add a 4" x 5 1/4" piece of Flirty Flamingo cardstock, and, to this layer, add a 3 3/4" x 5" piece of the colorful Designer Series Paper from the Daffodil Afternoon DSP pack.
Run a 3 3/4" x 2" piece of Very Vanilla cardstock through your embossing machine inside the Painted Texture 3D Embossing Folder.
From a piece of Silver Foiled Cardstock, die cut the bird and the branch from the Iconic Dies set.
Using liquid glue sparingly, add these two pieces to the embossed piece, with the bird's feet resting on the branch.
Adhere the Very Vanilla piece to a 3 3/4" x 2 1/4" piece of Flirty Flamingo cardstock. Using Stampin' Dimensionals, add this to the DSP portion about 1/2" from the top of the DSP.
In black ink, stamp the sentiment on a piece of Very Vanilla cardstock. Die cut the sentiment with the scalloped edge die that measures 1 1/4" x 2 1/2" from the Stitched So Sweetly die set.
Using a sliver of the silver cardstock that measures 1/4' x 3 1/2", adhere this strip centered to the back of the sentiment piece. Add it with Stampin' Dimensionals below the bird section.

Spring-y
Smiles.
Very cute card! Looks like spring to me.
ReplyDeleteThanks, Judy! Yes, spring -- can't wait for it. We need to have all these artificial reminders . . .
DeleteVery pretty!
ReplyDeleteThank you so much, Donna!
DeleteI'm always fascinated by the texture and layering on your cards. I also like the understated colors in this one. Thank you for participating in Talent-Sharing Tuesdays Link-Up 13.
ReplyDeleteCarol
www.scribblingboomer.com
Thank you, Carol, for your sweet words!
DeleteLinda, I always enjoy bird cutouts and admire the way you build up a card from the ground up! This little guy is especially fetching!
ReplyDeleteThanks for sharing at the FWF link party :)
Hugs,
Rachelle
Aw, thank you so much, Rachelle! This was card so much fun to build!
DeleteBeautiful card Linda - I love the bird portion! :-)
ReplyDeleteThank you!!
Delete